
Customer Forum
Event Portal - Using the Check In Portal
| Posted: 2017-11-29 18:12 |
|
Below is a summary of each area of the Event Check In Portal, what it displays, how to mark someone as 'Attended' or add a new Attendee. Main MenuIf opening the Event Check In Portal from the Preview tab of the Web Process, rather than from the Check In tab on an Event, then the first page you will see is as below. You will be asked to select which Event you want to check people into.
Event Check InOnce you have selected the correct Event, or if you are opening the Check In Portal from the tab on the Event, then you will be taken to the Check In page for that Event. Here you will see the list of Members against that Event, with their details and Membership Status.
Finding a MemberThere are many tools for you to use to find the member that you want to Check In. You can use more than one of these tools at once:
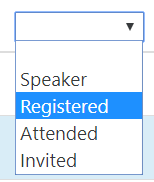
Checking in a memberClicking on the Membership Status next to the person will automatically set their Membership Status in Workbooks to 'Attended' - you will see a loading wheel while this is happening. Once done, the portal will reflect the new status and the little icon next to the status will change from a question mark to a tick.
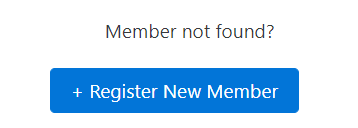
Adding a memberIf the person you are checking in is not in the list, it may be that they did not register. If you run events that attendees do not have to book in advance, then you can add them into the system on the day. Click on the 'Register New Member' button and fill out the form.
Once submitted, this will look for an existing Person in Workbooks using the email address, or create a new one if a matching person is not found. It will then add them to the Event as a member with a membership status of 'Attended'. |


- Log in to post comments