
Customer Forum
Workbooks & GatorMail for Transactional Emails - WORKED EXAMPLE
| Posted: 2019-08-16 15:27 | ||||||||||||||||||
|
This forum post follows on from our previous post which explains how you can use GatorMail to send out an email series such as renewal reminders. We'll use this as a basis for a worked example, laid out below. Let's assume Acme Inc wants to out a series of subscription renewal reminder emails 1 month before renewal, 1 week before renewal and then again if their subscription expires and the customer hasn't renewed. They'd like to include the renewal date, plus the renewal price in their emails. Step 1: Create a Workbooks Report For this example, we will build a Contract report but the Plugin supports any transaction record type, and also Activities.
Firstly, we need to build a Workbooks Report to identify the customers that should receive our email. That's customers where their Contract Start Date is TODAY + 1 Month, TODAY + 1 Week and TODAY, but only if the customer has not already renewed. Typically, a business would create the Contract for a renewal upfront, several months in advance so that a pipeline can be managed in CRM so our report will be looking at "Renewal Contracts", not existing ACTIVE Contracts. We can build this as one Report, and then use Summary Views to split up our data into the different categories. This post explains how to achieve a list of Contracts where the Start Date is 1 month from TODAY but the same can be applied for the other emails that we want to send by building additional Summary Views in our Report, and then tweaking the criteria. Create a new Contracts Report by clicking Start > New > Report > Contracts. We'll assume that we have a DLI Custom Field created on our Contract records already created called "Primary Contact" which we will use to add Person information to our report. Add in the following columns:
Add the following calculated columns:
A column called "Renewal Due" with the following formula: CASE WHEN start_date = DATE_ADD(CURDATE(), INTERVAL 1 MONTH) THEN "1 Month" WHEN start_date = DATE_ADD(CURDATE(), INTERVAL 1 WEEK) THEN "1 Week" WHEN start_date = CURDATE() THEN "Expired" ELSE "Unknown" END Carefully consider your criteria. Workbooks would recommend the following at a minimum:
Next we'll create a new Summary View, grouped by Contract Reference. Add all of the columns from your Details View into the Summary except for the Unit Price. We need to create a Summary View as we want the total value of the Contract, and only one row for each Contract. If we run our process from the Details view, we could end up sending multiple emails to the same contact for the same Contract - one for each Line Item! For Unit Price, click Add Value Column > Subtotal Column and then choose our Unit Price. This will give us the total value of our Contract. Add two report criteria as follows - we only want to only show Contracts where:
This will identify any Contracts where the Start Date is 1 month from today, and where the email has not already been sent. Step 2: Create a Custom Field As part of this example, we will configure the script to update a field on our Contract record once an email has been sent to our Primary Contact. To do this, create a new Text Field on "Contract" records and name it appropriately. If you are about to configure a series of email reminders, you may wish to configure this field as a Picklist or even a Checkbox if this is a one time email. Ensure that the column called "Email Reminder Status" created above in Step 1, outputs a value suitable for the Custom Field data type that you are creating e.g. if you decide to create a Checkbox, then your calculated column should output TRUE, rather than a text value. You will need this field as part of Step 4 in the Workbooks Plugin later. Step 3: Create a GatorMail Email (Creative) In GatorMail, before you run the Workbooks Plugin, you should create a GatorMail Email that can be used to send to each Primary Contact (each row) on the Report. In GatorMail, click Creative > Email. The Workbooks Plugin will only find your GatorMail Email Creative if the name starts with the word "TEMPLATE" (case sensitive) so ensure your creative is named appropriately otherwise you won't be able to complete the Workbooks Plugin configuration fully.
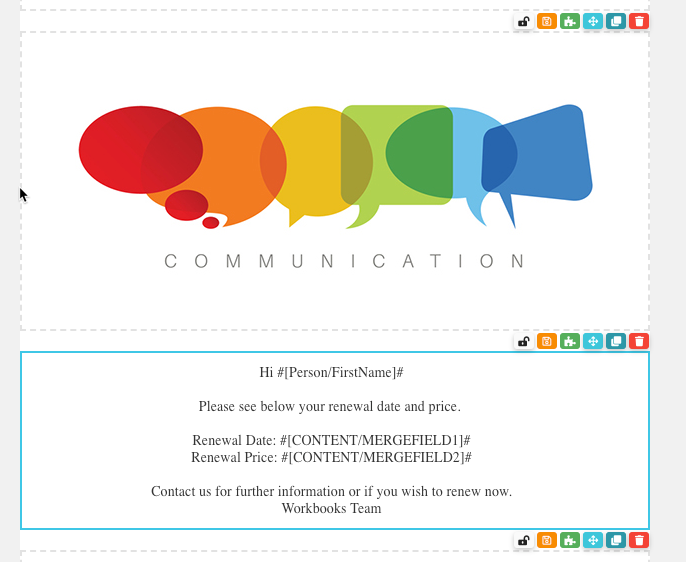
Within your Email, you can use Campaign Merge Fields to pull data from your Workbooks Report Columns into your creative. For this example, add in Merge Fields 1 and 2 to your email (if you are not sure how to achieve this, see here). These Merge Fields will be configured in Step 3 of the Plugin to pull in Renewal Date and Renewal Price from the Report configured above. You can also add in Contact Merge Fields to personalise the email by adding in First & Last Name placeholders. At this time, no other fields are synced to a Contact record in GatorMail so they cannot be used as part of this integration.
Whilst this is a basic example to explain the functionality, more complex features exist in GatorMail of which you may wish to use. Spotler's Knowledge Base has lots of useful guides on how to build out an email creative further. See here for more information. Step 4: Setup the Process to Send Email You are now ready to step through the Workbooks Plugin to configure your process. Assuming you have already installed the Plugin, the option for "Gator Transactional Emails" should be visible under "Email & Integration". For each Step in the Plugin, we will configure the following settings:
Step 4: Update your Workbooks Report The final step once you have completed the Workbooks Plugin wizard, the last step of the configuration is to update your Workbooks Report to include the GatorMail Campaign Id as a new column. Without this column, the integration cannot send an email via GatorMail. Create a new Calculated Column called "Gator Campaign Id" in your Report Summary View. You should have clicked "Copy to Clipboard" on the last page of the Workbooks Plugin. Paste the example formula into the Calculated Column - it will look something like the below: # Gator Campaign Name: Testing Transactional Emails (Gator Campaign Id: 699) CASE {FIELD_NAME} We need to make some changes to this before we can save the Report Column based on our business needs. The example provided is a CASE statement and allows you to apply logic to which GatorMail Campaign Id is used. In our example, we are planning to send several different emails, with different email content so we could update the formula to output different Campaign Ids based on the logic we define. For example, if you had multiple brands, you could use a separate GatorMail Campaign for each brand, but use the same Workbooks Report. Assume we have 2 Brands (Brand 1 & Brand 2), our Contract tracks which Brand in a field simply called "Brand" which is a Picklist, so we may amend out formula as follows to account for Brand 1 and Brand 2 like so: CASE cf_customer_contract_brand To keep things simple however, we don't need to worry about using any of this logic. Our formula simply needs to output a single Campaign Id of 699 which was returned from GatorMail when we created a Campaign. Simply remove all of the formula, and leave the 699 (the Campaign Id) in place. We'd also recommend leaving the formula comment in place (the text after the "#" so you know what Campaign this Id refers to if you need to amend it later), # Gator Campaign Name: Testing Transactional Emails (Gator Campaign Id: 699) Save the Report Column, then the Report. Step 5: Test Email & Review Schedule You should check what was created in GatorMail to ensure that everything was completed successfully. The Plugin should have created the following on your behalf in GatorMail:
After you have completed this setup, GatorMail will send the user that configured the process a test email automatically. This can happen fairly quickly, or it could take a few minutes to arrive. Once you have received this email, your process is ready to be used. NOTE: The test email received will not have the Merge Fields added, these will be blank. The Scheduled Process that is created as part of this configuration is setup with a default schedule. You may wish to visit this and enable it for every day (by default, the process is disabled on weekends) and also change the frequency to suit your needs. If you wish to configure further emails in this series, repeat all of the above steps. For the Workbooks Report, you can create a new Summary View and tweak the criteria. Any subsequent processes can update the same field created in Step 2 so you may not necessary need separate fields either.
|

- Log in to post comments