|
It is possible to send emails directly from most records in Workbooks CRM by clicking Send Email, then choosing a predefined email template or starting from a blank email. Where the record you are starting from has a standard Workbooks "Contact" field such as Cases or Activities, the email is prepopulated with the selected contact in the "To" field so you can send the email straight away. Also, if you have defined a PDF Template for the record type, you can attach them to the email. The very nature of PDFs means that the PDF will be generated before sending the email, thus pulling through data from the record. Once the email has been sent, it can then found under the "Emails" tab of the record that you sent the email from. See more information on sending emails from Workbooks CRM here.
Whilst this can be manually achieved, if you have high volumes of emails to send, this can quickly become a manually intensive process.
With the Workbooks Process Engine, we have provided a simple automation script in our Script Library, which takes a Workbooks Report and automatically sends an email for each row on the report. Once sent, the record is then updated with a flag to exclude it from the report, thus allowing you to configure a workflow of automated emails at different stages throughout a business process.
This script can be very useful in lots of different scenarios and our Workbooks Professional Services team have configured these in lots of different scenarios. Imagine automating the sending of emails in the following scenarios:
- For Media & Publishing businesses: Sending out reminder emails requesting further information (such as artwork requests)
- For Finance departments: Send out reminder emails for overdue Invoices e.g. on the date, 1 week overdue, 1 month overdue and so on
- For Support: Sending out emails when a new case is raised in Workbooks. Or send a reminder that a Case hasn't been updated for X number of days.
- ...the list goes on!
The script supports the automatic sending of emails for the following record types:
- Cases
- Opportunities
- Quotations
- Orders
- Invoices
- Contracts
- Supplier Orders
- Credit Notes
This guide gives details on how to deploy such a process to your database. We have provided template reports and email templates to help expedite the setup process. We provide two examples as follows:
- Case Reminders (for Production Cases)
- Invoice Reminders
This article provides details of the moving parts that are common to all examples, and where appropriate explains what can be changed to support different use cases outlined above.
Step 1: Create Custom Fields
| # |
Field Name |
Data Type |
Record Type |
Additional Information |
| 1 |
Reminder Last Action |
Date |
The report type you want to send an email e.g. Cases or Invoices |
This field is updated once a record is processed. Criteria will be used to exclude any records where this field is populated with today. |
| 2 |
Primary Contact |
DLI |
Transaction Record Types e.g. Invoices |
NOTE: This field is not required when configuring this process on Cases. There is a standard Workbooks field called Contact that can be used instead.
To create a DLI on People records in Workbooks, see this forum post here.
|
As an additional step you may wish to configure your Form Layouts to show these fields, or you may wish to simply build reports to expose the data. See Step 2 below for further information on Reports needed to drive this process.
Step 2: Create Workbooks Reports
A Workbooks Report is used for this process to identify the records that will be processed. Each row on the report will generate an email to the Contact specified. We have provided two reports in our Report Template Library as a starting point for configuring the following examples:
- Sending out emails for Cases initially requesting some further information or reminding a contact they haven't provided you with something to progress their case. In Media & Publishing businesses, this might be a request for artwork needed to produce a publication, or for support teams, this might be chasing up an open case that hasn't had a response in a given timeframe
- Sending out reminder emails for Invoices with an attached PDF of the Invoice record e.g. on the date, 1 week overdue and so on
You can deploy both of our Template Reports by clicking Start > New > Report > Create Report from a Template Report, then choose the Report you want to create from the list below:
- For Invoices: Choose "TEMPLATE - Reminder Emails for Invoices"
- For Cases: Choose "TEMPLATE - Reminder Emails for Cases"
- Other record types can be built on the supported record types as required
Once deployed, there are a few tweaks that you need to make to the report to reference configuration within your database. These are outlined in the sections below. For Invoice example, refer to Step 2a. For a Case example, refer to Step 2b.
Step 2a: Modifying TEMPLATE - Reminder Emails for Invoices
This report requires the following modifications which are specific to the database that you are configuring the process in:
- Add the field called "Reminder Last Action" as a column to the Details view, and any Summary views. In this example, the column should be added to the Initial Request and the 1 Week Overdue
- Add the field called "Primary Contact" as a column in the Details view and each of the Summary Views
- Review the Criteria in the DETAILS for which Invoices are shown in the report
- Consider the Invoice Type, do you need to send emails for all Invoices or just a specific type?
- Add criteria to drill through to Primary Contact > Id and Primary Contact > Email to exclude Invoices where the Primary Contact is either not set, or does not have an email address.
- Review the criteria in the "Initial Request" view:
- Add in criteria where "Reminder Last Action" IS BLANK. This will identify Invoices that have never received an email from this process. After the process has run, this field will be updated to exclude it from this view.
- Tweak the Email Template Name column to replace it with an Email Template from your database. See Step 3 below for available Templates or create your own then update the name here. You can use Report Formulas to use different email templates based on logic if required e.g. if you have different brands, configure a CASE statement to return a different Email Template Name for each brand. This is the email that will be sent when this process runs.
- Tweak the PDF Name column to suit your business needs. By default, the PDF Name is used to define the file name that is attached to the email. In the calculated column, set the "REPLACE ME" string to either something more sensible or use a Report Formula to define what the name of the file should be.
- Tweak the PDF Template Id to relevant PDF Template Id from Configuration > PDF Templates. By default, the calculated column is set to the unified.xsl Id. If your database has custom PDFs configured, you'll need to replace this Id with the custom PDF template Id instead
- Review the criteria in the "1 Week Overdue" view:
- Amend the Days Until Due column to suit your needs. The default is 7. Alternatively, copy the view and create your own date range by tweaking this number for your needs.
- As above, tweak the Email Template Name column to replace it with an Email Template from your database.
- As above, tweak the PDF Name and PDF Template Id columns to replace them with suitable values, specific to your database.
- Consider further emails that might be required. The Template provides an "Initial Request" and a "1 Week Overdue" example, do you need further emails? You can copy either Summary Views to configure your own set of automated emails as required.
Lastly, save the report with a sensible name. You will need this in Step 4 to configure the Scheduled Process.
Step 2b: Modifying TEMPLATE - Reminder Emails for Cases
This report requires the following modifications which are specific to the database that you are configuring the process in:
- Add the field called "Reminder Last Action" as a column to the Details view and any Summary views. In this example, the column should be added to the Initial Request and the Due in 1 Week
- Review the Criteria in the DETAILS for which Cases are shown in the report
- Consider the Case Type, do you need to send emails for all Cases or just a specific type?
- Review the criteria in the "Initial Request" view:
- Add in criteria where "Reminder Last Action" IS BLANK. This will identify Cases that have never received an email from this process. After the process has run, this field will be updated to exclude it from this view.
- Tweak the Email Template Name column to replace it with an Email Template from your database. See Step 3 below for available Templates or create your own then update the name here. You can use Report Formulas to use different email templates based on logic if required e.g. if you have different brands, configure a CASE statement to return a different Email Template Name for each brand. This is the email that will be sent when this process runs.
- Review the criteria in the "Due in 1 Week" view:
- Amend the Days Until Due column to suit your needs. The default is 7. Alternatively, copy the view and create your own date range by tweaking this number for your needs.
- As above, tweak the Email Template Name column to replace it with an Email Template from your database.
- Consider further emails that might be required. The Template provides an "Initial Request" and a "Due in 1 Week" example, do you need further emails? You can copy either Summary Views to configure your own set of automated emails as required.
Lastly, save the report with a sensible name. You will need this in Step 4 to configure the Scheduled Process.
Step 3: Create Email Templates
We provide basic templates for two scenarios to get you started. Of course, you can create your own if you'd rather. The Email Templates provided are as follows:
- For Case Reminders, the template is called "TEMPLATE - Case Reminder"
- For Invoices Reminders, the template is called "TEMPLATE - Invoice Reminder"
These templates can be deployed to your Workbooks database by clicking Start > Marketing > Templates > New Template. Select "A Specific Record Type", then choosing either Cases or Invoices depending on which variant of this process you are configuring.
NOTE: Don't forget that this script can be configured for other record types (see the top of this article!). Whilst Email Templates are not provided, you can simply create your own template from scratch for the relevant record type.
Within the template, you may wish to change the following:
- Email Template Name: Either leave this as the default or rename to something more appropriate. You will need to know this name later.
- From: Select an appropriate email account for this email to be sent from. An email account will need to be configured on your Workbooks database before you can select it here. See here for further details.
- To: Enter the email addresses of any recipients
- Subject: Either leave this as the default or rename to something more appropriate. The @object_ref@ placeholder will be replaced with the Case or Invoice Object Reference e.g. CASE-123 or INV-123 when an email is sent. You may wish to add further text to give context e.g "INV-123 - 1st Payment Reminder".
- Body: We have provided some basic text. You may wish to write your own or leave this as the default.
- You can include Custom Placeholders in your Email that are populated from Calculated Columns on your report, simply add a manual placeholder by typing "@PLACEHOLDER_NAME@", replacing PLACEHOLDER_NAME with a sensible name. You will need to configure the process parameters later to map this placeholder to a Report Column so remember the name!
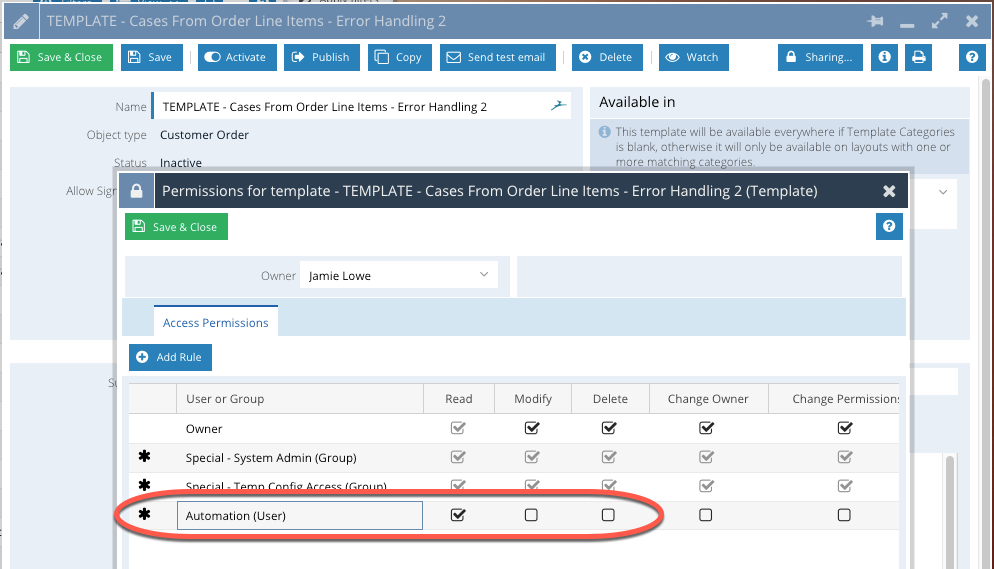
Check the Sharing Permissions of this Template to ensure that it is shared with the user that the Scheduled Process (See Step 4) will be running as. Typically we would recommend that any automated processes run as the "Automation" user. Click the sharing padlock on the Email Template and add a new row as follows to share the template:
Take note of the name that you saved the Email Template with, you will need this for Step 4 below, whilst configuring the Scheduled Process Parameters.
Step 4: Setup Scheduled Processes
From Start > Configuration > Automation > Scheduled Processes, you will need to configure a separate Scheduled Process for each Workbooks Report View i.e each email type that you wish to send. For example, if you wanted to send out an Initial Request and a 1 week reminder as provided in the template reports, ensure that you repeat the below steps for each view. This guide focuses on setting up a Scheduled Process for the initial request only but should be repeated for the 1 week reminder.
Create a new Scheduled Process and set the following options on the Process:
- Name: Cases - Send Initial Request
- Script: Script Library > Send Emails from Workbooks Report
- Run As: Automation
- Enabled: TRUE
- Log Level: Set to "Debug" and set the date to be 1 week from now. This will allow any initial setup issues to be investigated and resolved easily
Remember to revise the default Scheduled Process frequency to meet your business needs and potential volumes.
Once you have configured the above, click "Save" to reveal a Parameters tab where you will need to configure the following:
| # |
Parameter Name |
Parameter Description |
Parameter Value |
| 1 |
email_template_placeholders |
A list of email template placeholders that will be replaced with report column values when this script runs. The list must be separated in the format {PLACEHOLDER_NAME}:{REPORT_COLUMN_NAME} and with each placeholder on a new line. |
See Step 4b below. |
| 2 |
data_view_name |
The name of the report view that this script will monitor when it runs |
Set this to the name of the Report created in Step 2 above, concatenated with the Report View Name. In this example, the value should be set to "{REPORT_NAME}:{REPORT_VIEW_NAME}". For example, where the report is the name of the Report is called "Invoice Reminders" and the Report View is called "1 week overdue" set this parameter to "Invoice Reminders:1 week overdue"
NOTE: Ensure there is no space between the colon and the view name otherwise the script will not be able to find your report, resulting in a process failure!
|
| 3 |
dev_mode |
Controls whether an email is sent or just created in DRAFT state for testing purposes. Should be set to blank in Production or "true" in test databases. |
Leave this is blank if you are planning to send emails straight away. Or set to TRUE if you are configuring in a test database first. |
| 4 |
record_type |
The record type that this script should work on e.g. "Cases". |
Set this parameter according to the record type that your Report is based on. For example, if you are building out reminder emails fro Cases, set this parameter to "Cases". Possible options and supported record types are:
- Cases
- Opportunities
- Quotations
- Orders
- Invoices
- Contracts
- Supplier Orders
- Credit Notes
NOTE: Any other record type will not work with this process and will cause it to fail.
|
| 5 |
processing_batch_size |
The number of records that will be processed in one run of this script |
Set to a suitable number based on your volumes, if this parameter is not set, the script defaults to 5 Line Items at a time. We'd recommend no more than 100 in one run for optimal performance |
| 6 |
fields_to_update |
A list of field names on the Case record that will be updated with report column values when this script runs. The list must be separated in the format {CASE_FIELD_NAME}:{REPORT_COLUMN_NAME} and with each placeholder on a new line. |
See Step 4a below. |
Step 4a: Setup Field Mappings
By default, the process will update a field called "Reminder Last Action" which is a Date field. This field can be used in your Workbooks Report to calculate when the Next Action is required.
Field mappings to update the source record from a column in the Workbooks Report when a record is processed, are configurable to suit your business needs, and can be configured by setting the parameter for "fields_to_update". Before attempting to edit the Parameter, add the required column to the Report configured in Step 2.
This mapping should be in the following format as follows:
CASE_FIELD_NAME:REPORT_COLUMN_NAME
For example, let's assume we want to update a field called "1st Reminder Sent" on our Invoice record to TRUE when we have sent out an email. Add a new calculated column called 1st Reminder Sent and make sure it outputs TRUE or 1. Then in the parameter, add the following value:
cf_customer_invoice_1st_reminder_sent:1st_reminder_sent
NOTE: All mappings must be in lower case. For Report Columns, also replace spaces with underscores from the column name, otherwise, the mapping will not work.
NOTE: cf_customer_invoice_1st_reminder_sent can be obtained by looking at the API Reference for Invoice records available under Start > Configuration > Automation > API Reference, then select Invoices. From here, use CTRL/CMD + F to look for the FIELD LABEL, then copy and paste the FIELD NAME column to your parameter.
Each mapping should be separated by a newline (i.e. pressing return on your keyboard).
Step 4b: Setup Email Template Mappings
You can include Custom Placeholders in your email that are populated from Calculated Columns on your report. When you create your Email Template, add a manual placeholder by typing "@PLACEHOLDER_NAME@", replacing PLACEHOLDER_NAME with a sensible name. This parameter is configured in a similar fashion to the field mappings in Step 4a, allowing you to map Report Columns to a specified placeholder.
This mapping should be in the following format as follows:
PLACEHOLDER_NAME:REPORT_COLUMN_NAME
e.g. assume the placeholder is called "@test@" and the column name is called "Test Column". The parameter should be set to the following:
test:test_column
NOTE: All mappings must be in lower case. For Report Columns, also replace spaces with underscores from the column name, otherwise, the mapping will not work. For placeholder names, do not include the @ symbols, only the placeholder name itself.
Each mapping should be separated by a newline (i.e. pressing return on your keyboard).
|
