
Workbooks
  • Knowledge Base
  • Customer Forum
  • Training
  • Support Portal
  • Support Processes
Login
  1. Home
  2. Support
  3. Knowledge Base
  4. Knowledge base
  5. Configuration
  6. Customisation
  7. Record Types
  8. Form Layouts
  9. Card View
Support

Knowledge Base

Browse our knowledge base articles to quickly solve your issue.

  1. Home
  2. Support
  3. Knowledge Base
  4. Knowledge base
  5. Configuration
  6. Customisation
  7. Record Types
  8. Form Layouts
  9. Card View
  • Welcome to the Knowledge Base
  • Introduction
    • Using the Knowledge Base
    • Editions & Licensing
      • Renewing Licences
    • Workflow
      • Queues
    • Logging In
      • Configuring Security Policies
      • Google Authentication
      • Login Protection
      • Microsoft Azure Active Directory
        • Link Workbooks to Microsoft Azure
        • Setting up User Templates
        • Locking down your Workbooks
    • Support Processes
  • Training
    • Training Videos
    • Training Courses
  • Getting Started
    • Supported browsers
    • Introduction
    • Desktop
      • Tips & Tricks on the Desktop
      • Welcome Messages & Bulletins
    • Records
      • External Links to Workbooks records
      • Tabs
        • Default Tab Views
        • Summary Timeline View
        • Overview Tab
      • Watching Records
      • Notes
    • Landing Pages
      • Bulk Actions
        • Scheduled Bulk Actions
      • Customising Views
        • Customising Columns
        • Filtering
          • Custom Filters
        • Calendar Views
        • Card View
          • Report Card View
          • Worked Examples of Card Views
      • Deleted Items
      • Edit Grids
      • Exporting Data
      • Exporting to MS Excel
    • Workbooks on Mobiles and Tablets
  • Preferences
    • Introduction to Preferences
    • Setting your Preferences
      • Email Accounts
      • Notifications & Reminders
  • Activities
    • Introduction to Activities
    • Using Activities
      • Meetings
        • Integrating Workbooks and Google Calendar
          • Installing and Managing Workbooks and Google Calendar Integration
          • Synchronising your Google Calendar with Workbooks
      • Follow-on Activities
  • Cases
    • Introduction to Cases
    • Displaying & Adding Cases
    • Managing Cases
    • Case Portal
      • Installation
        • Custom Fields
        • Case Portal Configuration
          • Company Details
          • General
            • Case Portal Reports
          • New Case
          • Help Text
          • Emails
          • Advanced Features
          • Field Mappings
          • Help Dialog
          • Product Area Questions
        • Case Portal Additional Features
          • Setting up Public/Private Activity creation
          • Setup Registration Emails from a Person
          • Automatic Emails on Case Status Change
      • Using the Case Portal
        • Case Updates - Public & Private Activities
        • Inviting a Person to the Case Portal
  • Email
    • Introduction to Email
    • Working With Emails
    • Email Signatures
    • Sending Bulk Email
    • Common Email Errors
    • Email Integrations
    • Mailing Lists
  • Forecasts & Quotas
    • Introduction to Forecasts & Quotas
    • Sales Forecasts
      • Adjusting Forecasts
      • Included Forecasts
    • Sales Quotas
  • Importing Data
    • Introduction to Importing
    • Preparing your Import Data
      • Import Templates
      • Compulsory fields for Import
    • Workbooks Import Wizard
      • Uploading your data
      • Defining Field Mappings
      • Extending your Import to other Record types
      • Checking for Duplicates
      • Running and Reviewing your Import
    • Managing your Imports
      • Undoing an Import
  • Leads
    • Introduction to Leads
    • Displaying & Adding Leads
    • Converting Leads
  • Marketing
    • Introduction to Marketing
    • Marketing Campaigns
      • Displaying & Adding Campaigns
      • Campaign Management
      • Campaign Membership
      • Tracking URLs on Campaigns
      • Integrating DotDigital and Workbooks
        • Configuring Workbooks and Dotmailer
      • Integrating MailChimp and Workbooks
        • Configuring Workbooks and MailChimp
    • Mailing Lists
      • Creating Mailing Lists
    • Products
      • Pricing Schemes
      • Supply Scheme
      • Product Bundles
    • Mailshots
      • Creating a Mailshot
    • Upload Library
      • Using the Upload Library
    • Templates
      • Creating Templates
      • Creating a Template to show multiple lines
      • Extra Template Placeholders
    • Using HubSpot with Workbooks
    • Event Management
      • Introduction to Event Management
      • Enabling the Event Management Module
      • Using Event Records
        • Event Records
        • Event Sessions
        • Event Speakers
        • Event Sponsors
        • Event Products
        • Event Tickets
        • Event Attendees
      • The Event Management Portal
        • Introduction to the Event Management Portal
        • Prerequisites for installation
        • Accessing the Plugin
        • Installing the Event Management Portal
        • Amending Event Portal Parameters
        • Adding Custom CSS to the Event Portal
      • On The Day Registration App
      • Setup On the Day Registration App
    • Compliance Records
      • Introduction to Compliance Records
      • Enabling Compliance Records
      • Creating Compliance Records
      • Using Compliance Records
    • Spotler Integration
      • What is Spotler?
      • Navigating your Spotler homepage
      • GatorMail
        • Introduction to GatorMail
        • Managing your GatorMail Account
          • Domain Setup
        • GatorMail Configuration
          • GatorMail Field Mappings
            • GatorMail Hard Bounces
          • Preference Centres & Landing Pages
            • Preference Centre Setup
        • Creating Emails in GatorMail
          • Imbedding Images and Videos
        • Sending Emails in GatorMail
          • Sending GatorMail Campaigns
            • Campaign Action Types
            • Ramp-up
            • Testing Campaigns and Emails
          • Using SendForensics
          • Understanding your Campaign results
        • Advanced Features
          • Gator Smart Forms
          • GatorMail - Dynamic Content
      • GatorLeads / Web Insights
        • Tracking Code
          • Restricting Page Tracking
        • Setting up the Plugin
        • Viewing Web Insights Data on your Form Layouts
        • Domain Names and Online Activities
        • Reporting incorrect Leads created through Web Insights
        • Reporting on Web Insights data
        • Using UTM Values
        • Why aren’t Online Activities being created in the database?
        • Why is GatorLeads recording online activities in a foreign language?
      • GatorSurvey
      • GatorWorkflow
        • Spotler Data Sync
        • Triggered Mailshots
      • GatorPopup
  • Opportunities
    • Introduction to Opportunities
    • Displaying & Adding Opportunities
    • Opportunity Line Items
    • Opportunity Relationships
  • Integrations
    • Mapping
      • Introduction to the Mapping Module
      • Using the Mapping Module
      • Using Mapping in Reports
        • Changing the size/colour of Map Pins
    • Electronic Signing Tools
      • Docusign Integration
        • DocuSign Functionality
          • Copy Document on Signature
          • Update Related Records
          • Sending Multiple Documents
          • People, Organisations & Cases with DocuSign
          • Invoice Payments with DocuSign
          • Managing DocuSign Documents
        • Setting up the DocuSign Integration
          • Authentication with DocuSign
          • Production vs Sandbox
          • Creating a Document with a DocuSign Template
          • Creating a Document with a Workbooks PDF
          • DocuSign Fields
          • DocuSign Settings
          • Form Layout Configuration
        • DocuSign - Worked Examples
          • Taking Payments
          • Updating Related Records
          • Multiple Document Sends
          • Creating a Template for Cases
          • Creating a Template for Organisations
          • Creating a Template for People
          • Unified PDF for Transaction Documents
        • DocuSign - Reporting
          • Multiple Send Report Grid
          • Document Review Report
          • Monitoring Integration Errors
      • Adobe Sign Integration
        • Introduction to Adobe Sign
        • Authentication with Adobe Sign
        • Installing the Integration
        • Integration Monitoring & Error Handling
        • Setup of Adobe Sign
        • Adobe Sign Fields & Form Layout Configuration
        • Optional Custom Fields for Adobe Sign
        • Adobe Sign Button Process
        • Using the Adobe Sign Integration
    • Creditsafe Integration
      • Installing the Creditsafe Plugin
      • Configuring Organisations to use the Creditsafe Integration
      • An example of how to use the Creditsafe Integration
    • Zapier
      • Introduction to Zapier
      • Available Triggers and Actions
      • Linking your Workbooks Account to Zapier
      • Setting up Zaps
        • Posted Invoices to Xero Invoices
        • Xero payments to Workbooks Tasks
        • New Case to Google Drive folder
        • New Case to Basecamp Project
        • New Workbooks Case to JIRA Ticket
        • Jira Issue to new Case
        • 123FormBuilder Form Entry to Case
        • Eventbrite Attendee to Sales Lead and Task
        • Facebook Ad Leads to Sales Leads
        • Wufoo Form Entry to Sales Lead
        • Posted Credit Note to Task
        • QuickBooks Online
          • Initial Setup
            • Authentication with QuickBooks Online
          • People & Organisations to QuickBooks Customers
          • POSTED Workbooks Invoice to QuickBooks Online
          • QuickBooks Online Payment to Workbooks Invoice & Task
          • QuickBooks Sales Tax Code Lookup
        • Survey Monkey responses to Tasks
      • Multistep Zaps
    • Email Integrations
      • Email Dropbox
        • Setting up your Dropbox
        • Using your Dropbox
      • Workbooks Exchange Server Sync
        • Supported email clients
        • Set Up
          • Setting up the WESS
          • Setting up the Outlook Add-In
          • Customising the WESS Add-In
          • How to change Authentication setup for WESS
            • O365 Exchange authentication Troubleshooting
        • What gets synchronised?
          • Synchronising with the WESS
          • Synchronising with the WESS Add-in
          • How to force a sync
          • Best practice
        • WESS Troubleshooting
      • Workbooks Outlook Connector
        • Introduction to the Outlook Connector
        • Before downloading the Outlook Connector
          • System Requirements
          • Enabling the Outlook Connector
        • Download/update the Outlook Connector
        • Installing the Outlook Connector
          • Uninstalling the Outlook Connector
        • Using the Outlook Connector
          • Configuring the Outlook Connector's Settings
          • Identifying Records in Workbooks created in Outlook
        • Outlook Connector Troubleshooting
    • Event & Webinar Integration Tools
      • GoToWebinar
        • Installation
          • GoToWebinar Fields & Processes
          • Setting up Process Buttons for GoToWebinar
        • Authentication
          • Multiple GoToWebinar Accounts
          • Removing GoToWebinar Accounts
        • Create/Update & Cancel Webinars from Events
        • Event Attendees as Webinar Registrants
        • Event Speakers as Webinar Panelists
        • Retrieve Webinar Data
      • ON24
        • Installation
          • ON24 Fields & Processes
          • Setting Up Process Buttons for ON24
        • Authentication with ON24
          • Removing ON24 Accounts
        • Create Webcasts from Events
        • Event Attendees as Webcast Registrants
        • Retrieve Webcast Data
          • Reporting: Survey Responses
          • Reporting: Poll Responses
        • Retrieve Survey Data
        • Engagement Hub Interactions
    • Microsoft Office
      • Azure Active Directory
      • Excel
      • Outlook
      • Power BI
      • SharePoint
        • Authentication
        • Installation
          • Custom Fields & Processes
          • SharePoint Integration Settings
        • Using the SharePoint Integration
      • Word
        • Introduction to the Word Add-in
        • Deploying the Word Add-in
        • Creating Word Add-in Templates
          • Example Word Add-in Templates
        • Using Word Add-in Templates
        • Word Add-in Tips and Tricks
    • Outreach
      • Installation
        • Outreach Fields & Processes
        • Create Outreach Custom Field Mappings
          • Configure Outreach Field Dynamic Picklist
        • Sync Outreach Mappings
      • Outreach Authentication
        • Remove Outreach Account
      • Sync People to Outreach Prospects
        • People Field Mappings
      • Sync Organisations to Outreach Accounts
        • Organisation Field Mappings
      • Sync Workbooks Opportunities to Outreach
        • Opportunity Field Mappings
      • Sync Tasks/Activities from Workbooks to Outreach
        • Follow-Up Activities created via Scheduled Process
      • Sync Outreach Sequences to Workbooks
      • Sync Outreach Sequence States to Workbooks
      • Sync Outreach Sequence Step Numbers to Workbooks
      • Sync Prospects/Accounts/Opportunities from Outreach to Workbooks
      • Sync Outreach Tasks/Calls/Meetings to Workbooks
    • Scribe/Workbooks Connector
      • Connection Setup
        • Microsoft SQL Server Connection Requirements
      • Connector Control Blocks
      • Worked Example - Create, Read, Update & Delete
    • RingCentral
      • Installation
        • RingCentral Integration Fields and Processes
      • RingCentral Authentication
        • Remove RingCentral Account
      • Creating Phone Call Activities
      • Click to Dial
  • People & Organisations
    • Introduction to People & Organisations
    • Organisations
      • Displaying & Adding Organisations
      • Customers & Suppliers
    • People
      • Displaying & Adding People
      • Adding People to Outlook
    • Relationships
      • Change Employer Wizard
      • Direct Relationships
      • Third Party Relationships
    • De-duplication and Merge
      • Workbooks Merging
      • Workbooks DQ
      • Data Quality
    • Using Postcode Lookup
    • Data Enrichment
      • Introduction to Data Enrichment
      • Setting up Data Enrichment
  • Snippets
  • Reporting
    • Introduction to Reporting
      • Creating Reports
        • Standard Workbooks Reports
        • Creating a Pre-populated Report
        • Creating a Report from a Template
          • Report Templates
        • Creating a Blank Report
        • Auto-refreshing Report Views
      • Sharing Reports
    • Using Reports
      • Reporting Explained
        • Adding Targets, Conditional Formatting and CSS Styling
          • Calculated Targets
          • Target Sets
            • Creating a Target set for Closed Cases per Customer Support Agent
            • Creating a Target set for Closed Sales amount per Sales Person by quarter
        • Reporting with multiple currencies
        • Drilling into Summary Views
        • Improving Report Performance & Run Time
      • Displaying reports within Record Views
      • Displaying Reports
        • Reporting Views (Reports on Landing Pages)
      • Adding a Report view to a Dashboard
    • Charts
      • Creating & Using Charts
        • Bar Charts
          • Targets on Bar Charts
        • Line Charts
        • Pie Charts
        • Dial Charts
    • Exporting Reports
      • Emailing Scheduled Reports
    • Advanced Reporting
      • Types of Split Columns
      • Using Calculated Columns
        • Introduction to the IF Statement
        • Introduction to the CASE Statement
        • Applying Search filters in Calculated Columns
        • Comments in Calculated Columns
        • Financial Year Reporting
        • Introduction to Date Functions in Reports
        • Using Calculated Criteria
        • Reporting on empty fields
      • Audit Reporting
  • Dashboards
    • Adding Elements to Dashboards
      • Configuring Dashboard Elements
    • Dashboard Views
    • Dashboard Fields
    • Creating a Sales Dashboard
    • Springboard
    • Adding a Dashboard as a Record Tab
  • Okta Authentication
  • Transaction Documents
    • Introduction to Transaction Documents
      • Displaying & Adding Transaction Documents
      • Copying Transaction Documents
      • Transaction Documents Fields Help
      • Transaction Documents Line Items Help
      • Printing & Sending Transaction Documents
      • Managing Transaction Document Currencies
      • Managing Transaction Document Statuses
      • Setting a Blank Default Currency on Transaction Documents
    • Credit Notes
    • Customer Orders
    • Invoices
    • Quotations
    • Supplier Orders
    • Contract Management
      • Displaying & Adding Contracts
      • Using Contracts with Cases
    • Sagelink
  • Auditing
    • Auditing
  • Configuration
    • Introduction to System Administration
      • Quick Start Wizard
    • Users & Security
      • Users
        • Setting up your Users
        • Disabling Users
        • Profile Pictures
      • User Groups
        • Capabilities
        • Creating & Modifying User Groups
      • Permissions
        • Sharing Policies & Mandatory Permissions
          • Configuring the Advanced Security Module
            • Configuring the Advanced Security Module: Segmenting Users by function
            • Configuring the Advanced Security Module: Segmenting Users by location
      • Account Settings
      • Licences & Modules
        • Multi Language
    • Database
      • Databases
      • Storage Usage
      • Prefixes & Numbering
        • Modifying Object References
      • Export Database
      • Database Settings
    • Accounting
      • Accounting Periods
      • Exchange Rates
        • Setting Exchange Rates
      • Tax Regimes
        • Setting Tax Rates
        • Sales Tax Rulesets
          • Using Sales Tax Rulesets
      • Own Organisations
        • Setting up your Own Organisation
    • Email & Integration
      • Email Settings
        • Setting up your Email Server
        • Using Workbooks Server to send Emails
      • API Keys
      • Web to Case and Web to Lead
        • Setting up a Web2Case Form
        • Setting up a Web2Lead Form
        • Using Web Forms in Workbooks
        • Editing a Web Key Form
      • Preference Centre
      • MailChimp & dotMailer
      • Loqate
      • Bank Account Validation
    • Customisation
      • Creating & Modifying Picklists
      • Desktop Preferences
      • Theme
      • Record Types
        • Creating Custom Fields
          • Dynamic Linked Items & Picklists
          • Constrained Dynamic Linked Items (DLI) & Picklists
          • Creating relationships with Dynamic Linked Items (DLIs)
          • Linking Custom Field Values
          • Showing Linked Records in Tabs
        • Report-based Custom Fields
          • Improving the Performance of Report Cells/Grids
        • Linked Fields & Reference Fields
        • Record Templates
        • Form Layouts
          • Customising an Organisation form
          • Displaying a Tab as a Side Panel
          • Card View
          • Read-only Assigned to Fields
        • Customising relationships between parties
          • Configuring Custom Party Relationships
        • Opportunity Stages
      • Custom Records
        • Enabling Custom Records
        • Creating Custom Record Types
          • Editing Custom Record Types
        • Using Custom Records
    • Automation
      • Plugins
        • Field Updater Plugin
        • File Storage Plugin
          • Using File Storage
          • Using SharePoint File Storage
        • Cognism Enrich Plugin
          • Using Cognism Enrich
        • Email to Case Plugin and Process
      • Processes
        • Process Logging
      • Workbooks Scripts
        • Script Library
        • How Workbooks Runs Scripts
        • Workbooks Script External Access
      • API Data
      • Triggers and Webhooks
        • Configuring Triggers and Webhooks
    • PDF Configuration
      • Modifying Document Templates
        • Adding Terms & Conditions to your Documents
        • Multi-line Value Tags
      • Modifying Default Colours & Images
      • Creating Custom Document Templates
  • Contact Support
    • Contacting Workbooks Support
    • Workbooks CRM Advisory Packs
    • Introduction to the Administrator Service
  • Releases & Roadmap
    • Roadmap
    • September 2022 Release
    • June 2022 Release
    • March 2022 Release
    • October 2021 Release
    • June 2021 Release
    • March 2021 Release
    • 2020 Releases
      • December 2020 Release
      • September 2020 Release
      • April 2020 Release
      • January 2020 Release
    • 2019 Releases
      • September 2019 Release
      • February 2019 - Event Management Release
      • January 2019 Release
    • 2018 Releases
      • October 2018 Release
      • May 2018 Release
      • February 2018 Release
      • January 2018 Release
    • 2017 Releases
      • November 2017 Release
      • September 2017 Release
      • June 2017 Release
      • March 2017 Release
    • 2016 Releases
      • December 2016 Release
      • August 2016 Release
      • January 2016 Release
  • Workbooks Glossary

Card View

Card View Overview

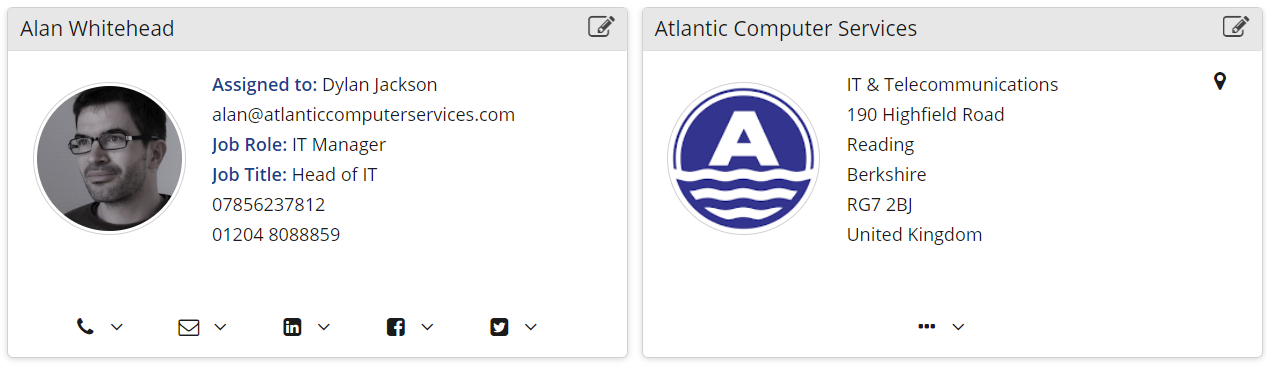
To help users focus on the important pieces of information in your system and to provide a crisp, cut-down version of the data, you can use Card View.

This shows the fields in an easy-to-use read-only summary, which can be expanded in an editable view. Card View can also include an image on the left-hand side and one or more 'action buttons' for easy access to:

  • Telephone numbers - which can be clicked to make a call (if VOIP integration has been set up).
  • Email addresses - these can be clicked to open an email record, either within Workbooks or within your standard email client.
  • Associated records - for example, you could click to open a Person's employer record.
  • Map position - opens the map for the associated location.

When displaying fields in Card View you can configure them to be prefixed with or exclude the Field Label. If the field has an action button it's also possible to hide the value from the text but still show the value in the button.

NOTE: If the field added to the Card View is empty, neither the Field Label nor the empty field will be visible in the collapsed view but they will show when the Card View is expanded.

It's also possible to configure the Card View's title to be a value from a field, for example, you can configure the card to use the Person's name as the title.

Action buttons will show at the bottom of the card, except the Map Position, which will show in the top right-hand corner. If the section that the Card View uses contains more than one Map Position, the one from the first field detected will be used.

Each Card View can contain one image of up to 10MB in size, which will display on the left-hand side in a square or circle, with or without a border. If the section that the Card View uses contains more than one image, the one from the first image field detected will be used.

Card Views can include Report Cell fields (and will retain any formatting previously applied to the cell) but other types of Report Custom Fields will not be shown in the Card View.

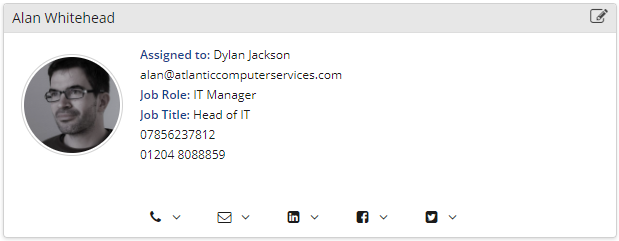
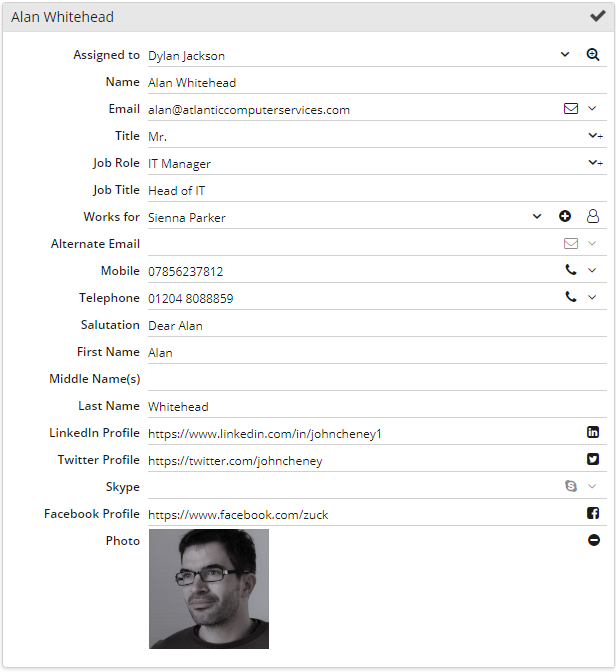
The first screenshot below shows a Person record in a collapsed Card View and the second one shows the same record when the Card View has been expanded to reveal the underlying fields in editable mode.

"Card View Collapsed"
Card View - collapsed

"Card View Expanded"
Card View - expanded

Setting up Card View

Card View is set up in the same way as any other section used in Form Layouts. You add all the fields you want to see in the expanded view and in the order you want to see them. The difference is that you specify whether the field should also appear in the cut-down Card View. There are two steps involved:

  1. Setting up your Card View Section.
  2. Adding Fields to your Card View Section.

Setting up your Card View Section

Imagine you want to set up a Card View similar to the one for a Person shown in the screenshots above. Navigate to Start > Configuration > Customisation > Record Types > People. Open the Form Layouts tab where you can select either an existing Form Layout or create a new one. Either way, with the relevant Form Layout open, open the Sections tab. You can add a new Section or modify an existing one to show as a Card View.

"Card View - Setup"

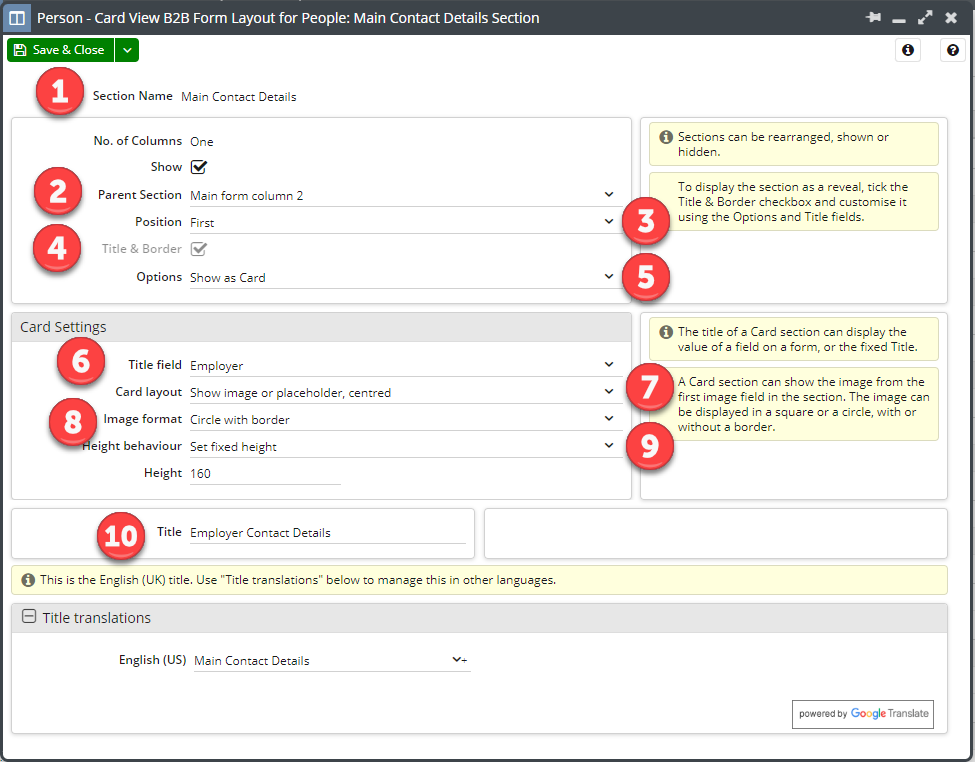
  1. Give your Section a name. This is only visible to System Administrators looking at the Form Layout but nonetheless, we'd advise giving it a self-explanatory name based on the type of fields you're going to put into the Section.
  2. Select the Parent Section within which you want your Card View to appear.
  3. Select where within the Parent Section you want your Card View to appear.
  4. To create a Card View rather than a 'normal' section, you MUST tick the 'Title and Border' checkbox.
  5. Within Options, select 'Show as Card'. Doing this will cause a new section to appear on the dialogue box, entitled 'Card Settings'.
  6. If you want the value in one of the fields from your record to act as the title of the Card View (which will make it appear at the top left of the Card View), use the dropdown picklist to select the appropriate field. Our recommendation would be (where possible) to select a mandatory field to ensure that every record displays this value (see step 10 below).
  7. The default setting here is 'Show image if present, no placeholder', which means the first image in your Section will show on the left-hand side of the Card View and the other fields will be indented slightly to the right. If you want an image to appear in your expanded Card View but not on the Card itself, select 'No image, left aligned'. If you want an image to show, and for it to use a placeholder image when no image has been uploaded, choose 'Show image or placeholder, centred'. 
  8. If your Card includes an image it can be displayed as a square or a circle, with or without a border, so choose your preferred option.
  9. By default, the Height behaviour field is set to 'Fit content', which means the height will grow to match the content. If you prefer, you set a minimum or a fixed height. Choosing a fixed height is useful if you want to configure two Cards side by side so that they line up. If there's too much data in the Card to be displayed within the fixed height a scroll bar will appear.
  10. The Title field is mandatory, even if you've already specified a value within the field labelled Title field. This is so that if the field you want to display at step 6 above is empty, the value entered here will display instead. If you haven't specified a field at step 6 then the value you enter here will always show.

You can now click Save & Close.

Adding Fields to your Card View Section

Once your Card View Section has been created and saved, navigate to the Fields tab on your Form Layout. Work through the fields you want to add to the section, making sure you select ALL the fields you want to see when the Card View is expanded, not just the ones you want to see when it's collapsed.

"Card View - fields"

Make sure you add the Field to the relevant Card View Section and specify the position in that Section where  you want to see the Field. 

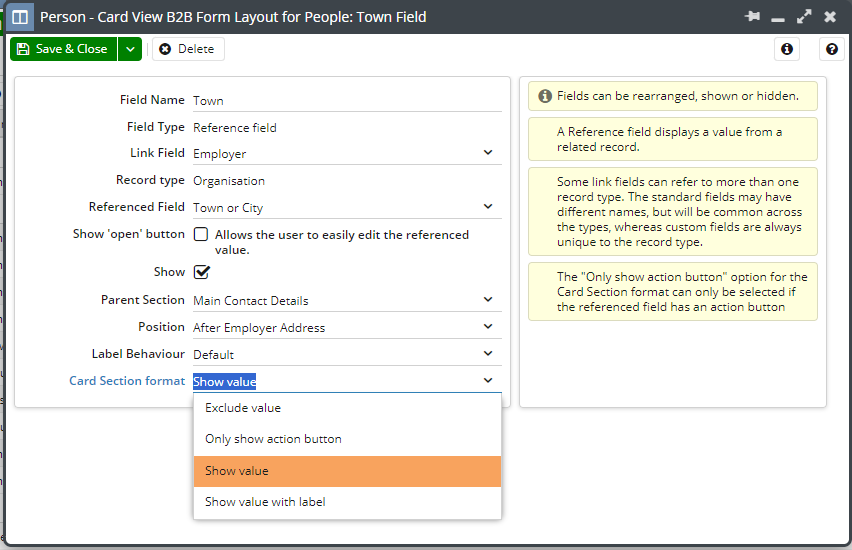
The Card Section format field controls the behaviour of the collapsed versus the expanded Card View:

  • 'Exclude value' - select this if you only want to see the Field in the expanded Card View.
  • 'Only show action button' - you will only see this option if the Field you're positioning is one of the following Fields: Telephone; Email; Social Media; Map Position; Associated Record (eg, the Employer Field on a Person record, or the Prospective Customer on an Opportunity). This will show a clickable button at the bottom of the Card except for the Map Position, which will show a button in the top right-hand corner of the Card.
  • 'Show value' - this will display the value of the relevant Field on the Card. If the Field you're positioning is one of the following Fields: Telephone; Email; Social Media; Associated Record, an action button will also display.
  • 'Show value with label' - this will display both the Field Label AND the value of the relevant Field on the Card. If the Field you're positioning is one of the following Fields: Telephone; Email; Social Media; Associated Record, an action button will also display.

* Remember, if the Field doesn't contain a value, nothing will display on the Card, not even the label.

The following video guides you through the set up of Card View.


  • Displaying a Tab as a Side Panel
  • Read-only Assigned to Fields

© 2023 Workbooks.com - privacy & terms
  • Linkedin
  • Twitter
  • Youtube
  • Facebook