
Workbooks
  • Knowledge Base
  • Customer Forum
  • Training
  • Support Portal
  • Support Processes
Login
  1. Home
  2. Support
  3. Knowledge Base
  4. Knowledge base
  5. Marketing
  6. Spotler Integration
  7. GatorMail
  8. Advanced Features
  9. Gator Smart Forms
Support

Knowledge Base

Browse our knowledge base articles to quickly solve your issue.

  1. Home
  2. Support
  3. Knowledge Base
  4. Knowledge base
  5. Marketing
  6. Spotler Integration
  7. GatorMail
  8. Advanced Features
  9. Gator Smart Forms
  • Welcome to the Knowledge Base
  • Introduction
    • Using the Knowledge Base
    • Editions & Licensing
      • Renewing Licences
    • Workflow
      • Queues
    • Logging In
      • Configuring Security Policies
      • Google Authentication
      • Login Protection
      • Microsoft Azure Active Directory
        • Link Workbooks to Microsoft Azure
        • Setting up User Templates
        • Locking down your Workbooks
    • Support Processes
  • Training
    • Training Videos
    • Training Courses
  • Getting Started
    • Supported browsers
    • Introduction
    • Desktop
      • Tips & Tricks on the Desktop
      • Welcome Messages & Bulletins
    • Records
      • External Links to Workbooks records
      • Tabs
        • Default Tab Views
        • Summary Timeline View
        • Overview Tab
      • Watching Records
      • Notes
    • Landing Pages
      • Bulk Actions
        • Scheduled Bulk Actions
      • Customising Views
        • Customising Columns
        • Filtering
          • Custom Filters
        • Calendar Views
        • Card View
          • Report Card View
          • Worked Examples of Card Views
      • Deleted Items
      • Edit Grids
      • Exporting Data
      • Exporting to MS Excel
    • Workbooks on Mobiles and Tablets
  • Preferences
    • Introduction to Preferences
    • Setting your Preferences
      • Email Accounts
      • Notifications & Reminders
  • Activities
    • Introduction to Activities
    • Using Activities
      • Meetings
        • Integrating Workbooks and Google Calendar
          • Installing and Managing Workbooks and Google Calendar Integration
          • Synchronising your Google Calendar with Workbooks
      • Follow-on Activities
  • Cases
    • Introduction to Cases
    • Displaying & Adding Cases
    • Managing Cases
    • Case Portal
      • Installation
        • Custom Fields
        • Case Portal Configuration
          • Company Details
          • General
            • Case Portal Reports
          • New Case
          • Help Text
          • Emails
          • Advanced Features
          • Field Mappings
          • Help Dialog
          • Product Area Questions
        • Case Portal Additional Features
          • Setting up Public/Private Activity creation
          • Setup Registration Emails from a Person
          • Automatic Emails on Case Status Change
      • Using the Case Portal
        • Case Updates - Public & Private Activities
        • Inviting a Person to the Case Portal
  • Email
    • Introduction to Email
    • Working With Emails
    • Email Signatures
    • Sending Bulk Email
    • Common Email Errors
    • Email Integrations
    • Mailing Lists
  • Forecasts & Quotas
    • Introduction to Forecasts & Quotas
    • Sales Forecasts
      • Adjusting Forecasts
      • Included Forecasts
    • Sales Quotas
  • Importing Data
    • Introduction to Importing
    • Preparing your Import Data
      • Import Templates
      • Compulsory fields for Import
    • Workbooks Import Wizard
      • Uploading your data
      • Defining Field Mappings
      • Extending your Import to other Record types
      • Checking for Duplicates
      • Running and Reviewing your Import
    • Managing your Imports
      • Undoing an Import
  • Leads
    • Introduction to Leads
    • Displaying & Adding Leads
    • Converting Leads
  • Marketing
    • Introduction to Marketing
    • Marketing Campaigns
      • Displaying & Adding Campaigns
      • Campaign Management
      • Campaign Membership
      • Tracking URLs on Campaigns
      • Integrating DotDigital and Workbooks
        • Configuring Workbooks and Dotmailer
      • Integrating MailChimp and Workbooks
        • Configuring Workbooks and MailChimp
    • Mailing Lists
      • Creating Mailing Lists
    • Products
      • Pricing Schemes
      • Supply Scheme
      • Product Bundles
    • Mailshots
      • Creating a Mailshot
    • Upload Library
      • Using the Upload Library
    • Templates
      • Creating Templates
      • Creating a Template to show multiple lines
      • Extra Template Placeholders
    • Using HubSpot with Workbooks
    • Event Management
      • Introduction to Event Management
      • Enabling the Event Management Module
      • Using Event Records
        • Event Records
        • Event Sessions
        • Event Speakers
        • Event Sponsors
        • Event Products
        • Event Tickets
        • Event Attendees
      • The Event Management Portal
        • Introduction to the Event Management Portal
        • Prerequisites for installation
        • Accessing the Plugin
        • Installing the Event Management Portal
        • Amending Event Portal Parameters
        • Adding Custom CSS to the Event Portal
      • On The Day Registration App
      • Setup On the Day Registration App
    • Compliance Records
      • Introduction to Compliance Records
      • Enabling Compliance Records
      • Creating Compliance Records
      • Using Compliance Records
    • Spotler Integration
      • What is Spotler?
      • Navigating your Spotler homepage
      • GatorMail
        • Introduction to GatorMail
        • Managing your GatorMail Account
          • Domain Setup
        • GatorMail Configuration
          • GatorMail Field Mappings
            • GatorMail Hard Bounces
          • Preference Centres & Landing Pages
            • Preference Centre Setup
        • Creating Emails in GatorMail
          • Imbedding Images and Videos
        • Sending Emails in GatorMail
          • Sending GatorMail Campaigns
            • Campaign Action Types
            • Ramp-up
            • Testing Campaigns and Emails
          • Using SendForensics
          • Understanding your Campaign results
        • Advanced Features
          • Gator Smart Forms
          • GatorMail - Dynamic Content
      • GatorLeads / Web Insights
        • Tracking Code
          • Restricting Page Tracking
        • Setting up the Plugin
        • Viewing Web Insights Data on your Form Layouts
        • Domain Names and Online Activities
        • Reporting incorrect Leads created through Web Insights
        • Reporting on Web Insights data
        • Using UTM Values
        • Why aren’t Online Activities being created in the database?
        • Why is GatorLeads recording online activities in a foreign language?
      • GatorSurvey
      • GatorWorkflow
        • Spotler Data Sync
        • Triggered Mailshots
      • GatorPopup
  • Opportunities
    • Introduction to Opportunities
    • Displaying & Adding Opportunities
    • Opportunity Line Items
    • Opportunity Relationships
  • Integrations
    • Mapping
      • Introduction to the Mapping Module
      • Using the Mapping Module
      • Using Mapping in Reports
        • Changing the size/colour of Map Pins
    • Electronic Signing Tools
      • Docusign Integration
        • DocuSign Functionality
          • Copy Document on Signature
          • Update Related Records
          • Sending Multiple Documents
          • People, Organisations & Cases with DocuSign
          • Invoice Payments with DocuSign
          • Managing DocuSign Documents
        • Setting up the DocuSign Integration
          • Authentication with DocuSign
          • Production vs Sandbox
          • Creating a Document with a DocuSign Template
          • Creating a Document with a Workbooks PDF
          • DocuSign Fields
          • DocuSign Settings
          • Form Layout Configuration
        • DocuSign - Worked Examples
          • Taking Payments
          • Updating Related Records
          • Multiple Document Sends
          • Creating a Template for Cases
          • Creating a Template for Organisations
          • Creating a Template for People
          • Unified PDF for Transaction Documents
        • DocuSign - Reporting
          • Multiple Send Report Grid
          • Document Review Report
          • Monitoring Integration Errors
      • Adobe Sign Integration
        • Introduction to Adobe Sign
        • Authentication with Adobe Sign
        • Installing the Integration
        • Integration Monitoring & Error Handling
        • Setup of Adobe Sign
        • Adobe Sign Fields & Form Layout Configuration
        • Optional Custom Fields for Adobe Sign
        • Adobe Sign Button Process
        • Using the Adobe Sign Integration
    • Creditsafe Integration
      • Installing the Creditsafe Plugin
      • Configuring Organisations to use the Creditsafe Integration
      • An example of how to use the Creditsafe Integration
    • Zapier
      • Introduction to Zapier
      • Available Triggers and Actions
      • Linking your Workbooks Account to Zapier
      • Setting up Zaps
        • Posted Invoices to Xero Invoices
        • Xero payments to Workbooks Tasks
        • New Case to Google Drive folder
        • New Case to Basecamp Project
        • New Workbooks Case to JIRA Ticket
        • Jira Issue to new Case
        • 123FormBuilder Form Entry to Case
        • Eventbrite Attendee to Sales Lead and Task
        • Facebook Ad Leads to Sales Leads
        • Wufoo Form Entry to Sales Lead
        • Posted Credit Note to Task
        • QuickBooks Online
          • Initial Setup
            • Authentication with QuickBooks Online
          • People & Organisations to QuickBooks Customers
          • POSTED Workbooks Invoice to QuickBooks Online
          • QuickBooks Online Payment to Workbooks Invoice & Task
          • QuickBooks Sales Tax Code Lookup
        • Survey Monkey responses to Tasks
      • Multistep Zaps
    • Email Integrations
      • Email Dropbox
        • Setting up your Dropbox
        • Using your Dropbox
      • Workbooks Exchange Server Sync
        • Supported email clients
        • Set Up
          • Setting up the WESS
          • Setting up the Outlook Add-In
          • Customising the WESS Add-In
          • How to change Authentication setup for WESS
            • O365 Exchange authentication Troubleshooting
        • What gets synchronised?
          • Synchronising with the WESS
          • Synchronising with the WESS Add-in
          • How to force a sync
          • Best practice
        • WESS Troubleshooting
      • Workbooks Outlook Connector
        • Introduction to the Outlook Connector
        • Before downloading the Outlook Connector
          • System Requirements
          • Enabling the Outlook Connector
        • Download/update the Outlook Connector
        • Installing the Outlook Connector
          • Uninstalling the Outlook Connector
        • Using the Outlook Connector
          • Configuring the Outlook Connector's Settings
          • Identifying Records in Workbooks created in Outlook
        • Outlook Connector Troubleshooting
    • Event & Webinar Integration Tools
      • GoToWebinar
        • Installation
          • GoToWebinar Fields & Processes
          • Setting up Process Buttons for GoToWebinar
        • Authentication
          • Multiple GoToWebinar Accounts
          • Removing GoToWebinar Accounts
        • Create/Update & Cancel Webinars from Events
        • Event Attendees as Webinar Registrants
        • Event Speakers as Webinar Panelists
        • Retrieve Webinar Data
      • ON24
        • Installation
          • ON24 Fields & Processes
          • Setting Up Process Buttons for ON24
        • Authentication with ON24
          • Removing ON24 Accounts
        • Create Webcasts from Events
        • Event Attendees as Webcast Registrants
        • Retrieve Webcast Data
          • Reporting: Survey Responses
          • Reporting: Poll Responses
        • Retrieve Survey Data
        • Engagement Hub Interactions
    • Microsoft Office
      • Azure Active Directory
      • Excel
      • Outlook
      • Power BI
      • SharePoint
        • Authentication
        • Installation
          • Custom Fields & Processes
          • SharePoint Integration Settings
        • Using the SharePoint Integration
      • Word
        • Introduction to the Word Add-in
        • Deploying the Word Add-in
        • Creating Word Add-in Templates
          • Example Word Add-in Templates
        • Using Word Add-in Templates
        • Word Add-in Tips and Tricks
    • Outreach
      • Installation
        • Outreach Fields & Processes
        • Create Outreach Custom Field Mappings
          • Configure Outreach Field Dynamic Picklist
        • Sync Outreach Mappings
      • Outreach Authentication
        • Remove Outreach Account
      • Sync People to Outreach Prospects
        • People Field Mappings
      • Sync Organisations to Outreach Accounts
        • Organisation Field Mappings
      • Sync Workbooks Opportunities to Outreach
        • Opportunity Field Mappings
      • Sync Tasks/Activities from Workbooks to Outreach
        • Follow-Up Activities created via Scheduled Process
      • Sync Outreach Sequences to Workbooks
      • Sync Outreach Sequence States to Workbooks
      • Sync Outreach Sequence Step Numbers to Workbooks
      • Sync Prospects/Accounts/Opportunities from Outreach to Workbooks
      • Sync Outreach Tasks/Calls/Meetings to Workbooks
    • Scribe/Workbooks Connector
      • Connection Setup
        • Microsoft SQL Server Connection Requirements
      • Connector Control Blocks
      • Worked Example - Create, Read, Update & Delete
    • RingCentral
      • Installation
        • RingCentral Integration Fields and Processes
      • RingCentral Authentication
        • Remove RingCentral Account
      • Creating Phone Call Activities
      • Click to Dial
  • People & Organisations
    • Introduction to People & Organisations
    • Organisations
      • Displaying & Adding Organisations
      • Customers & Suppliers
    • People
      • Displaying & Adding People
      • Adding People to Outlook
    • Relationships
      • Change Employer Wizard
      • Direct Relationships
      • Third Party Relationships
    • De-duplication and Merge
      • Workbooks Merging
      • Workbooks DQ
      • Data Quality
    • Using Postcode Lookup
    • Data Enrichment
      • Introduction to Data Enrichment
      • Setting up Data Enrichment
  • Snippets
  • Reporting
    • Introduction to Reporting
      • Creating Reports
        • Standard Workbooks Reports
        • Creating a Pre-populated Report
        • Creating a Report from a Template
          • Report Templates
        • Creating a Blank Report
        • Auto-refreshing Report Views
      • Sharing Reports
    • Using Reports
      • Reporting Explained
        • Adding Targets, Conditional Formatting and CSS Styling
          • Calculated Targets
          • Target Sets
            • Creating a Target set for Closed Cases per Customer Support Agent
            • Creating a Target set for Closed Sales amount per Sales Person by quarter
        • Reporting with multiple currencies
        • Drilling into Summary Views
        • Improving Report Performance & Run Time
      • Displaying reports within Record Views
      • Displaying Reports
        • Reporting Views (Reports on Landing Pages)
      • Adding a Report view to a Dashboard
    • Charts
      • Creating & Using Charts
        • Bar Charts
          • Targets on Bar Charts
        • Line Charts
        • Pie Charts
        • Dial Charts
    • Exporting Reports
      • Emailing Scheduled Reports
    • Advanced Reporting
      • Types of Split Columns
      • Using Calculated Columns
        • Introduction to the IF Statement
        • Introduction to the CASE Statement
        • Applying Search filters in Calculated Columns
        • Comments in Calculated Columns
        • Financial Year Reporting
        • Introduction to Date Functions in Reports
        • Using Calculated Criteria
        • Reporting on empty fields
      • Audit Reporting
  • Dashboards
    • Adding Elements to Dashboards
      • Configuring Dashboard Elements
    • Dashboard Views
    • Dashboard Fields
    • Creating a Sales Dashboard
    • Springboard
    • Adding a Dashboard as a Record Tab
  • Okta Authentication
  • Transaction Documents
    • Introduction to Transaction Documents
      • Displaying & Adding Transaction Documents
      • Copying Transaction Documents
      • Transaction Documents Fields Help
      • Transaction Documents Line Items Help
      • Printing & Sending Transaction Documents
      • Managing Transaction Document Currencies
      • Managing Transaction Document Statuses
      • Setting a Blank Default Currency on Transaction Documents
    • Credit Notes
    • Customer Orders
    • Invoices
    • Quotations
    • Supplier Orders
    • Contract Management
      • Displaying & Adding Contracts
      • Using Contracts with Cases
    • Sagelink
  • Auditing
    • Auditing
  • Configuration
    • Introduction to System Administration
      • Quick Start Wizard
    • Users & Security
      • Users
        • Setting up your Users
        • Disabling Users
        • Profile Pictures
      • User Groups
        • Capabilities
        • Creating & Modifying User Groups
      • Permissions
        • Sharing Policies & Mandatory Permissions
          • Configuring the Advanced Security Module
            • Configuring the Advanced Security Module: Segmenting Users by function
            • Configuring the Advanced Security Module: Segmenting Users by location
      • Account Settings
      • Licences & Modules
        • Multi Language
    • Database
      • Databases
      • Storage Usage
      • Prefixes & Numbering
        • Modifying Object References
      • Export Database
      • Database Settings
    • Accounting
      • Accounting Periods
      • Exchange Rates
        • Setting Exchange Rates
      • Tax Regimes
        • Setting Tax Rates
        • Sales Tax Rulesets
          • Using Sales Tax Rulesets
      • Own Organisations
        • Setting up your Own Organisation
    • Email & Integration
      • Email Settings
        • Setting up your Email Server
        • Using Workbooks Server to send Emails
      • API Keys
      • Web to Case and Web to Lead
        • Setting up a Web2Case Form
        • Setting up a Web2Lead Form
        • Using Web Forms in Workbooks
        • Editing a Web Key Form
      • Preference Centre
      • MailChimp & dotMailer
      • Loqate
      • Bank Account Validation
    • Customisation
      • Creating & Modifying Picklists
      • Desktop Preferences
      • Theme
      • Record Types
        • Creating Custom Fields
          • Dynamic Linked Items & Picklists
          • Constrained Dynamic Linked Items (DLI) & Picklists
          • Creating relationships with Dynamic Linked Items (DLIs)
          • Linking Custom Field Values
          • Showing Linked Records in Tabs
        • Report-based Custom Fields
          • Improving the Performance of Report Cells/Grids
        • Linked Fields & Reference Fields
        • Record Templates
        • Form Layouts
          • Customising an Organisation form
          • Displaying a Tab as a Side Panel
          • Card View
          • Read-only Assigned to Fields
        • Customising relationships between parties
          • Configuring Custom Party Relationships
        • Opportunity Stages
      • Custom Records
        • Enabling Custom Records
        • Creating Custom Record Types
          • Editing Custom Record Types
        • Using Custom Records
    • Automation
      • Plugins
        • Field Updater Plugin
        • File Storage Plugin
          • Using File Storage
          • Using SharePoint File Storage
        • Cognism Enrich Plugin
          • Using Cognism Enrich
        • Email to Case Plugin and Process
      • Processes
        • Process Logging
      • Workbooks Scripts
        • Script Library
        • How Workbooks Runs Scripts
        • Workbooks Script External Access
      • API Data
      • Triggers and Webhooks
        • Configuring Triggers and Webhooks
    • PDF Configuration
      • Modifying Document Templates
        • Adding Terms & Conditions to your Documents
        • Multi-line Value Tags
      • Modifying Default Colours & Images
      • Creating Custom Document Templates
  • Contact Support
    • Contacting Workbooks Support
    • Workbooks CRM Advisory Packs
    • Introduction to the Administrator Service
  • Releases & Roadmap
    • Roadmap
    • September 2022 Release
    • June 2022 Release
    • March 2022 Release
    • October 2021 Release
    • June 2021 Release
    • March 2021 Release
    • 2020 Releases
      • December 2020 Release
      • September 2020 Release
      • April 2020 Release
      • January 2020 Release
    • 2019 Releases
      • September 2019 Release
      • February 2019 - Event Management Release
      • January 2019 Release
    • 2018 Releases
      • October 2018 Release
      • May 2018 Release
      • February 2018 Release
      • January 2018 Release
    • 2017 Releases
      • November 2017 Release
      • September 2017 Release
      • June 2017 Release
      • March 2017 Release
    • 2016 Releases
      • December 2016 Release
      • August 2016 Release
      • January 2016 Release
  • Workbooks Glossary

Setting Up Gator Smart Forms

Smart Forms are web capture forms that can be used within email Landing Pages and sent out through Campaigns to a targeted audience, or they can be embedded on to your website in order to capture new leads. In addition, Smart Forms can be added to Popups, which makes capturing prospect data even easier as your prospects won't have to make as many clicks to complete an action. Data collected on the forms will be pushed back into GatorLeads. You could use a Popup to promote Newsletter sign ups, or to receive more information about an event you’re hosting.

Smart Forms are an great way to help identify unique visitors. Once a form is submitted a cookie is placed on the User’s browser meaning that the next time they visit they are identifiable by their email address rather than their company IP address.

If, like most customers, you're using WordPress for your website, a Plugin is available to help you add the form to your website without having to amend the HTML widget.  Information on the Plugin is available here.

There is now a web form option called Single Script. This enables automatic updates on your form when displayed on a web page, making the administration and maintenance of your forms much easier.

Additionally, Smart Form information also feeds back into Workbooks which can then be used to create or update information on the appropriate Person or Lead Record, more information on this can be found on the Field Mapping page. 

To create a Smart Form, go to Tools > Smart Forms then click Create New which will bring up a screen like this:


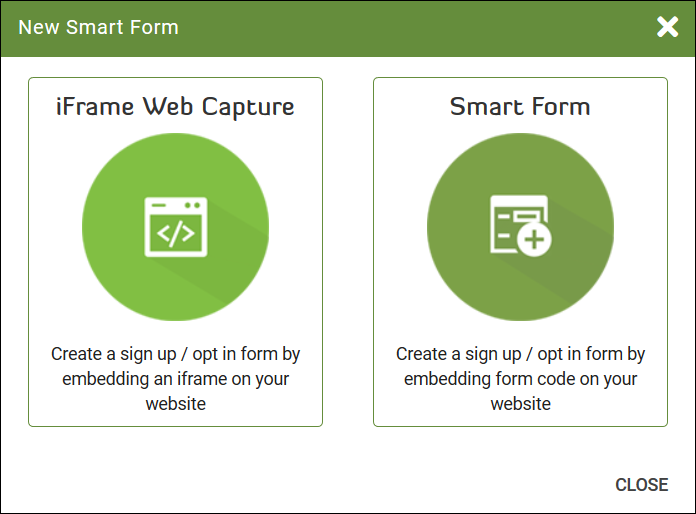
Here you can choose to create a form by embedding an iframe on your website or to create one by embedding HTML on your website. Where possible, we'd recommend using the embedded code as it provides a more secure submission and is more compatible with https based domains.

Select Smart Form and give your new form a Name and Description. If you want to create a Single Script form, make sure you tick the checkbox, then click Create which takes you to the setup screen where you have 3 tabs:

  • Settings
  • Fields
  • Submit Rules

Under Settings you have a number of options on the left, which are:

  • Submission Settings
  • Email Address
  • Confirmation Opt In
  • Data Management
  • Submission URL
  • GatorLeads
  • reCAPTCHA
  • Pre-populate
  • Design Settings
  • Analytics Goal Conversion
  • WordPress Plugin Settings

Settings

Submission Settings

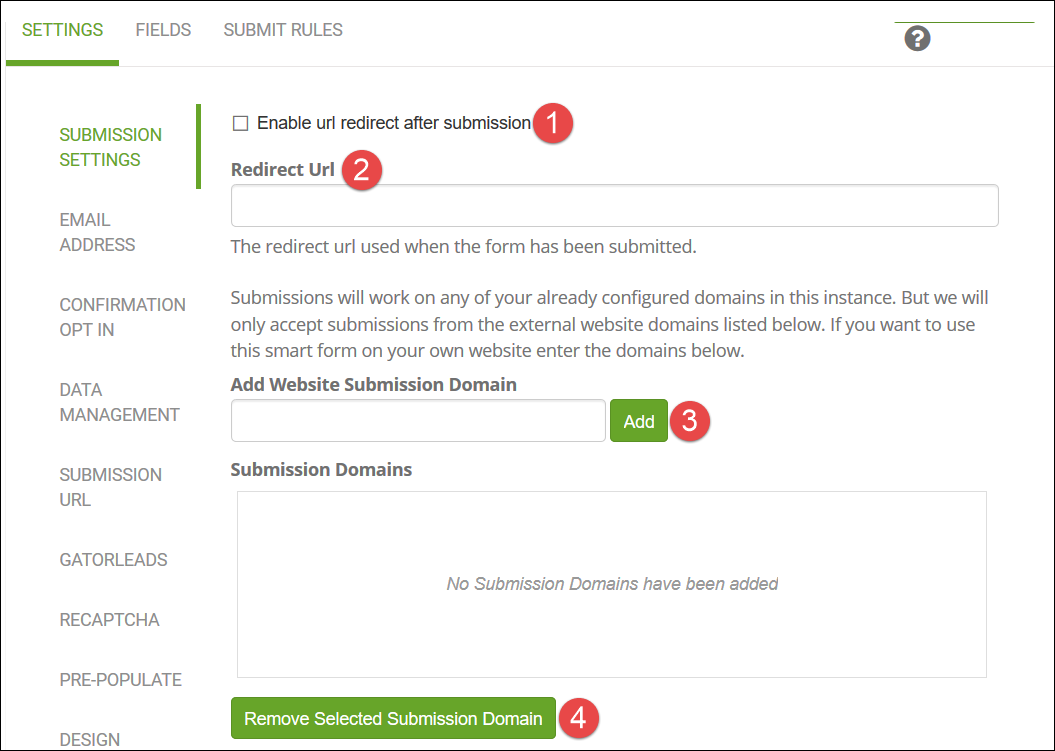
  1. Enable URL redirect after submission means that the person submitting the form will be directed to a different page once the form is filled and submitted.
  2. This is where you enter the URL that you want the person to be redirected to.
  3. The Website Submission Domain is usually your website domain but if not, needs to be a domain that has been set up with Spotler.  When entering the domain, do not include the https:// part. You can add more than one if required and they will appear in the Submission Domains box.
  4. If you want to remove a domain from the Submission Domains box, highlight it and click Remove Selected Submission Domain.

Email Address

When a person completes a Smart Form, the email address is always a mandatory field, even if nothing else is. If you want the form to check the validity of the email address, you should tick the checkbox next to Enable Additional Email Validation and select an option from the dropdown next to Email Validation.  The choices are:

  • Standard Email Address - any valid Email address is allowed to be used to submit the form.
  • Business Email Address - submissions from personal email address domains such as Gmail or Hotmail are prevented when submitting the form.
  • AUS Government Email Addresses - only submissions with a valid Australian Government email address (.gov.au) can submit the form.

(The additional validation is added to the form as JavaScript validation.)

Confirmation Opt In

Enable Confirmation Opt In

Once the form has been submitted your selected Confirmation Opt In will be sent in an email to the User allowing for a “double opt in” process on the form.

Add confirm statement

The confirmation Opt In Statement is inserted into the Web Form so someone completing the form is able to confirm their opt in while submitting the form and do not need to do this via an email.

Data Management

Within Data Management you can decide what you want to happen to the submitted data. It allows you to control how you process the submission and can prevent the same contact from submitting a form multiple times.

Submission URL

If you have multiple Landing Zone URLs set up on your account you can select which URL you want to be used for posting data.

GatorLeads

The redirect URL will contain GatorLeads tracking information so once the User continues browsing your site you are able to track all subsequent activities. We recommend that you tick this checkbox.

reCAPTCHA

Adding a reCAPTCHA code to your forms means that human verification will be required before the form can be submitted. For reCAPTCHA to work, you need to have set up a site key and secret key for the domain where your form is located.

Pre-populate

When checked, data from previous form submissions will automatically appear in your new form.

Design Settings

Here you can set up the success and failure messages that appear when someone submits a form as well as defining the wording on the submit button.

Analytics Goal Conversion

If you want to use Google Analytics, you can set up your form to track what they call Events. Events are user interactions with content that can be measured independently from a web page or a screen load. Examples of events include: downloads, link clicks and video plays. More information on Google Events is available here.

WordPress Plugin Settings

Once you've created your Smart Form, you'll want to display it on a website page, which is made easier using the WordPress Plugin. The settings you see in this session need to be provided within your WordPress account for the Plugin. More information on downloading and using the Plugin are available here.

Fields

This is where you choose which fields to display on your Smart Form. They've been broken up by their data type to help you find them more easily. Simply tick the checkbox next to the fields you want to use. As you do so, you'll see the list on the right-hand side of Selected Fields grows and you can reorder them using drag and drop and remove them from your selection using the red cross on the right. The Email field is always added to your forms by default so cannot be deleted.

Submit Rules

Submit Rules allow you to control what happens when a person submits a form. When creating a rule you can do it based on a Page URL or on Field Data. You can choose to have a rule which redirects to a new URL, add the recipient to a Gator Campaign, add the recipient to a Gator Group or trigger an email notification. NOTE: If you choose to add a person to a campaign it must be a Refresh Non-Recurring Type.

Save and Get Embedded Code

When you've finished setting up your form click Save and Get Embedded Code, where you have 3 choices:

  • Single Script
  • WordPress Plugin
  • Form Templates

Single Script

Choose this option and tick the checkbox next to Include in Single Script. This means any later changes to the form will be reflected automatically on the form. You can then copy the HTML from the two dialogue boxes to put on your website.

WordPress Plugin

Choose this option if you're using the WordPress Plugin.

Form Templates

Choose this option to access the traditional script for inserting a form onto your page.

Save & Lock

We recommend that once you have fully setup and tested your form, you lock it before live submissions are made. This protects your form from any unwanted changes.

For more information on setting up smart forms please see Spotler's help site here.

  • Advanced Features
  • GatorMail - Dynamic Content

© 2023 Workbooks.com - privacy & terms
  • Linkedin
  • Twitter
  • Youtube
  • Facebook