
- Welcome to the Knowledge Base
- Introduction
- Training
- Getting Started
- Preferences
- Activities
- Cases
- Forecasts & Quotas
- Importing Data
- Leads
-
Marketing
- Introduction to Marketing
- Marketing Campaigns
- Mailing Lists
- Products
- Mailshots
- Upload Library
- Templates
- Event Management
- Compliance Records
-
Spotler Integration
- What is Spotler?
- Navigating your Spotler homepage
- GatorMail
-
GatorLeads / Web Insights
- Tracking Code
- Setting up the Plugin
- Viewing Web Insights Data on your Form Layouts
- Domain Names and Online Activities
- Reporting incorrect Leads created through Web Insights
- Reporting on Web Insights data
- Using UTM Values
- Why aren’t Online Activities being created in the database?
- Why is GatorLeads recording online activities in a foreign language?
- GatorSurvey
- GatorWorkflow
- GatorPopup
- Opportunities
-
Integrations
- Mapping
- Electronic Signing Tools
- Creditsafe Integration
-
Zapier
- Introduction to Zapier
- Available Triggers and Actions
- Linking your Workbooks Account to Zapier
-
Setting up Zaps
- Posted Invoices to Xero Invoices
- Xero payments to Workbooks Tasks
- New Case to Google Drive folder
- New Case to Basecamp Project
- New Workbooks Case to JIRA Ticket
- Jira Issue to new Case
- 123FormBuilder Form Entry to Case
- Eventbrite Attendee to Sales Lead and Task
- Facebook Ad Leads to Sales Leads
- Wufoo Form Entry to Sales Lead
- Posted Credit Note to Task
- QuickBooks Online
- Survey Monkey responses to Tasks
- Multistep Zaps
-
Email Integrations
- Email Dropbox
- Workbooks Exchange Server Sync
- Workbooks Outlook Connector
- RevenueGrid Intelligence and Engage
-
Event & Webinar Integration Tools
- GoToWebinar
- ON24
- Microsoft Office
-
Outreach
- Installation
- Outreach Authentication
- Sync People to Outreach Prospects
- Sync Organisations to Outreach Accounts
- Sync Workbooks Opportunities to Outreach
- Sync Tasks/Activities from Workbooks to Outreach
- Sync Outreach Sequences to Workbooks
- Sync Outreach Sequence States to Workbooks
- Sync Outreach Sequence Step Numbers to Workbooks
- Sync Prospects/Accounts/Opportunities from Outreach to Workbooks
- Sync Outreach Tasks/Calls/Meetings to Workbooks
- Scribe/Workbooks Connector
- RingCentral
- Auditing
- Comments
- People & Organisations
- Projects
-
Reporting
- Introduction to Reporting
- Using Reports
- Charts
- Exporting Reports
- Advanced Reporting
- Report Snapshots
- Dashboards
-
Transaction Documents
-
Introduction to Transaction Documents
- Displaying & Adding Transaction Documents
- Copying Transaction Documents
- Transaction Documents Fields Help
- Transaction Documents Line Items Help
- Printing & Sending Transaction Documents
- Managing Transaction Document Currencies
- Managing Transaction Document Statuses
- Setting a Blank Default Currency on Transaction Documents
- Credit Notes
- Customer Orders
- Invoices
- Quotations
- Supplier Orders
- Contract Management
- Sagelink
-
Introduction to Transaction Documents
- Auditing
-
Configuration
- Introduction to System Administration
- Users & Security
- Preferences
- Database
- Accounting
- Email & Integration
-
Customisation
- Creating & Modifying Picklists
- Theme
-
Record Types
- Creating Custom Fields
- Report-based Custom Fields
- Linked Fields & Reference Fields
- Record Templates
- Form Layouts
- Customising relationships between parties
- Opportunity Stages
- Custom Records
- Automation
- PDF Configuration
- Contact Support
- Releases & Roadmap
Outlook Connector Troubleshooting
Welcome to the Outlook Connector Troubleshooting Guide. This guide should be used if you have received any errors using the Outlook Connector or if it isn't working as expected. For questions about using or installing the Outlook Connector, please watch our videos on the Introduction to the Outlook Connector page.
Please use the options below to select what type of issue you are experiencing.
I'm receiving an error message
Select from the list below the item which best describes the issue.
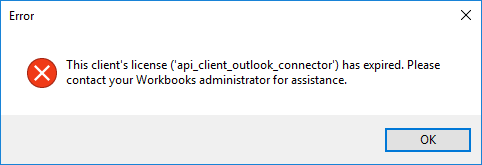
Licence has expired error
When I try to log in to the Outlook Connector, I receive the error ‘This client’s license (‘api_client_outlook_connector’) has expired. Please contact your Workbooks administrator for assistance.’ If this doesn't match what you are seeing, you can return to the previous list by clicking the above title again.
How do I fix this error?
Select the type of user you are to find further guidance on how to resolve this error.
I'm the End User
Click to expand each of the steps below to find further guidance on how to complete that step.
Step 1: Check your login credentials
To ensure that you are using the right login credentials in the Outlook Connector setup:
- Open the Workbooks login page
- Manually enter the username and password that you are using during the Outlook Connector First Run Assistant.
- Log in to Workbooks
![]() The login is successful: You have the right credentials and this now needs to be escalated to your System Administrator. They should be able to resolve this for you by starting at Step 3 of the System Administrator Troubleshooting Steps.
The login is successful: You have the right credentials and this now needs to be escalated to your System Administrator. They should be able to resolve this for you by starting at Step 3 of the System Administrator Troubleshooting Steps.
![]() The login is not successful: Proceed to Step 2 below.
The login is not successful: Proceed to Step 2 below.
Step 2: Reset or recover your password
If within Step 1 you were unable to log in to Workbooks website, the login credentials you were entering are incorrect. You will need to either reset or recover your password using the methods below.
If you asked your browser to remember your login details, it may be possible for you to view what has been saved. For more information on how to do this for specific Browser please use the links below:
- Viewing Stored Passwords in Mozilla Firefox.
- Viewing Stored Passwords in Google Chrome.
- Viewing Stored Passwords in Internet Explorer.
- Viewing Stored Passwords in Safari.
- Viewing Stored Passwords in Opera.
- Viewing Stored Passwords in Microsoft Edge.
![]() The login is successful: You now have the right credentials and this needs to be escalated to your System Administrator. They should be able to resolve this for you by starting at Step 3 of The System Administrator Troubleshooting Steps.
The login is successful: You now have the right credentials and this needs to be escalated to your System Administrator. They should be able to resolve this for you by starting at Step 3 of The System Administrator Troubleshooting Steps.
![]() The login is not successful: Please contact your System Administrator to reset your password using the instructions in the System Admin Troubleshooting Steps
The login is not successful: Please contact your System Administrator to reset your password using the instructions in the System Admin Troubleshooting Steps
I'm the System Administrator
Click to expand each of the steps below to find further guidance on how to complete that step.
Step 1: Check the login email address matches the user record within Workbooks
Ensure that the correct User login email address is being used by matching the value on the user record to that being used by User. This can be found following the path Start > Configuration > Users and Security > Users and selecting the affected User.
![]() The email address matches: Proceed to Step 2 below.
The email address matches: Proceed to Step 2 below.
![]() The email address is different: Inform the user of the correct email address to use.
The email address is different: Inform the user of the correct email address to use.
Step 2: Reset the user’s password within Workbooks
Reset the Users password and ask them to try to complete the First Run Assistant again after waiting for up to approximately 20 minutes, this will allow any changes to be migrated to the Outlook Connector.
Passwords can be reset when accessing the User record found by following the path Start > Configuration > Users and Security > Users and selecting the affected User.
![]() The user can now log in successfully: No further action required.
The user can now log in successfully: No further action required.
![]() The user can log into Workbooks but the Outlook Connector is still not working: Proceed to Step 3 below.
The user can log into Workbooks but the Outlook Connector is still not working: Proceed to Step 3 below.
![]() The user is still unable to log in to Workbooks: Please escalate to the Workbooks Support Team. Workbooks Support can be contacted on 0118 3030 101 or by emailing support@workbooks.com.
The user is still unable to log in to Workbooks: Please escalate to the Workbooks Support Team. Workbooks Support can be contacted on 0118 3030 101 or by emailing support@workbooks.com.
Step 3: Allocate the Extension to the User
Ensure that the User has an Outlook Connector Licence allocated to their User Record. These can be located by following the path Start > Configuration > Users and Security > Users. When choosing the User in question you should tick the checkbox for Outlook Connector and save the User record.
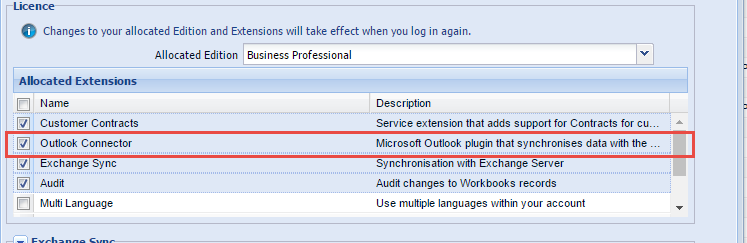
The affected user should now try to set up the Outlook Connector again.
![]() The licence allocation is successful: If this issue persists when the licence has been allocated successfully and the correct credentials are being used, please escalate to the Workbooks Support team. Workbooks Support can be contacted on 0118 3030 101 or by emailing support@workbooks.com.
The licence allocation is successful: If this issue persists when the licence has been allocated successfully and the correct credentials are being used, please escalate to the Workbooks Support team. Workbooks Support can be contacted on 0118 3030 101 or by emailing support@workbooks.com.
![]() The licence allocation is not successful: Please proceed to Step 4.
The licence allocation is not successful: Please proceed to Step 4.
Step 4: Troubleshoot the Allocation of the Extension
Using the options below, please select the error you are receiving when allocating the Extension.
I cannot see Outlook Connector in Allocated Extensions section
You need to activate the Module for your database. Follow the guidelines on our Before downloading the Outlook Connector Knowledge base page to resolve this.
I am receiving the message ‘You cannot allocate Outlook Connector Edition/Extension because it will exceed your licence.’ when trying to save the change to the User record.

This message will appear when all of your allowed Outlook Connector Licences have been allocated already. To resolve this behaviour, follow the steps below;
- Ensure that you have followed the instructions on the Disabling Users Knowledge base page to make sure you don’t have any disabled Users who still have an Outlook Connector Licence allocated to them.
- Contact the Workbooks Sales team on 0119 3030 100 or sales@workbooks.com and purchase the additional Licences required.
None of the above
Escalate to Workbooks Support via the Authorised Support Contact procedures.
Workbooks Support can be contacted on 0118 3030 101 or by emailing support@workbooks.com.
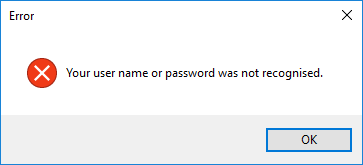
User name or password not recognised
When I try to log in to the Outlook Connector, I receive the error ‘Your user name or password was not recognised.’ If this doesn't match what you are seeing, you can return to the previous list by clicking the above title again.
How do I fix this error?
Select the type of user you are to find further guidance on how to resolve this error.
I'm the End User
Click to expand each of the steps below to find further guidance on how to complete that step.
Step 1: Check your login credentials
To ensure that you are using the right login credentials in the Outlook Connector setup:
- Open the Workbooks login page
- Manually enter the username and password that you are using during the Outlook Connector First Run Assistant.
- Log in to Workbooks
![]() The login is successful: You have the right credentials and this now needs to be escalated to your System Administrator. They should be able to resolve this for you by starting at Step 3 of the System Administrator Troubleshooting Steps.
The login is successful: You have the right credentials and this now needs to be escalated to your System Administrator. They should be able to resolve this for you by starting at Step 3 of the System Administrator Troubleshooting Steps.
![]() The login is not successful: Proceed to Step 2 below.
The login is not successful: Proceed to Step 2 below.
Step 2: Reset or recover your password
If within Step 1 you were unable to log in to Workbooks website, the login credentials you were entering are incorrect. You will need to either reset or recover your password using the methods below.
If you asked your browser to remember your login details, it may be possible for you to view what has been saved. For more information on how to do this for specific Browser please use the links below:
- Viewing Stored Passwords in Mozilla Firefox.
- Viewing Stored Passwords in Google Chrome.
- Viewing Stored Passwords in Internet Explorer.
- Viewing Stored Passwords in Safari.
- Viewing Stored Passwords in Opera.
- Viewing Stored Passwords in Microsoft Edge.
![]() The login is successful: You now have the right credentials and this needs to be escalated to your System Administrator. They should be able to resolve this for you by starting at Step 3 of The System Administrator Troubleshooting Steps.
The login is successful: You now have the right credentials and this needs to be escalated to your System Administrator. They should be able to resolve this for you by starting at Step 3 of The System Administrator Troubleshooting Steps.
![]() The login is not successful: Please contact your System Administrator to reset your password using the instructions in the System Admin Troubleshooting Steps
The login is not successful: Please contact your System Administrator to reset your password using the instructions in the System Admin Troubleshooting Steps
I'm the System Administrator
Click to expand each of the steps below to find further guidance on how to complete that step.
Step 1: Check the login email address matches the user record within Workbooks
Ensure that the correct User login email address is being used by matching the value on the user record to that being used by User. This can be found following the path Start > Configuration > Users and Security > Users and selecting the affected User.
![]() The email address matches: Proceed to Step 2 below.
The email address matches: Proceed to Step 2 below.
![]() The email address is different: Inform the user of the correct email address to use.
The email address is different: Inform the user of the correct email address to use.
Step 2: Reset the user’s password within Workbooks
Reset the Users password and ask them to try to complete the First Run Assistant again after waiting for up to approximately 20 minutes, this will allow any changes to be migrated to the Outlook Connector.
Passwords can be reset when accessing the User record found by following the path Start > Configuration > Users and Security > Users and selecting the affected User.
![]() The user can now log in successfully: No further action required.
The user can now log in successfully: No further action required.
![]() The user is still unable to log in successfully: Proceed to Step 3 below.
The user is still unable to log in successfully: Proceed to Step 3 below.
Step 3: Escalate to Workbooks Support
Escalate to Workbooks Support via the Authorised Support Contact procedures.
Workbooks Support can be contacted on 0118 3030 101 or by emailing support@workbooks.com.
Data Structure Collision error message
When trying to run a synchronisation of my Outlook Connector, the synchronisation is unsuccessful and I receive an error on my Windows Desktop that informs me that there is a data structure collision issue. If this doesn't match what you are seeing, you can return to the previous list by clicking the above title again.

How do I fix this error?
Click to expand each of the steps below to find further guidance on how to complete that step.
Step 1: Uninstall the Outlook Connector
Uninstall the Workbooks Outlook Connector (WOC) from the PC by going to Add/Remove programs or Programs & Features in the Control Panel.
If this is unsuccessful, please see the Unable to uninstall the Outlook Connector section.
Step 2: Clean up the Exchange Storage
Run a clean-up of the Exchange storage for the Outlook Connector to remove objects conflicting records from your internal storage.
IMPORTANT: Using these steps you will be affecting change in your local Offline Exchange Storage and therefore care needs to be taken to ensure that these steps are being followed exactly. If you are unsure about what to do please request that your IT department assist with these steps.
Download and run the MFCMAPI tool
- The latest version can be downloaded from the MFCMAPI official downloads website.
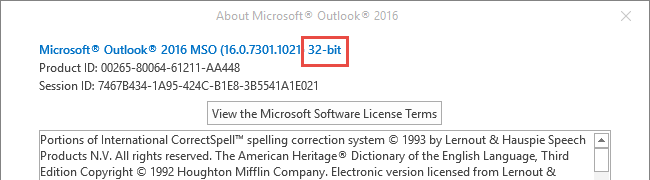
To discover which version is required (32 or 64-bit), in Outlook go to File > Office Account > About Office where the 'bit version' will be present in the top of the window
- Run the .exe. file after it has downloaded
- Proceed to Delete relevant IPC settings
Delete relevant IPC settings
- Go to Session > Logon...
- Select the profile where WOC was installed. (If prompted)
- Click OK
- Double-click on the Display Name where the WOC was installed previously (usually this is the default storage and has a value of "True" in the "Default Store" field)

- Expand the "Root" directory and the data structure of current storage will be displayed.
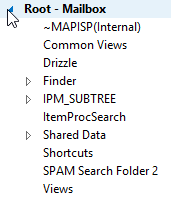
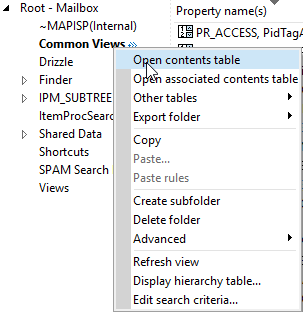
- Right-click on the "IPM_COMMON_VIEWS" or "Common Views" (the name of this folder depends on the storage type) and select "Open associated contents table".

- Click on the "Message Class" column header in the top half of the screen to sort by that column. (you may need to scroll across to see this column)
- Delete any entries that contain the following values in "Message Class":
- IPC.MS.REN.USERFIELDS (stores the list of custom field names for custom objects)
- IPC.SettingStore (stores the main info about data structure, types and fields)
For both of the above, the number of these entries may vary, and may not exist at all.
- Close this window when done.
- Right-click on the "IPM_COMMON_VIEWS" or "Common Views" again and select "Open contents table".
- Delete any entries with "IPM.Contact.WB..." under the "Message Class" heading. (this may be empty)
- Close this window when done.
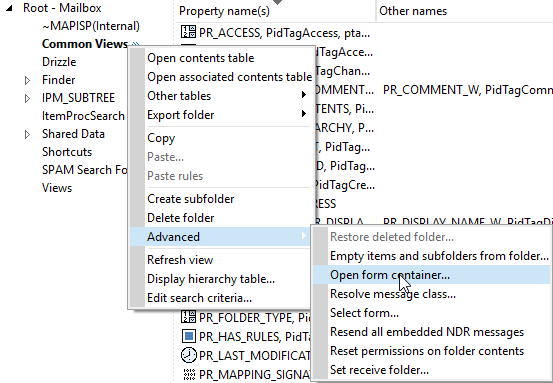
- Right-click on the "IPM_COMMON_VIEWS" or "Common Views" again and select "Advanced > Open form container".
- Sort items by PR_MESSAGE_CLASS and delete any items that contain "WB" in it (IPM.Contact.WB.Contact, IPM.Task.WB.Task, etc.). If you see the message 'Click Session/Logon to begin', close this window.
- Close this window when done.
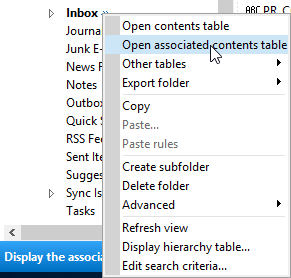
- Right-click on "Inbox" and choose "Open associated contents table".
- Delete any entries with the "Message Class" of "IPC.SettingsStore".
The number of these entries may vary, and may not exist at all. - Proceed to the next step.
Delete hidden folders and objects
- Expand the root of Outlook folders "Top of Outlook data file" or "IPM_SUBTREE" (the name depends on storage type).
- If present, delete the folder Facade_Hidden_Folders (stores hidden folders and objects, which are not visible to the user from within Outlook, like associations).
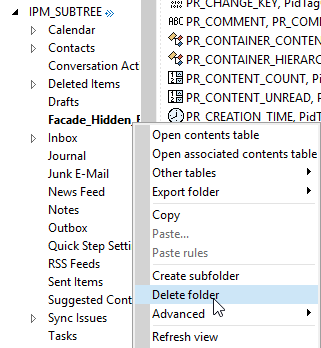
- Proceed to the next step.
Delete Shared Contacts, Events and Tasks
It is necessary to remove Shared Contacts, Events and Tasks as they may cause synchronisation issues, duplicates and conflicts when the Workbooks Outlook Connector is re-installed.
- Right-click on Contacts and select "Open contents table"
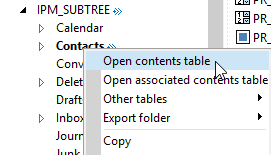
- Sort contacts by "Message Class".
- Delete shared WOC Contacts - these are contacts with "IPM.Contact.WB.Contact.Shared" name in "Message Class".
NOTE: Do not delete those marked as IPM.Contact.WB.Contact or IPM.Contact. - Close this window when done.
- Right-click on Tasks and select "Open contents table".

- Sort objects by "Message Class"
- Delete shared Tasks - these are objects with a "Message Class" of "IPM.Task.WB.Task.Shared".
NOTE: Do not delete those marked as IPM.Task.WB or IPM.Task. - Close this window when done.
- Right-click on Calendar and select "Open contents table".
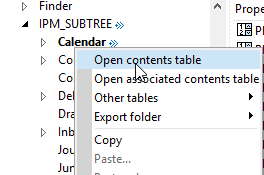
- Sort objects by "Message Class"
- Delete shared Events/Appointments - these are objects with a "Message Class" of "IPM.Appointment.WB.Event.Shared".
NOTE: Do not delete those marked as IPM.Appointment.WB or IPM.Appointment - Proceed to next step
Step 3: Reinstall the Outlook Connector
Close all MFCMAPI windows and try reinstalling the Outlook Connector by downloading the latest version from our Download page.
![]() This was successful: The WOC will now successfully install and I get no errors when running through the First Run Assistant.
This was successful: The WOC will now successfully install and I get no errors when running through the First Run Assistant.
![]() This was not successful: If the Outlook Connector will not successfully install, please contact the Workbook Support team on 0118 3030 101 or by emailing support@workbooks.com.
This was not successful: If the Outlook Connector will not successfully install, please contact the Workbook Support team on 0118 3030 101 or by emailing support@workbooks.com.
Profile has changed or A new Profile has been detected error
You may receive an error when opening Outlook if your Outlook Profile has changed or a new Outlook profile is in place.
How do I fix this error?
Click to expand each of the steps below to find further guidance on how to complete that step.
Step 1: Uninstall the Outlook Connector
Uninstall the Workbooks Outlook Connector (WOC) from the PC by going to Add/Remove programs or Programs & Features in the Control Panel.
If this is unsuccessful, please see the Unable to uninstall the Outlook Connector section.
Step 2: Remove Registry key reference to the incorrect Profile
Warning: Any change to the registry keys need to be carried out with care as unintended changes to these keys can have significant effects on your computer's behaviour.
- Close Outlook
- Click on the Windows button and type ‘regedit’ to open the registry editor.
- Locate the file path HKEY_CURRENT_USER > Software > Workbooks > Workbooks Outlook Connector and delete this folder;

- Reinstall the Outlook Connector using the most current version available from our Download the Outlook Connector Knowledge base page
![]() This was successful: When opening Outlook the First Run Assist will appear and it will be possible to link the Connector with the correct Profile.
This was successful: When opening Outlook the First Run Assist will appear and it will be possible to link the Connector with the correct Profile.
![]() This was not successful: If the First Run Assist will not run and the Outlook Connector is still not working please follow the next step.
This was not successful: If the First Run Assist will not run and the Outlook Connector is still not working please follow the next step.
Step 3: Clean up the Exchange Storage
Run a clean-up of the Exchange storage for the Outlook Connector to remove objects conflicting records from your internal storage.
IMPORTANT: Using these steps you will be affecting change in your local Offline Exchange Storage and therefore care needs to be taken to ensure that these steps are being followed exactly. If you are unsure about what to do please request that your IT department assist with these steps.
Download and run the MFCMAPI tool
- The latest version can be downloaded from the MFCMAPI official downloads website.
To discover which version is required (32 or 64-bit), in Outlook go to File > Office Account > About Office where the 'bit version' will be present in the top of the window
- Run the .exe. file after it has downloaded
- Proceed to Delete relevant IPC settings
Delete relevant IPC settings
- Go to Session > Logon...
- Select the profile where WOC was installed. (If prompted)
- Click OK
- Double-click on the Display Name where the WOC was installed previously (usually this is the default storage and has a value of "True" in the "Default Store" field)
- Expand the "Root" directory and the data structure of current storage will be displayed.
- Right-click on the "IPM_COMMON_VIEWS" or "Common Views" (the name of this folder depends on the storage type) and select "Open associated contents table".
- Click on the "Message Class" column header in the top half of the screen to sort by that column. (you may need to scroll across to see this column)
- Delete any entries that contain the following values in "Message Class":
- IPC.MS.REN.USERFIELDS (stores the list of custom field names for custom objects)
- IPC.SettingStore (stores the main info about data structure, types and fields)
For both of the above, the number of these entries may vary, and may not exist at all.
- Close this window when done.
- Right-click on the "IPM_COMMON_VIEWS" or "Common Views" again and select "Open contents table".
- Delete any entries with "IPM.Contact.WB..." under the "Message Class" heading. (this may be empty)
- Close this window when done.
- Right-click on the "IPM_COMMON_VIEWS" or "Common Views" again and select "Advanced > Open form container".
- Sort items by PR_MESSAGE_CLASS and delete any items that contain "WB" in it (IPM.Contact.WB.Contact, IPM.Task.WB.Task, etc.). If you see the message 'Click Session/Logon to begin', close this window.
- Close this window when done.
- Right-click on "Inbox" and choose "Open associated contents table".
- Delete any entries with the "Message Class" of "IPC.SettingsStore".
The number of these entries may vary, and may not exist at all. - Proceed to the next step.
Delete hidden folders and objects
- Expand the root of Outlook folders "Top of Outlook data file" or "IPM_SUBTREE" (the name depends on storage type).
- If present, delete the folder Facade_Hidden_Folders (stores hidden folders and objects, which are not visible to the user from within Outlook, like associations).
- Proceed to the next step.
Delete Shared Contacts, Events and Tasks
It is necessary to remove Shared Contacts, Events and Tasks as they may cause synchronisation issues, duplicates and conflicts when the Workbooks Outlook Connector is re-installed.
- Right-click on Contacts and select "Open contents table"
- Sort contacts by "Message Class".
- Delete shared WOC Contacts - these are contacts with "IPM.Contact.WB.Contact.Shared" name in "Message Class".
NOTE: Do not delete those marked as IPM.Contact.WB.Contact or IPM.Contact. - Close this window when done.
- Right-click on Tasks and select "Open contents table".
- Sort objects by "Message Class"
- Delete shared Tasks - these are objects with a "Message Class" of "IPM.Task.WB.Task.Shared".
NOTE: Do not delete those marked as IPM.Task.WB or IPM.Task. - Close this window when done.
- Right-click on Calendar and select "Open contents table".
- Sort objects by "Message Class"
- Delete shared Events/Appointments - these are objects with a "Message Class" of "IPM.Appointment.WB.Event.Shared".
NOTE: Do not delete those marked as IPM.Appointment.WB or IPM.Appointment - Proceed to next step
Step 4: Gather logs and send to Workbooks Support
- Open the Outlook Connector Options menu (right-click on icon in task bar)
- Go to the advanced tab.
- Configure the Logging policy to Exhaustive and apply the change.

- Close Outlook and reopen.
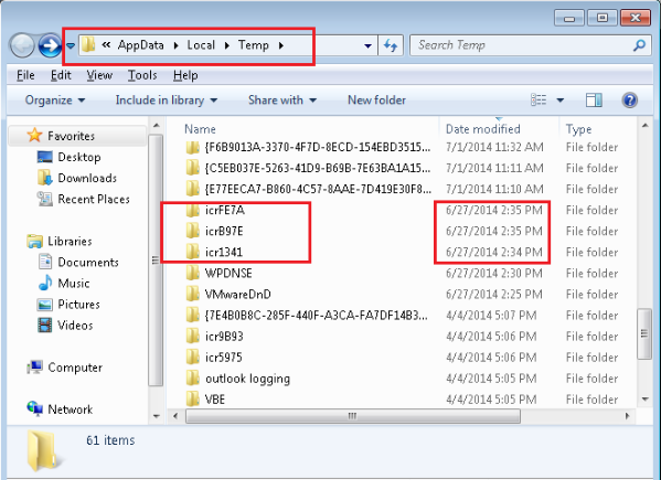
- Open the Local AppData folder (Click the Windows button and type ‘%localappdata%’, then press enter)
- Open the folder called 'Temp'
- Locate any file with a name like icrXXXX and attach to an email to support@workbooks.com.
-
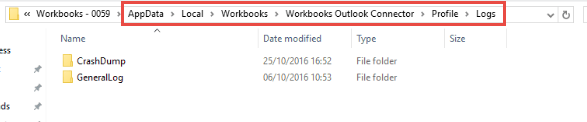
Back in the Local Appdata folder (%localappdata%), go to Workbooks > Workbooks > Outlook Connector > Profile > Logs and attach these to the email too.
![]() This was successful: Having retrieved these files please email them to support@workbooks.com.
This was successful: Having retrieved these files please email them to support@workbooks.com.
![]() This was not successful: Contact support@workbooks.com to allow the support team to assist further.
This was not successful: Contact support@workbooks.com to allow the support team to assist further.
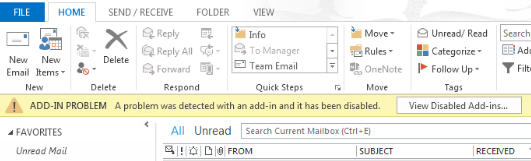
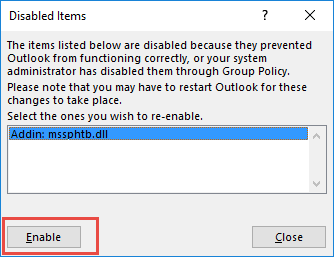
Add-in is disabled when I start Outlook
You may receive the Add-in problem warning bar when you open Outlook, as per the screenshot below. If this does not match what you are seeing, you can return to the previous list by clicking the above title again.
How do I fix this error?
Click to expand each of the steps below to find further guidance on how to complete that step.
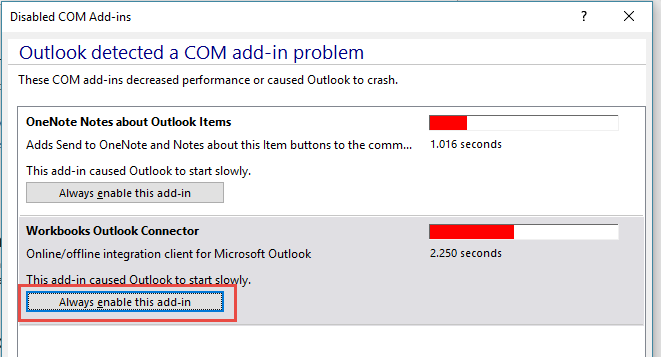
Step 1: Manage slow and disabled Add-ins
- Click on the View Disabled Add-ins... button

- Click to Always Enable the Workbooks Outlook Connector Add-in
![]() This was successful: You will now see an Outlook Connector Icon
This was successful: You will now see an Outlook Connector Icon ![]() in the bottom of your taskbar and the normal Outlook Connector functionality will be present.
in the bottom of your taskbar and the normal Outlook Connector functionality will be present.
![]() This was not successful: If you see no change or if you cannot see an option to Manage the Add-ins in this way then please move onto the next step.
This was not successful: If you see no change or if you cannot see an option to Manage the Add-ins in this way then please move onto the next step.
Step 2: Remove the Outlook Connector from the Disabled Add-ins list
- Follow the path File > Options > Add-ins > Disabled Add-ins in Outlook
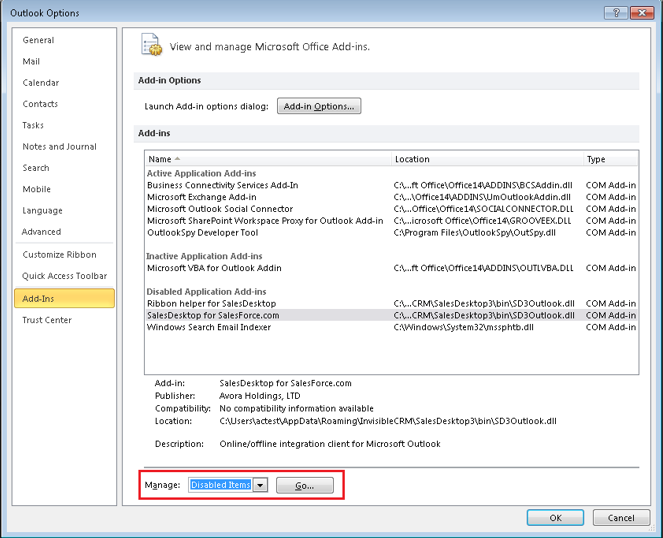
- If there is an Add-in listed that refers to the Workbooks Outlook Connector then select it and press the Enable button
![]() This was successful: You may now be able to see the Outlook Connector icon in the bottom right of your Windows Task bar.
This was successful: You may now be able to see the Outlook Connector icon in the bottom right of your Windows Task bar.
![]() This was not successful: It is more likely that this action has made the Outlook Connector available in the COM-Add-ins section of the Options window. Please follow the next step to activate it.
This was not successful: It is more likely that this action has made the Outlook Connector available in the COM-Add-ins section of the Options window. Please follow the next step to activate it.
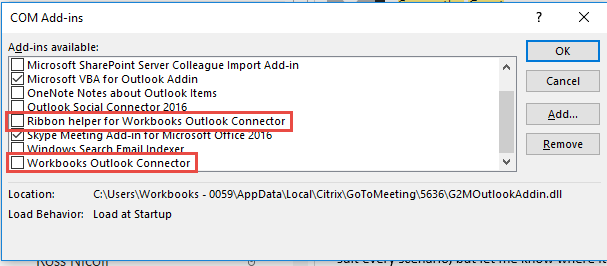
Step 3: Check that the Add-in is active within Outlook options
- Follow the path File > Options > Add-ins > COM Add-ins (Outlook 2010, 2013 or 2016), or Help > Disabled items (Outlook 2007).
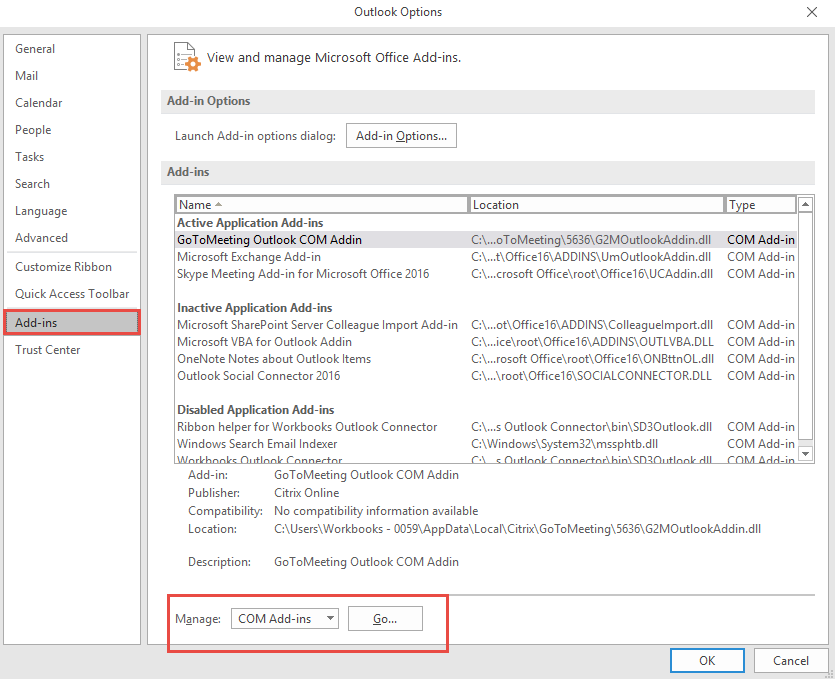
- Activate the Connector related Add-ins.
![]() This was successful: If this was successful then you will now be able to see the Connector Icon in the bottom of your Taskbar and no further actions should be needed. Although, if these steps are needing to be followed regularly, please continue to Step 4.
This was successful: If this was successful then you will now be able to see the Connector Icon in the bottom of your Taskbar and no further actions should be needed. Although, if these steps are needing to be followed regularly, please continue to Step 4.
![]() This was not successful: Please move onto the next step of this troubleshooting guide.
This was not successful: Please move onto the next step of this troubleshooting guide.
Step 4: Change the Outlook Connector Registry Key load behaviour value
Warning: Any change to the registry keys need to be carried out with care as unintended changes to these keys can have significant effects on your computer's behaviour.
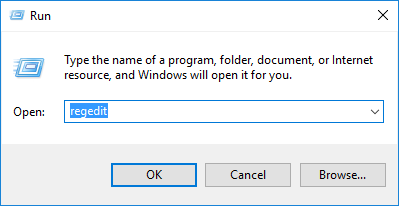
- Click on the Windows button and type ‘regedit’ to open the registry editor.
- Locate the file path HKEY_CURRENT_USER > Software > Microsoft > Office > Outlook > Addins where you will find a key that relates to the Outlook Connector.
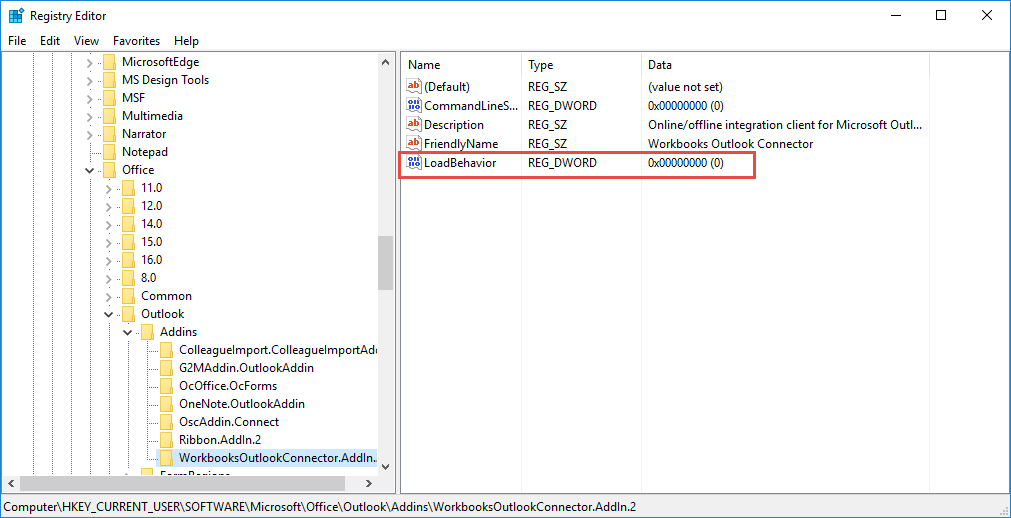
- Ensure that the Load behaviour value is 3
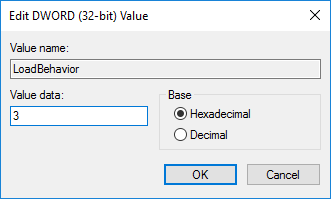
![]() This was successful: If this was successful, you should have no issues with Outlook loading the Outlook Connector add-in. This is because the hexadecimal value is the hard coding to always loading the Add-in regardless of the effect to Outlook.
This was successful: If this was successful, you should have no issues with Outlook loading the Outlook Connector add-in. This is because the hexadecimal value is the hard coding to always loading the Add-in regardless of the effect to Outlook.
![]() This was not successful: If this is not successful then please continue to the next step to gather logs which should be emailed to the Workbooks Support team for further assistance.
This was not successful: If this is not successful then please continue to the next step to gather logs which should be emailed to the Workbooks Support team for further assistance.
Step 5: Gather logs and provide to Workbooks Support
- Open the Outlook Connector Options menu (right-click on icon in task bar)
- Go to the advanced tab.
- Configure the Logging policy to Exhaustive and apply the change.
- Close Outlook and reopen.
- Open the Local AppData folder (Click the Windows button and type ‘%localappdata%’, then press enter)
- Open the folder called 'Temp'
- Locate any file with a name like icrXXXX and attach to an email to support@workbooks.com.
-
Back in the Local Appdata folder (%localappdata%), go to Workbooks > Workbooks > Outlook Connector > Profile > Logs and attach these to the email too.
![]() This was successful: Having retrieved these files please email them to support@workbooks.com.
This was successful: Having retrieved these files please email them to support@workbooks.com.
![]() This was not successful: Contact support@workbooks.com to allow the support team to assist further.
This was not successful: Contact support@workbooks.com to allow the support team to assist further.
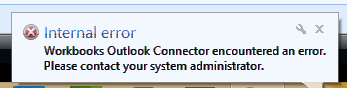
Internal Error during synchronisation
The below message is received when an outlook profile has been modified somehow to not follow the normal storage format. If this doesn't match what you are seeing, you can return to the previous list by clicking the above title again.
How do I fix this error?
Click to expand each of the steps below to find further guidance on how to complete that step.
Step 1: Use the Outlook Inbox repair tool
- Go to C:\Program Files and search for ‘Scanpst.exe’ in the search bar at the top

- Run this for the affected Outlook profile
(If multiple entries are found, the date modified will be similar to when the Mailbox was setup. If this date is not known, running all of the applications available should not cause any problems, but it is advised to ask your IT department for further assistance.)
- Run a synchronisation again.
![]() This was successful: If you no longer receive the Internal Error message, this has been successful and no further action is required.
This was successful: If you no longer receive the Internal Error message, this has been successful and no further action is required.
![]() This was not successful: If the error message is still being received and synchronisations are still not completing then please complete the next step in this troubleshooting document.
This was not successful: If the error message is still being received and synchronisations are still not completing then please complete the next step in this troubleshooting document.
Step 2: Clean up the Exchange Storage
Run a clean-up of the Exchange storage for the Outlook Connector to remove objects conflicting records from your internal storage.
IMPORTANT: Using these steps you will be affecting change in your local Offline Exchange Storage and therefore care needs to be taken to ensure that these steps are being followed exactly. If you are unsure about what to do please request that your IT department or System Administrator assist in these steps.
Download and run the MFCMAPI tool
- The latest version can be downloaded from the MFCMAPI official downloads website.
To discover which version is required (32 or 64-bit), in Outlook go to File > Office Account > About Office where the 'bit version' will be present in the top of the window
- Run the .exe. file after it has downloaded
- Proceed to Delete relevant IPC settings
Delete relevant IPC settings
- Go to Session > Logon...
- Select the profile where WOC was installed. (If prompted)
- Click OK
- Double-click on the Display Name where the WOC was installed previously (usually this is the default storage and has a value of "True" in the "Default Store" field)
- Expand the "Root" directory and the data structure of current storage will be displayed.
- Right-click on the "IPM_COMMON_VIEWS" or "Common Views" (the name of this folder depends on the storage type) and select "Open associated contents table".
- Click on the "Message Class" column header in the top half of the screen to sort by that column. (you may need to scroll across to see this column)
- Delete any entries that contain the following values in "Message Class":
- IPC.MS.REN.USERFIELDS (stores the list of custom field names for custom objects)
- IPC.SettingStore (stores the main info about data structure, types and fields)
For both of the above, the number of these entries may vary, and may not exist at all.
- Close this window when done.
- Right-click on the "IPM_COMMON_VIEWS" or "Common Views" again and select "Open contents table".
- Delete any entries with "IPM.Contact.WB..." under the "Message Class" heading. (this may be empty)
- Close this window when done.
- Right-click on the "IPM_COMMON_VIEWS" or "Common Views" again and select "Advanced > Open form container".
- Sort items by PR_MESSAGE_CLASS and delete any items that contain "WB" in it (IPM.Contact.WB.Contact, IPM.Task.WB.Task, etc.). If you see the message 'Click Session/Logon to begin', close this window.
- Close this window when done.
- Right-click on "Inbox" and choose "Open associated contents table".
- Delete any entries with the "Message Class" of "IPC.SettingsStore".
The number of these entries may vary, and may not exist at all. - Proceed to the next step.
Delete hidden folders and objects
- Expand the root of Outlook folders "Top of Outlook data file" or "IPM_SUBTREE" (the name depends on storage type).
- If present, delete the folder Facade_Hidden_Folders (stores hidden folders and objects, which are not visible to the user from within Outlook, like associations).
- Proceed to the next step.
Delete Shared Contacts, Events and Tasks
It is necessary to remove Shared Contacts, Events and Tasks as they may cause synchronisation issues, duplicates and conflicts when the Workbooks Outlook Connector is re-installed.
- Right-click on Contacts and select "Open contents table"
- Sort contacts by "Message Class".
- Delete shared WOC Contacts - these are contacts with "IPM.Contact.WB.Contact.Shared" name in "Message Class".
NOTE: Do not delete those marked as IPM.Contact.WB.Contact or IPM.Contact. - Close this window when done.
- Right-click on Tasks and select "Open contents table".
- Sort objects by "Message Class"
- Delete shared Tasks - these are objects with a "Message Class" of "IPM.Task.WB.Task.Shared".
NOTE: Do not delete those marked as IPM.Task.WB or IPM.Task. - Close this window when done.
- Right-click on Calendar and select "Open contents table".
- Sort objects by "Message Class"
- Delete shared Events/Appointments - these are objects with a "Message Class" of "IPM.Appointment.WB.Event.Shared".
NOTE: Do not delete those marked as IPM.Appointment.WB or IPM.Appointment - Proceed to next step
Step 3: Delete Profile Data from LocalAppData
- Delete the following folder from your Computer
- C:\Users%username%\AppData\Local\Workbooks\Workbooks Outlook Connector\Profile - Note: Appdata can be accessed by using the command ‘%appdata%’ from the run menu
- You should now reopen Outlook to check that the Outlook Connector is working as expected.
![]() This was successful: If this was successful, you should have no issues with during synchronisation.
This was successful: If this was successful, you should have no issues with during synchronisation.
![]() This was not successful: If you are still experiencing issues with the Outlook Connector, please continue to the next step to gather logs which need to be provided to Workbooks Support.
This was not successful: If you are still experiencing issues with the Outlook Connector, please continue to the next step to gather logs which need to be provided to Workbooks Support.
Step 4: Gather logs and provide to Workbooks Support
- Open the Outlook Connector Options menu (right-click on icon in task bar)
- Go to the advanced tab.
- Configure the Logging policy to Exhaustive and apply the change.
- Close Outlook and reopen.
- Open the Local AppData folder (Click the Windows button and type ‘%localappdata%’, then press enter)
- Open the folder called 'Temp'
- Locate any file with a name like icrXXXX and provide to your System Administrator.
-
Back in the Local Appdata folder (%localappdata%), go to Workbooks > Workbooks > Outlook Connector > Profile > Logs and provide these folders to your System Administrator too.
![]() This was successful: Having retrieved these files please provide them to your System Administrator and ask them to email support@workbooks.com with this information.
This was successful: Having retrieved these files please provide them to your System Administrator and ask them to email support@workbooks.com with this information.
![]() This was not successful: Contact your System administrator and ask them to contact support@workbooks.com to allow the support team to assist further.
This was not successful: Contact your System administrator and ask them to contact support@workbooks.com to allow the support team to assist further.
Unable to uninstall the Outlook Connector
Please select the option below that best describes the error you are receiving.
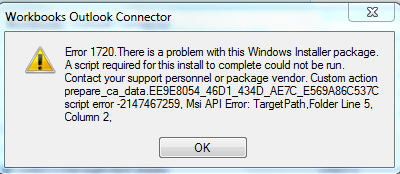
Error 1720. There is a problem with this Windows Installer package
When trying to remove the Outlook Connector from your computer, sometimes the process will not complete and will display ‘error 1720’. If this doesn't match what you are seeing, you can return to the previous list by clicking the above title again.
How do I fix this error?
Click to expand each of the steps below to find further guidance on how to complete that step.
NOTE: It is advised that these steps are carried out as an Administrator on your device. If you have limited access please ask your IT department to complete the troubleshooting steps below.
Step 1: Uninstall as an Administrator
To run the uninstallation sometimes it is necessary to be running the process as an Administrator. Attempt the uninstall by logging in as an Administration User instead.
![]() The uninstall is successful: No further action is required.
The uninstall is successful: No further action is required.
![]() The uninstall is not successful: Proceed to the next step.
The uninstall is not successful: Proceed to the next step.
Step 2: Repair the Outlook Connector Installation and try again
- Open the Control Panel on your computer
- Go to Add/Remove programs
- Find Workbooks Outlook Connector in the list
- Right-click on the entry and choose the repair option

- After the repair has completed, choose the Uninstall option

![]() The uninstall is successful: No further action is required.
The uninstall is successful: No further action is required.
![]() The uninstall is not successful: Proceed to the next step.
The uninstall is not successful: Proceed to the next step.
Step 3: Manually remove the Workbooks Outlook Connector from your computer
NOTE: Manipulating registry keys has the potential to change behaviour on your device. Workbooks would always suggest that if you are not confident in doing this to ask your IT department for assistance.
- Open the registry editor (regedit) from the run menu (Start > search for 'Run')
- Delete the registry keys with the following values:
- HKEY_LOCAL_MACHINE\SOFTWARE\Microsoft\Windows\CurrentVersion\Uninstall{58A3BAAD-C4BB-44C6-8296-C61D254DEE9A}
- HKEY_LOCAL_MACHINE\SOFTWARE\Workbooks\Workbooks Outlook Connector
- HKEY_CURRENT_USER\Software\Microsoft\Installer\Products\6C23472FD24DD5848A07F07348D0C5FD [NOTE - the directory may not be named exactly this, check for Workbooks in the registry]
- HKEY_CURRENT_USER\Software\Workbooks\Workbooks Outlook Connector
NOTE: If you are having trouble locating any of these Registry keys then use Ctrl + F and search for ‘Workbooks’. Delete every folder you can find referring to the ‘Workbooks Outlook connector’ or the ‘Ribbon helper for Workbooks Outlook Connector’
- Delete the following folders from your Computer
- C:\Program Files\Workbooks\Workbooks Outlook Connector
- C:\Users%username%\AppData\Local\Workbooks\Workbooks Outlook Connector - Note: Appdata can be accessed by using the command ‘%appdata%’ from the run menu
- Start a command line cmd.exe from a Run menu
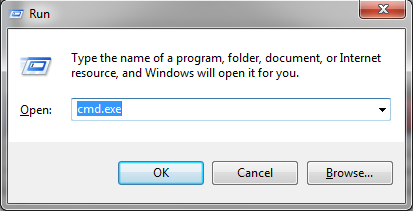
- Unregister the DLL Libraries by executing the commands below
- regsvr32 /u "C:\Program Files\Workbooks\Workbooks Outlook Connector\bin\SD3Outlook.dll"
- regsvr32 /u "C:\Program Files\Workbooks\Workbooks Outlook Connector\bin\Workbooks Unified Connector.dll"
![]() This was successful: The Outlook Connector will now be completely removed from your device.
This was successful: The Outlook Connector will now be completely removed from your device.
![]() This was not successful: If for any reason there is evidence that there is an Outlook Connector presence remaining on the computer please contact the Support team so that they can organise a Screen share to allow for further investigations.
This was not successful: If for any reason there is evidence that there is an Outlook Connector presence remaining on the computer please contact the Support team so that they can organise a Screen share to allow for further investigations.
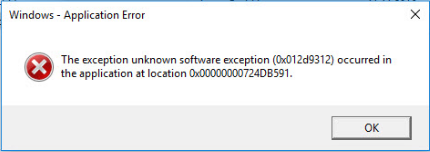
Exception unknown software exception (0x012d9312)
When uninstalling the Outlook Connector an error message that reads something like ‘The exception unknown software exception (0x012d9312) occurred in the application at location 0x55B128F2.’ is generated. If this does not match what you are seeing, you can return to the previous list by clicking the above title again.
How do I fix this error?
Click to expand each of the steps below to find further guidance on how to complete that step.
Step 1: Continue with Uninstall by clicking the OK button on the error message
Even though an error message is being shown the uninstall process should be able to continue and complete regardless. Press the OK button and allow the process to continue.
Step 2: Repair the Outlook Connector Installation and try again
- Open the Control Panel on your computer
- Go to Add/Remove programs
- Find Workbooks Outlook Connector in the list
- Right-click on the entry and choose the repair option
- After the repair has completed, choose the Uninstall option
![]() The uninstall is successful: No further action is required.
The uninstall is successful: No further action is required.
![]() The uninstall is not successful: Proceed to the next step.
The uninstall is not successful: Proceed to the next step.
Step 3: Manually remove the Workbooks Outlook Connector from your computer
NOTE: Manipulating registry keys has the potential to change behaviour on your device. Workbooks would always suggest that if you are not confident in doing this to ask your IT department for assistance.
- Open the registry editor (regedit) from the run menu (Start > search for 'Run')
- Delete the registry keys with the following values:
- HKEY_LOCAL_MACHINE\SOFTWARE\Microsoft\Windows\CurrentVersion\Uninstall{58A3BAAD-C4BB-44C6-8296-C61D254DEE9A}
- HKEY_LOCAL_MACHINE\SOFTWARE\Workbooks\Workbooks Outlook Connector
- HKEY_CURRENT_USER\Software\Microsoft\Installer\Products\6C23472FD24DD5848A07F07348D0C5FD [NOTE - the directory may not be named exactly this, check for Workbooks in the registry]
- HKEY_CURRENT_USER\Software\Workbooks\Workbooks Outlook Connector
NOTE: If you are having trouble locating any of these Registry keys then use Ctrl + F and search for ‘Workbooks’. Delete every folder you can find referring to the ‘Workbooks Outlook connector’ or the ‘Ribbon helper for Workbooks Outlook Connector’
- Delete the following folders from your Computer
- C:\Program Files\Workbooks\Workbooks Outlook Connector
- C:\Users%username%\AppData\Local\Workbooks\Workbooks Outlook Connector - Note: Appdata can be accessed by using the command ‘%appdata%’ from the run menu
- Start a command line cmd.exe from a Run menu
- Unregister the DLL Libraries by executing the commands below
- regsvr32 /u "C:\Program Files\Workbooks\Workbooks Outlook Connector\bin\SD3Outlook.dll"
- regsvr32 /u "C:\Program Files\Workbooks\Workbooks Outlook Connector\bin\Workbooks Unified Connector.dll"
![]() This was successful: The Outlook Connector will now be completely removed from your device.
This was successful: The Outlook Connector will now be completely removed from your device.
![]() This was not successful: If for any reason there is evidence that there is an Outlook Connector presence remaining on the device please contact the Support team so that they can organise a Screen share to allow for further investigations.
This was not successful: If for any reason there is evidence that there is an Outlook Connector presence remaining on the device please contact the Support team so that they can organise a Screen share to allow for further investigations.
None of the above
Escalate to Workbooks Support via the Authorised Support Contact procedures.
Workbooks Support can be contacted on 0118 3030 101 or by emailing support@workbooks.com.
I'm not receiving an error message but it's not working as expected
Select from the list below the item which best describes the issue.
There is no Outlook Connector Icon in my Task bar or the ribbon used to share items is missing
There will be no error message associated with this, but you will notice the following symptoms
- You do not see the ribbon to share items.
- The icon
.gif) is not in the task bar.
is not in the task bar. - The first run assistance does not open (after first time installing).
How do I fix this error?
Click expand each of the steps below to find further guidance on how to complete that step.
Step 1: Manage slow and disabled Add-ins using Microsoft Outlook Development tools
Microsoft Outlook monitors Add-ins and disables those that take longer to load, this is an effort to improve the performance. It is possible that the Outlook Connector has been captured by this process. To permanently enable this Add-in
- Follow the path File > Info > Slow and Disabled add-ins
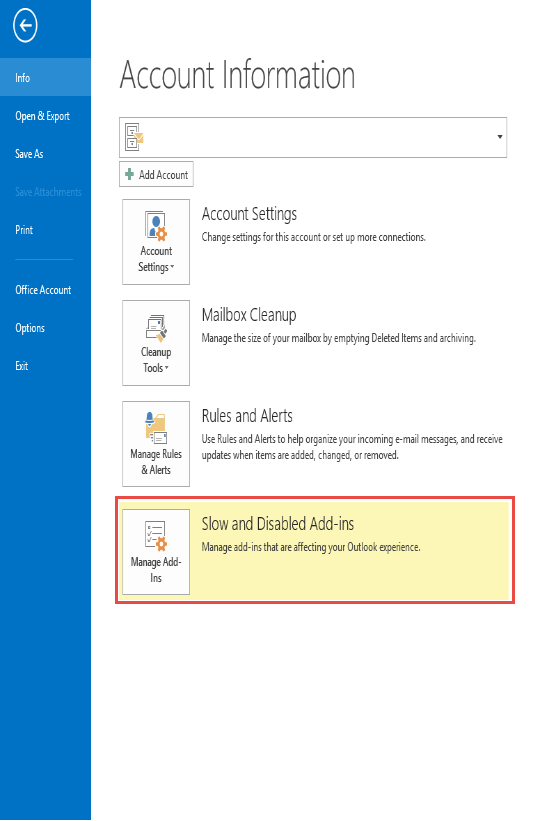
- Enable the Workbooks Outlook Connector for Outlook Add-in

![]() This was successful: You will now see an Outlook Connector Icon in the bottom of your taskbar and the normal Outlook Connector functionality will be present.
This was successful: You will now see an Outlook Connector Icon in the bottom of your taskbar and the normal Outlook Connector functionality will be present.
![]() This was not successful: If you see no change or if you cannot see an option to Manage the Add-ins in this way then please move onto Step 2.
This was not successful: If you see no change or if you cannot see an option to Manage the Add-ins in this way then please move onto Step 2.
Step 2: Remove the Outlook Connector from the Disabled Add-ins list
- Follow the path File > Options > Add-ins > Disabled Add-ins in Outlook
- If there is an Add-in listed that refers to the Workbooks Outlook Connector then select it and press the Enable button
![]() This was successful: You may now be able to see the Outlook Connector icon in the bottom right of your Windows Task bar.
This was successful: You may now be able to see the Outlook Connector icon in the bottom right of your Windows Task bar.
![]() This was not successful: It is more likely that this action has made the Outlook Connector available in the COM-Add-ins section of the Options window. Please follow step 3 to activate it.
This was not successful: It is more likely that this action has made the Outlook Connector available in the COM-Add-ins section of the Options window. Please follow step 3 to activate it.
Step 3: Check that the Add-in is active within Outlook options
- Follow the path File > Options > Add-ins > COM Add-ins (Outlook 2010, 2013 or 2016), or Help > Disabled items (Outlook 2007).
- Activate the Connector related Add-ins.
![]() This was successful: If this was successful then you will now be able to see the Connector Icon in the bottom of your Taskbar and no further actions should be needed. Although, if these steps are needing to be followed regularly, please continue to Step 4.
This was successful: If this was successful then you will now be able to see the Connector Icon in the bottom of your Taskbar and no further actions should be needed. Although, if these steps are needing to be followed regularly, please continue to Step 4.
![]() This was not successful: Please move onto the next step of this troubleshooting guide.
This was not successful: Please move onto the next step of this troubleshooting guide.
Step 4: Change the Outlook Connector Registry Key load behaviour value
Warning: Any change to the registry keys need to be carried out with care as unintended changes to these keys can have significant effects on your computer's behaviour.
- Click on the Windows button and type ‘regedit’ to open the registry editor.
- Locate the file path HKEY_CURRENT_USER > Software > Microsoft > Office > Outlook > Addins where you will find a key that relates to the Outlook Connector.
- Ensure that the Load behaviour value is 3
![]() This was successful: This hexadecimal value is the hard coding for always loading the Add-in regardless of the effect to Outlook. Therefore, this means that when next opening Outlook the Connector Add-in should load as normal.
This was successful: This hexadecimal value is the hard coding for always loading the Add-in regardless of the effect to Outlook. Therefore, this means that when next opening Outlook the Connector Add-in should load as normal.
![]() This was not successful: If this is not successful then please carry out the next steps in which you will be gathering logs to provide to your System Administrator, allowing them to contact the Workbooks Support team for further assistance.
This was not successful: If this is not successful then please carry out the next steps in which you will be gathering logs to provide to your System Administrator, allowing them to contact the Workbooks Support team for further assistance.
Step 5: Gather logs and send to Workbooks Support
- Open the Outlook Connector Options menu (right-click on icon in task bar)
- Go to the advanced tab.
- Configure the Logging policy to Exhaustive and apply the change.
- Close Outlook and reopen.
- Open the Local AppData folder (Click the Windows button and type ‘%localappdata%’, then press enter)
- Open the folder called 'Temp'
- Locate any file with a name like icrXXXX and attach to an email to support@workbooks.com
-
Back in the Local Appdata folder (%localappdata%), go to Workbooks > Workbooks > Outlook Connector > Profile > Logs and attach these to the email too.
![]() This was successful: Having retrieved these files please email them to support@workbooks.com.
This was successful: Having retrieved these files please email them to support@workbooks.com.
![]() This was not successful: Contact support@workbooks.com to allow the support team to assist further.
This was not successful: Contact support@workbooks.com to allow the support team to assist further.
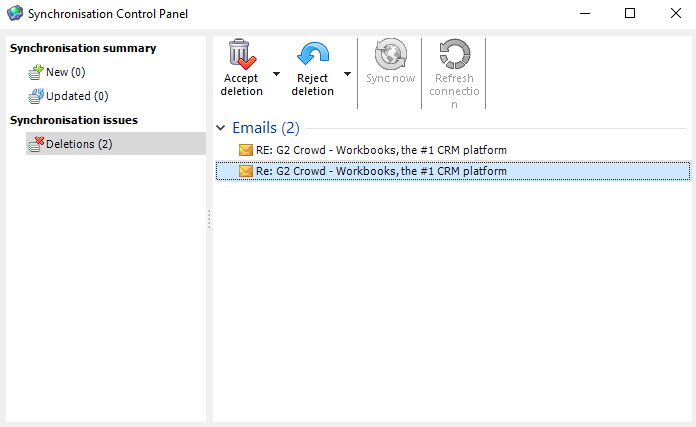
Emails are not syncing, but I can still see the Share Email Banner
The most common cause of this is that there is an unresolved deletion. If you have deleted a previously synchronised meeting or task from either Workbooks or Outlook, you need to confirm whether or not you want to accept this and remove it from the other program.
Resolution steps:
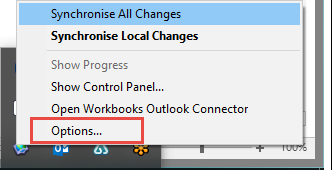
Step 1: Open Synchronisation Control Panel
Right click on the Connector icon on the bottom right of your Windows Task bar and choose Show Control Panel...;
Step 2: Resolve Deletions
From here you will see that there is a section marked as ‘Deletions’; you will need to either accept or reject the deletion before you are able to run the next synchronisation. Once these have been resolved you may find that you have a number of a Collisions that have been caused by data not syncing for some time.
Please note the Outlook Connector will not have performed a sync until this was resolved, so the first sync may take some time to run completely.
Meetings disappear from Outlook after completing them
Sometimes when running a synchronisation Meetings seem to be removed from the Calendar. This is normal behaviour for the Outlook Connector but the behaviour can be changed to suit your business/workflow needs.
The Outlook Connector synchronises Meetings in Workbooks with Outlook by applying the filters within the Settings of the Outlook Connector. There is a native filter applied when synchronising Meetings that only Meetings in an open state are to be synchronised. This means that when a Meeting is marked as Complete in Workbooks, it is given a state of Closed and will be removed from your Outlook Calendar.
How do I amend this behaviour?
Click to expand each of the steps below to find further guidance on how to complete that step.
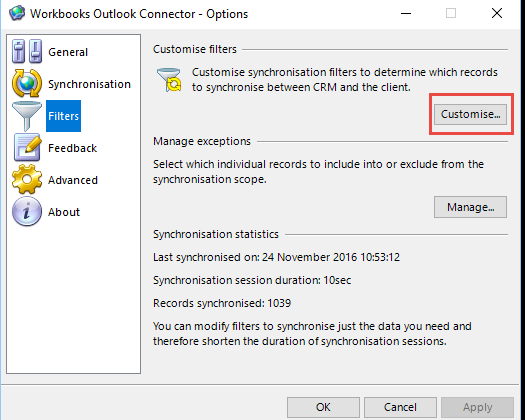
Step 1: Open Synchronisation Control Panel
- Right click on the Connector icon on the bottom right of your Windows Task bar and choose Options;
- Go to the Filters sub-menu and select the Customise filters option;
Step 2: Amend Meeting filters
- Click on Meetings in the left menu
- Delete the Filter 'Record state = open'
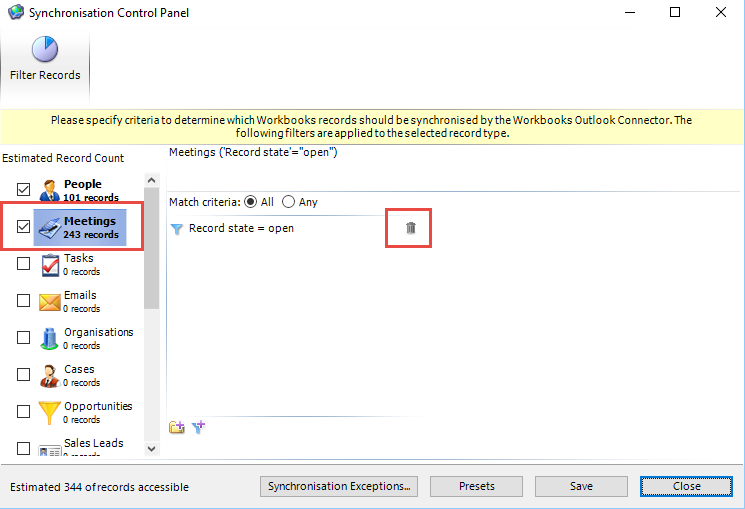
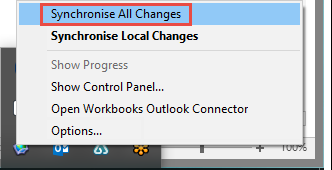
The next time the Outlook Connector runs a synchronisation the meetings will appear back in Outlook. You can manually run a synchronisation by using the Synchronise All Changes option when right clicking on the Outlook Connector icon in your system tray.
NOTE: If Meetings are used extensively in Workbooks then it is likely that a large amount of Meetings will be synced affecting Performance of the Outlook Connector.
Tasks disappear from Outlook after completing them
Sometimes when running a synchronisation Tasks seem to be removed from the Calendar. This is normal behaviour for the Outlook Connector but the behaviour can be changed to suit your business/workflow needs.
The Outlook Connector synchronises Tasks in Workbooks with Outlook by applying the filters within the Settings of the Outlook Connector. There is a native filter applied when synchronising Tasks that only Tasks in an open state are to be synchronised. This means that when a Task is set to Complete in Workbooks it is given a state of Closed and will be removed from your Outlook To-do list.
How do I amend this behaviour?
Click to expand each of the steps below to find further guidance on how to complete that step.
Step 1: Open Synchronisation Control Panel
- Right click on the Connector icon on the bottom right of your Windows Task bar and choose Options;
- Go to the Filters sub-menu and select the Customise filters option;
Step 2: Amend Task filters
- Click on Tasks in the left menu
- Delete the Filter 'Record state = open'
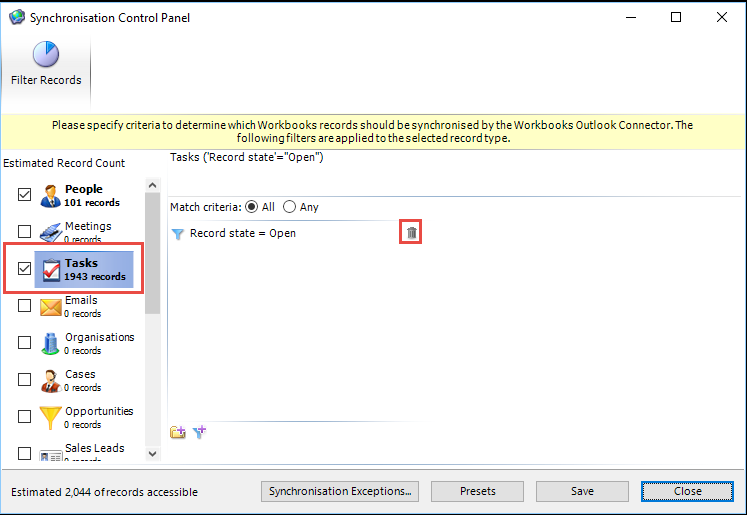
The next time the Outlook Connector runs a synchronisation the Tasks will appear back in Outlook. You can manually run a synchronisation by using the Synchronise All Changes option when right clicking on the Outlook Connector icon in your system tray.
NOTE: If Tasks are used extensively in Workbooks then it is likely that a large amount of Tasks will be synced affecting Performance of the Outlook Connector.
None of the above
Escalate to Workbooks Support via the Authorised Support Contact procedures.
Workbooks Support can be contacted on 0118 3030 101 or by emailing support@workbooks.com.
I would like to know how to install or use the Outlook Connector
Please select from the options below:
Installing the Outlook Connector
You can find further information about installing the Outlook connector by reading our Installation Guide or watching our video below:
Using the Outlook Connector
You can find further information about using the Outlook connector by visiting the Using the Outlook Connector page or by watching our video below: