- Welcome to the Knowledge Base
- Introduction
- Training
- Getting Started
- Preferences
- Activities
- Cases
- Forecasts & Quotas
- Importing Data
- Leads
-
Marketing
- Introduction to Marketing
- Marketing Campaigns
- Mailing Lists
- Products
- Mailshots
- Upload Library
- Templates
- Event Management
- Compliance Records
-
Spotler Integration
- What is Spotler?
- Navigating your Spotler homepage
- GatorMail
-
GatorLeads / Web Insights
- Tracking Code
- Setting up the Plugin
- Viewing Web Insights Data on your Form Layouts
- Domain Names and Online Activities
- Reporting incorrect Leads created through Web Insights
- Reporting on Web Insights data
- Using UTM Values
- Why aren’t Online Activities being created in the database?
- Why is GatorLeads recording online activities in a foreign language?
- GatorSurvey
- GatorWorkflow
- GatorPopup
- Opportunities
-
Integrations
- Mapping
- Electronic Signing Tools
- Creditsafe Integration
-
Zapier
- Introduction to Zapier
- Available Triggers and Actions
- Linking your Workbooks Account to Zapier
-
Setting up Zaps
- Posted Invoices to Xero Invoices
- Xero payments to Workbooks Tasks
- New Case to Google Drive folder
- New Case to Basecamp Project
- New Workbooks Case to JIRA Ticket
- Jira Issue to new Case
- 123FormBuilder Form Entry to Case
- Eventbrite Attendee to Sales Lead and Task
- Facebook Ad Leads to Sales Leads
- Wufoo Form Entry to Sales Lead
- Posted Credit Note to Task
- QuickBooks Online
- Survey Monkey responses to Tasks
- Multistep Zaps
-
Email Integrations
- Email Dropbox
- Workbooks Exchange Server Sync
- Workbooks Outlook Connector
- RevenueGrid Intelligence and Engage
-
Event & Webinar Integration Tools
- GoToWebinar
- ON24
- Microsoft Office
-
Outreach
- Installation
- Outreach Authentication
- Sync People to Outreach Prospects
- Sync Organisations to Outreach Accounts
- Sync Workbooks Opportunities to Outreach
- Sync Tasks/Activities from Workbooks to Outreach
- Sync Outreach Sequences to Workbooks
- Sync Outreach Sequence States to Workbooks
- Sync Outreach Sequence Step Numbers to Workbooks
- Sync Prospects/Accounts/Opportunities from Outreach to Workbooks
- Sync Outreach Tasks/Calls/Meetings to Workbooks
- Scribe/Workbooks Connector
- RingCentral
- Auditing
- Comments
- People & Organisations
- Projects
-
Reporting
- Introduction to Reporting
- Using Reports
- Charts
- Exporting Reports
- Advanced Reporting
- Report Snapshots
- Dashboards
-
Transaction Documents
-
Introduction to Transaction Documents
- Displaying & Adding Transaction Documents
- Copying Transaction Documents
- Transaction Documents Fields Help
- Transaction Documents Line Items Help
- Printing & Sending Transaction Documents
- Managing Transaction Document Currencies
- Managing Transaction Document Statuses
- Setting a Blank Default Currency on Transaction Documents
- Credit Notes
- Customer Orders
- Invoices
- Quotations
- Supplier Orders
- Contract Management
- Sagelink
-
Introduction to Transaction Documents
- Auditing
-
Configuration
- Introduction to System Administration
- Users & Security
- Preferences
- Database
- Accounting
- Email & Integration
-
Customisation
- Creating & Modifying Picklists
- Theme
-
Record Types
- Creating Custom Fields
- Report-based Custom Fields
- Linked Fields & Reference Fields
- Record Templates
- Form Layouts
- Customising relationships between parties
- Opportunity Stages
- Custom Records
- Automation
- PDF Configuration
- Contact Support
- Releases & Roadmap
How to Record Relationships with your Own Organisation
Creating Relationships between a third party and your Own Organisation
Tip
Searching for “ORG-1” in the Search box will find the first Own Organisation created.
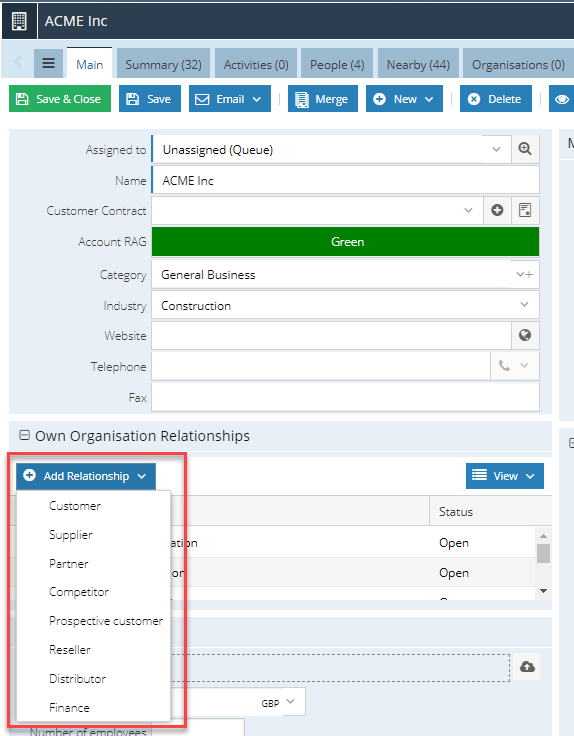
Workbooks allows you to create relationships between an Organisation/Person and your Own Organisation. You can mark an Organisation as being a:
- Customer
- Supplier
- Partner
- Competitor
- Prospective customer
- Reseller
- Distributor
- Finance
Alternatively, you can create your own custom relationship. For example, ABC Company is a Subsidiary of Workbooks Online Limited.
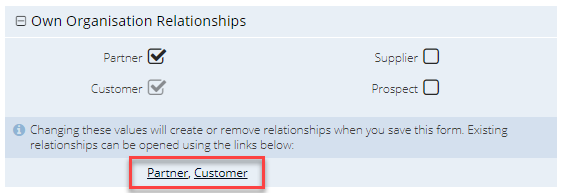
If you are using the checkbox view, which can be change by going into Database Settings, you can still create a relationship; Open the record for the Organisation or Person with whom you want to record a relationship. Click in the checkbox next to Partner, Supplier, Customer or Prospect as appropriate and click "Save". You can choose one or many of these classifications as the same Organisation or Person could have more than one type of relationship with your Own Organisation. Once you've saved the record, you'll notice a series of links appear below the help text. You can click these links to open up the Relationship record and add additional information as shown above.
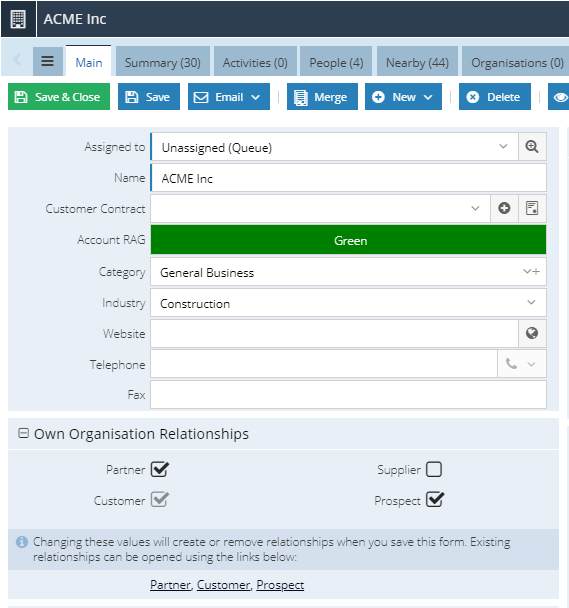
NOTE: In order to set these checkboxes you need the relevant Capabilities. Ask your System Administrator to make sure you've been granted the Capability to Relate own organisation CRM partner/supplier/customer, as appropriate. You don't need any specific Capability to tick the box next to Prospect. If you don't have these capabilities then these checkboxes will be greyed out and non-editable.
Relationship Status
NOTE: The Relationship Status of a Relationship record is not automatically populated based on the valid from and valid until dates, this will need to be manually changed. You may wish to consider creating an Activity record with a Reminder for the day the relationship expires so that it can be updated.
The status of a Relationship controls whether a user can create a Transaction Document against their Own Organisation. If an Organisation is marked as a Customer or Supplier, you can raise an Order, Invoice, Credit Note, Contract or Supplier Order against that Organisation providing they have a valid "Customer" or "Supplier" relationship i.e. the status is set to "Open". If the status is set to "Awaiting approval", "Suspended" or "Closed" you will be able to create the order and save it as a DRAFT order but you will not be able to POST the order. Workbooks will prompt you if this is the case, showing the following message:

NOTE: You can override this restriction if you wish by clicking in the "Customer Checks" section within Database Settings.
Switching between Grid view and Checkbox View
Within Database Settings the view of which you see Own Organisation Relationships can be changed within Database Settings

- Checkboxes in the Main tab.
- Grid in the Main tab (create new relationships without prompting) - Turns off the Relationship record prompt and simply creates the specified relationship between two records. The Relationship Status will automatically default to open.
- Grid in the Main tab (prompt for details when creating new relationships) - You will be prompted with a relationship record if you select this option. This allows you to populate any custom fields that you might have previously created.
- In the Organisations tab
If you are using the grid view, this can be customised to show any custom fields that exist on the Party Relationships record type in exactly the same way as Landing Pages and Line Item grid views.
NOTE: If you have created any custom Form Layouts on People or Organisations, you will need to review the positioning of fields after you have changed this setting to ensure the layout appears as you'd expect.
Creating Relationships between Own Organisations
Finally, Workbooks allows you to create relationships between two Own Organisations. This is useful if you want to relate different branches together, for example, My Organisation and My Organisation Australia.
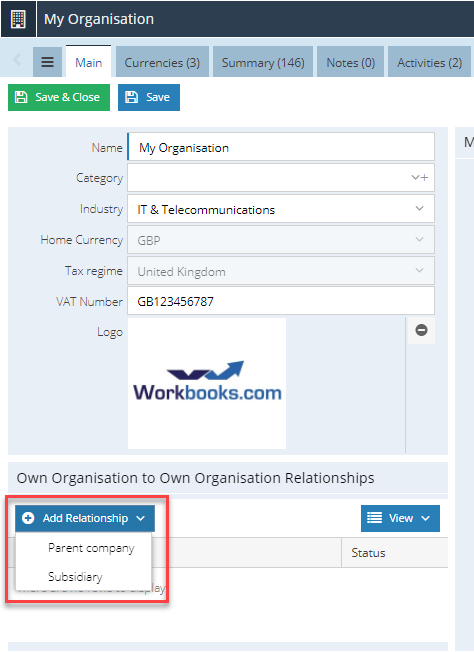
To utilise this type of relationship, open up your Own Organisation record either by searching for your company or from the Configuration landing page (Start > Configuration > Accounting > Own Organisation). Within the grid view on the main tab of the record, click "Add Relationship". You'll be presented with two standard options "Parent Company" and "Subsidiary". You can add more values to this list if you wish from the configuration landing page as described here.
If you are creating a relationship between two Own Organisations, you'll need to ensure that you have permission to access both records. Your System Administrator can arrange this for you and more information is available here on how to achieve this.
Removing Own Organisation Relationships
It is not possible to delete a Customer / Supplier relationship if you have Transaction Documents on which the Person / Organisation is the Customer / Supplier.
If your System Administrator has configured your database to use the grid view of Party Relationships, you'll need to click on the relationship to open it, then click "Delete".
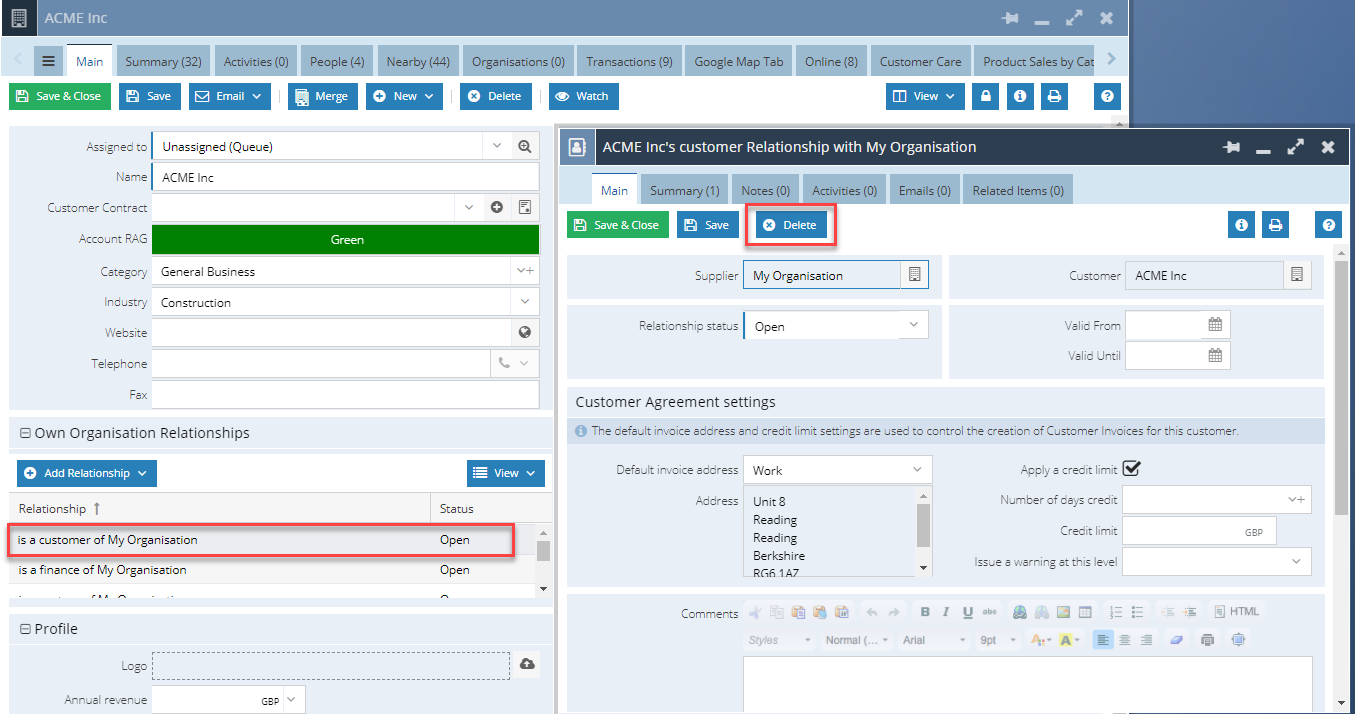
If you are using the Checkbox view, click on the relevant link underneath the checkboxes to open the relationship. Then click "Delete".
