


Setting up the WESS
How to get started with setting up and using the WESS, including configuring your exchange server, usernames, passwords and Impersonation Users.
- Purchasing the Exchange Sync license
- Activating the WESS module
- Setting up the Exchange Sync
- Users
- Configuration
- Databases
- Instructions for IT
- Checklist
- Configuring your Exchange Server
- Finding your Exchange Web Services URL
- Configuring usernames, passwords and Impersonation Users
- User preferences
Purchasing the Exchange Sync licence
The WESS license must be purchased as an add-on module per user – more information on the pricing of this can be found on our website here, or you can contact our sales team.
Activating the WESS module
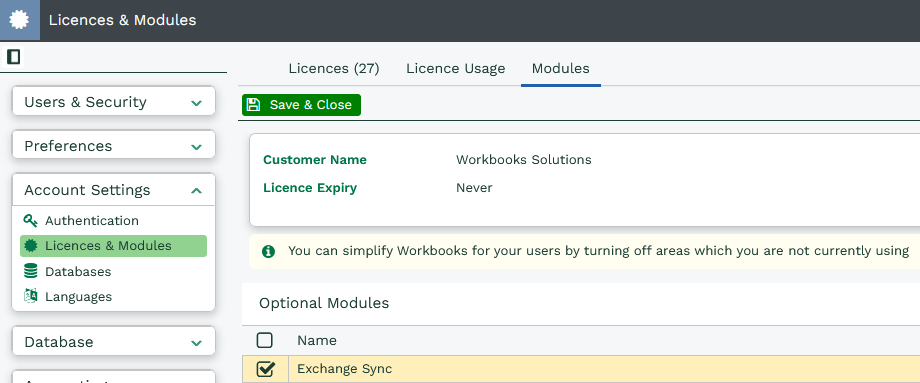
Once the license has been purchased, the corresponding module must be enabled in Workbooks. Go to Start > Configuration > Account Settings > Licenses and Modules and navigate to the Modules tab. Tick the checkbox next to ‘Exchange Sync’ and click Save & Close.
Setting up the Exchange Sync
After enabling the module on your database, access the Exchange Sync admin panel by going to Start > Configuration > Email & Integration > Exchange Sync. Here you will be presented with a screen asking you if you would like to connect your database to the Exchange Sync Service – click ‘Yes’ to continue:

The next page will confirm that the connection has been successful, click continue to move on. You will then be presented with your Users tab, which will be empty for now.
You will notice three tabs across the top of the page:
- Users – here you can remove and amend Users’ WESS access, and see at a glance what their sync status is.
- Configuration – this is where you control how your Users log into the WESS, set up an Impersonation User, and view your Users’ sync statuses.
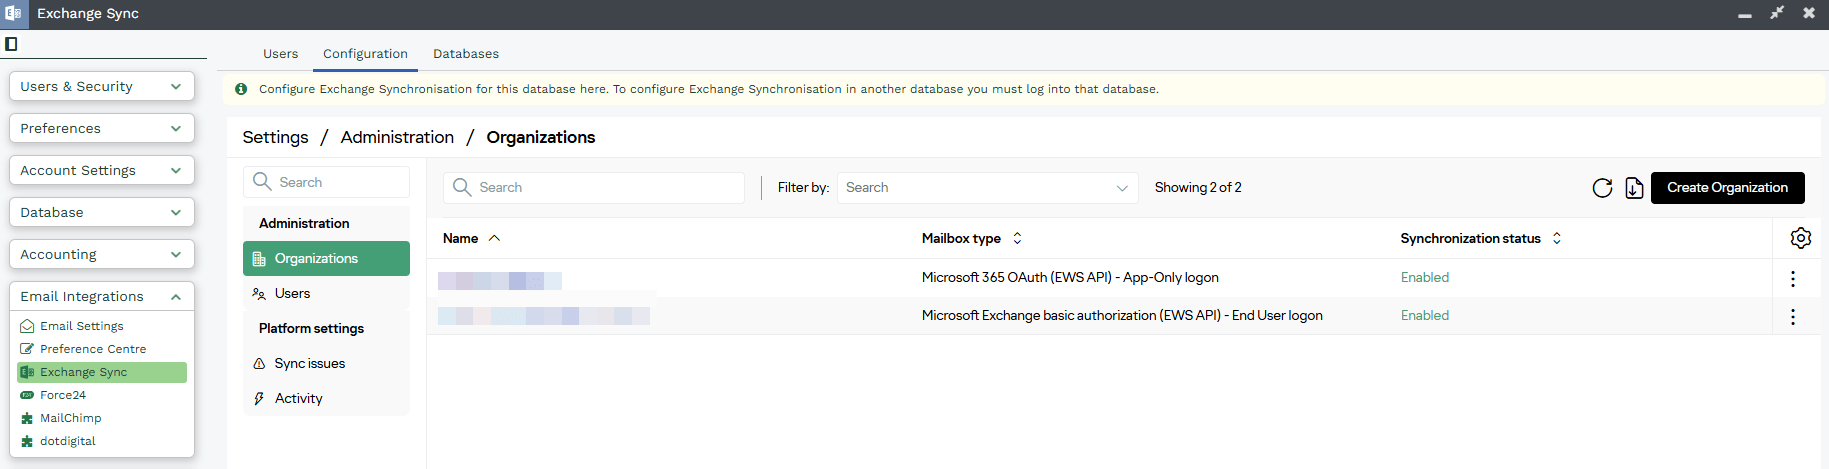
- Databases – this tab details what databases you have that are configured to access the WESS – having more than one database connected to the WESS, whilst technically possible if you have the same Microsoft tenant, it is not recommended.
Users tab
The Users tab displays a list of all Users with an Exchange Sync License, and details whether or not their sync is enabled or disabled, along with a sync status column allowing you to monitor any errors that may occur.
Note
NOTE: When adding users to the WESS it is important to check that the user already exists within Workbooks. If a user is present in the WESS before adding them in Workbooks it causes an error. Please see here to resolve issue. Always add users in Workbooks before WESS.
If the User already exists in Workbooks (Start > Configuration > Users & Security > Users) then you will be to add Users by clicking on the ‘Add Users’ button in the top left, which will open a new window showing all of the Users on your database – you can select multiple Users at once in order to assign Exchange Sync licenses en masse.
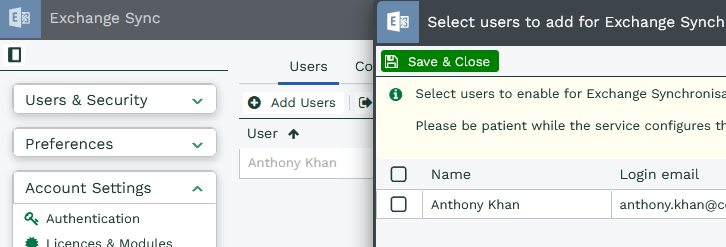
Once a User has been selected, they will appear in the list on the Users tab and will be greyed out if their sync is disabled. You can remove Users from the WESS by scrolling across to the right of the Users tab and clicking the X button.
You will then be presented with a number of sections as shown below –
- Users – this section contains much more detailed information than the aforementioned Users tab, including details of any errors that may have occurred, and if they are initialised or not. We recommend using this section for information only, and making any changes to Users via the main Users tab as previously detailed.
- Statistics – here you can find further information on your WESS Users; how many items were last synced,
- Activity – this contains logs of every change made via the WESS Admin Panel, such as changing how Users access the Exchange Sync.
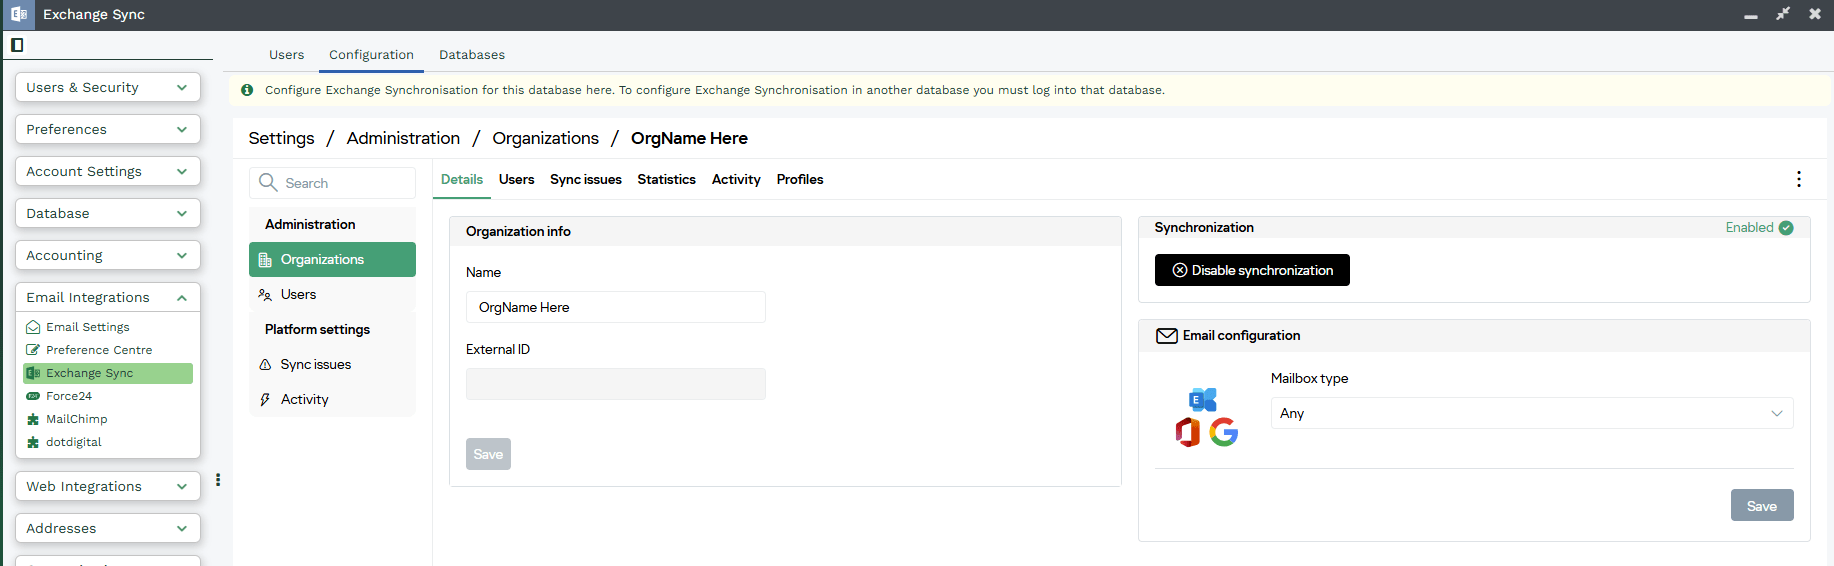
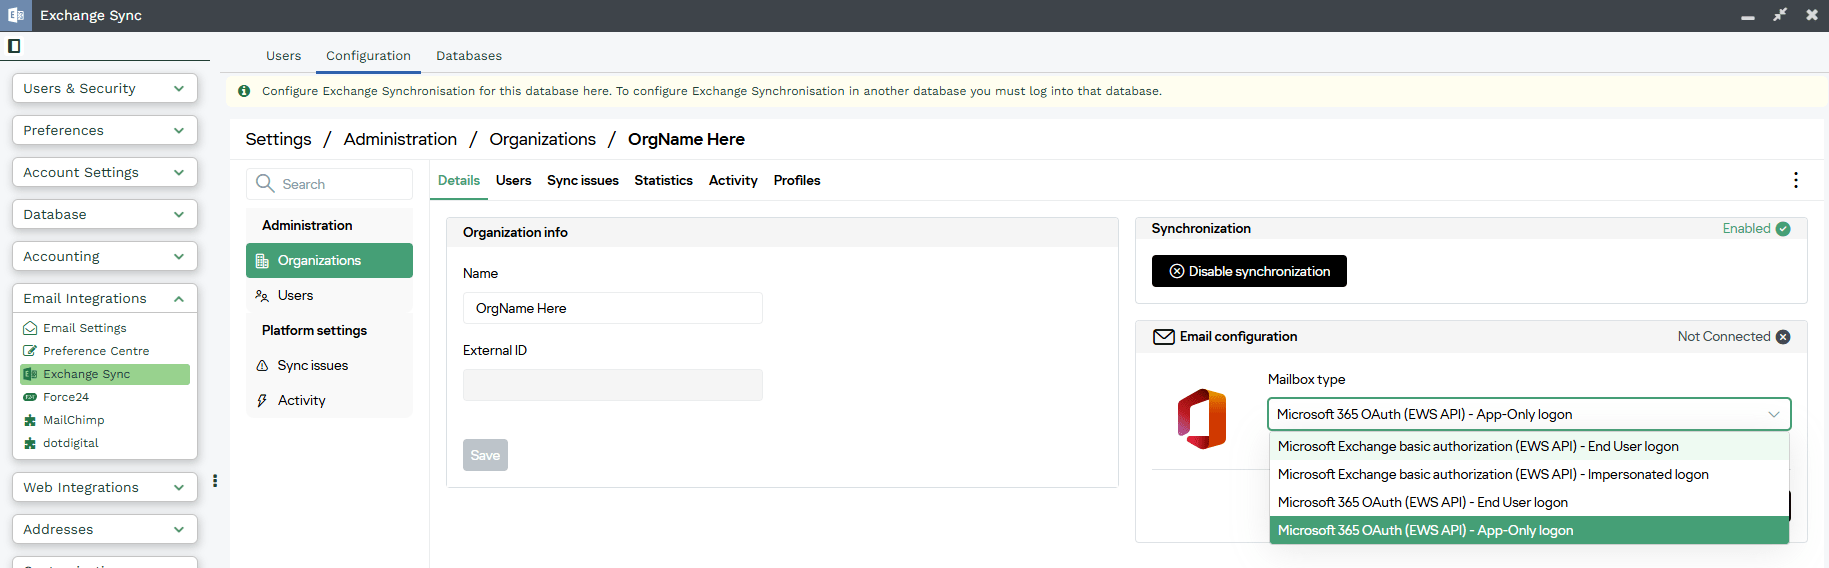
- Email Configuration – this section is where you will determine how your Users will access the Exchange Sync; the WESS supports four authorisation types,
- Microsoft Exchange basic authorization (EWS API) – End User logon(only works for On-premise solutions, please refer to Deprecation of Basic authentication in Exchange Online | Microsoft Learn ),
- Microsoft Exchange basic authorization (EWS API) – Impersonated logon (only works for On-premise solutions, please refer to Deprecation of Basic authentication in Exchange Online | Microsoft Learn
- Microsoft 365 OAuth (EWS API) – End User logon
- Microsoft 365 OAuth (EWS API) – App-Only logon.
More detail on each of these can be found here.
- Customisations – this is the home of your WESS Add-in profiles, where you can create and update existing profiles and apply them to the entire business.
Databases tab
This tab lists the databases you have configured to access the WESS, we recommend only having one database – your Main database – set up to communicate with the Exchange Sync; having multiple databases configured to use the WESS is not recommended.
IT Checklist
If you are using either of the Microsoft Exchange login methods, you must obtain your Exchange server details. When using the ‘Microsoft Exchange Impersonation’ method, you can use your Impersonation User’s login details to autodiscover your Exchange Web Services URL. If the autodiscover does not work, you will need to manually obtain your Exchange Web Services URL. If you are running Office365 this is most likely to be: https://outlook.office365.com/EWS/Exchange.asmx.
You must decide if you will go via the Impersonation Route. This may be easier for your organisation as it will reduce users’ need to authenticate their accounts. If you choose to use Impersonation, the Impersonation user needs to be setup by your IT Team, and Users’ mailboxes need to be setup to authenticate via the Impersonation User. You will need the Impersonation User Email and Password.
The WESS does support MFA so long as you are using either of the Microsoft 365 OAuth (EWS API) methods of login. If you encounter any problems, then anywhere where ‘Password’ is mentioned, use a Microsoft generated ‘App Password’ instead.
If you are running on premise Exchange you will also need to whitelist the following IP address range(s) from any intervening firewalls, mentioned in the below:23.97.212.108 (legacy)104.45.14.249 (legacy)
Please configure your Exchange Server and any intervening firewalls to accept connections over HTTPS (TCP port 443) from these IP addresses:
Legacy
- 23.97.212.108 (The sync service, wess.cloudapp.net)
- 104.45.14.249 through 104.45.14.253 (The provisioning system)
Supported Exchange auth methods:
- ‘Microsoft 365 OAuth (EWS API) – End User logon’ allows users to authenticate themselves directly with Microsoft Office 365 from Workbooks Preferences. This is the simplest method.
- ‘Microsoft 365 OAuth (EWS API) – App-only logon’ enables the Administrator to use Office 365 authentication to configure impersonation for all of the users in the Organization. Users do not need to authenticate themselves via Workbooks Preferences. This is the most secure method.
To setup your email configuration for the WESS using the options above:
- Navigate to WESS configuration via Start > Configuration > Email Integrations > Exchange Sync and then select your organisation. If you have multiple options here, then you will need to switch both of them individually.
- Once you have selected an organisation you will be taken to that organisation’s screen. On the details tab navigate to Email Configuration section and select one of two options: Microsoft 365 OAuth (EWS API) – App-only Logon or Microsoft 365 OAuth (EWS API) – End User Logon.
- If you have chosen Microsoft 365 OAuth (EWS API) – End User logon, the affected users will need to then navigate in Workbooks to, Start > Preferences > Exchange Sync, then the user will need to re-enter their Microsoft 365 credentials to authorise the WESS.
- If you have chosen Microsoft 365 OAuth (EWS API) – App-only logon, bear in mind the impersonated user must already be set up to do this (more information on this can be found on Microsoft’s help pages here), you will be prompted to authenticate the impersonation user. Once the impersonation user is authorised, the organisations users can be reenabled and the synchronisation should function as expected.
NOTE: When using “Domain\Username” format please ensure to use a back-slash, as shown, a forward-slash will not be recognised and will result in a failure to communicate with the Exchange provider.
Configuring usernames, passwords and Impersonation Users
Microsoft have a support article containing detailed information on Impersonation and how to configure this. The basic premise behind it is that an Impersonation user will control all of your User’s emails yet send them as if they have been sent from the mailbox owner. This is ideal for applications that connect to Exchange such as Workbooks as this one Impersonation User handles all emails, with the recipient completely unaware and the need for only one username and password.
If you do have an Impersonation User set up, then you should input your information into the corresponding field on the Email Configuration section. This will now work for all users who enable their synchronisation.
User Preferences
If you do not have an Impersonation User for your Microsoft Exchange then each user must enter their own password. This should be done by the individual User themselves.
Go to Start > Preferences > Integration > Exchange Sync. Click on the ‘Refresh’ button within the ‘Email Configuration’ section.
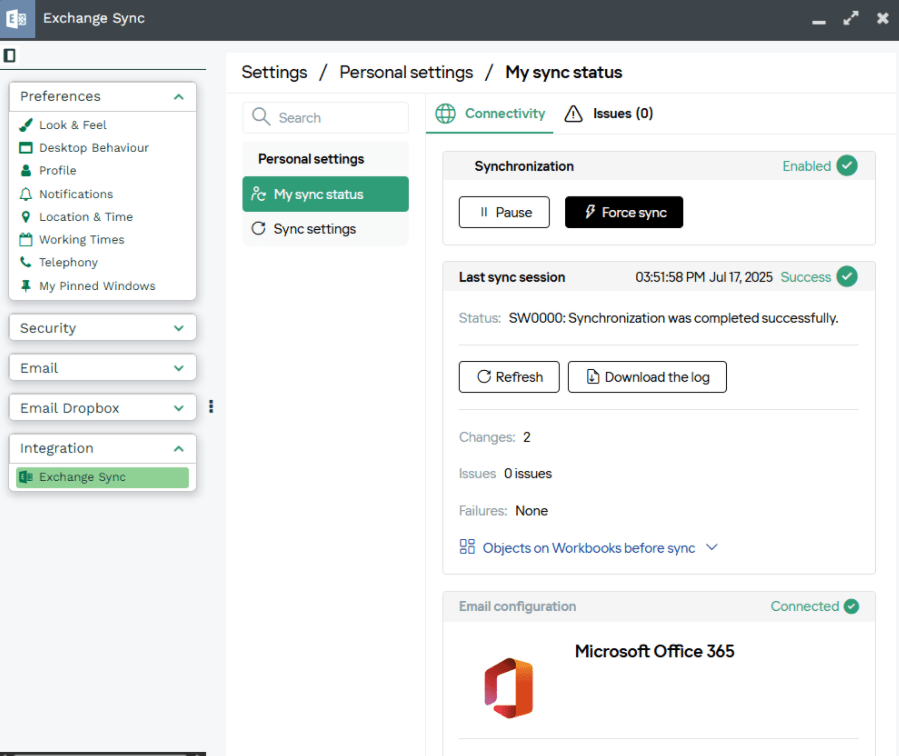
Depending on what method of login you have chosen for your Users, they will then be presented with a screen prompting them to login – if you have selected the ‘Any’ option, they will be given a choice between the available options:
Users’ Exchange Sync login information can also be viewed and changed by a System Administrator, however, the password will be encrypted to protect your Users.
Next steps:
Now that WESS is installed and configured, learn how to share emails, meetings, tasks and contacts between Workbooks and Outlook.