- Welcome to the Knowledge Base
- Introduction
- Training
- Getting Started
- Preferences
- Activities
- Cases
- Forecasts & Quotas
- Importing Data
- Leads
-
Marketing
- Introduction to Marketing
- Marketing Campaigns
- Mailing Lists
- Products
- Mailshots
- Upload Library
- Templates
- Using HubSpot with Workbooks
- Event Management
- Compliance Records
-
Spotler Integration
- What is Spotler?
- Navigating your Spotler homepage
- GatorMail
-
GatorLeads / Web Insights
- Tracking Code
- Setting up the Plugin
- Viewing Web Insights Data on your Form Layouts
- Domain Names and Online Activities
- Reporting incorrect Leads created through Web Insights
- Reporting on Web Insights data
- Using UTM Values
- Why aren’t Online Activities being created in the database?
- Why is GatorLeads recording online activities in a foreign language?
- GatorSurvey
- GatorWorkflow
- GatorPopup
- Opportunities
-
Integrations
- Mapping
- Electronic Signing Tools
- Creditsafe Integration
-
Zapier
- Introduction to Zapier
- Available Triggers and Actions
- Linking your Workbooks Account to Zapier
-
Setting up Zaps
- Posted Invoices to Xero Invoices
- Xero payments to Workbooks Tasks
- New Case to Google Drive folder
- New Case to Basecamp Project
- New Workbooks Case to JIRA Ticket
- Jira Issue to new Case
- 123FormBuilder Form Entry to Case
- Eventbrite Attendee to Sales Lead and Task
- Facebook Ad Leads to Sales Leads
- Wufoo Form Entry to Sales Lead
- Posted Credit Note to Task
- QuickBooks Online
- Survey Monkey responses to Tasks
- Multistep Zaps
-
Email Integrations
- Email Dropbox
- Workbooks Exchange Server Sync
- Workbooks Outlook Connector
-
Event & Webinar Integration Tools
- GoToWebinar
- ON24
- Microsoft Office
-
Outreach
- Installation
- Outreach Authentication
- Sync People to Outreach Prospects
- Sync Organisations to Outreach Accounts
- Sync Workbooks Opportunities to Outreach
- Sync Tasks/Activities from Workbooks to Outreach
- Sync Outreach Sequences to Workbooks
- Sync Outreach Sequence States to Workbooks
- Sync Outreach Sequence Step Numbers to Workbooks
- Sync Prospects/Accounts/Opportunities from Outreach to Workbooks
- Sync Outreach Tasks/Calls/Meetings to Workbooks
- Scribe/Workbooks Connector
- RingCentral
- People & Organisations
- Snippets
-
Reporting
- Introduction to Reporting
- Using Reports
- Charts
- Exporting Reports
- Advanced Reporting
- Dashboards
- Okta Authentication
-
Transaction Documents
-
Introduction to Transaction Documents
- Displaying & Adding Transaction Documents
- Copying Transaction Documents
- Transaction Documents Fields Help
- Transaction Documents Line Items Help
- Printing & Sending Transaction Documents
- Managing Transaction Document Currencies
- Managing Transaction Document Statuses
- Setting a Blank Default Currency on Transaction Documents
- Credit Notes
- Customer Orders
- Invoices
- Quotations
- Supplier Orders
- Contract Management
- Sagelink
-
Introduction to Transaction Documents
- Auditing
-
Configuration
- Introduction to System Administration
- Users & Security
- Database
- Accounting
- Email & Integration
- Customisation
- Automation
- PDF Configuration
- Contact Support
- Releases & Roadmap
- Workbooks Glossary
Using Calculated Columns
Workbooks reporting allows you to build a Calculated Column using formulae. The formulae are based on MySQL statements (which is simply a language that can be used to extract information from a database). Much like formulae in spreadsheets, formulae in Workbooks can be used for many purposes, including:
Tip
Click on Refresh preview each time you add a column, criteria or summarise your data.
This enables you to check your report is building correctly and 'sense-check' that it's displaying the results in the way you require.
- Calculations (for example, additions, subtraction, multiplication, etc).
- Comparing data (for example, if two values are the same, display 1 and if they're different display 0).
- Displaying dates and times in relation to another specified date and time.
- Formatting data such as dates, times, rounding decimal places, etc.
- Converting data, such as numbers into strings.
- Concatenating data (displaying a number followed by a percentage symbol, for example).
If you want to apply a simple calculation that generates any of the following:
- the total of the values
- the minimum of the values
- the maximum of the values
- the average of the values
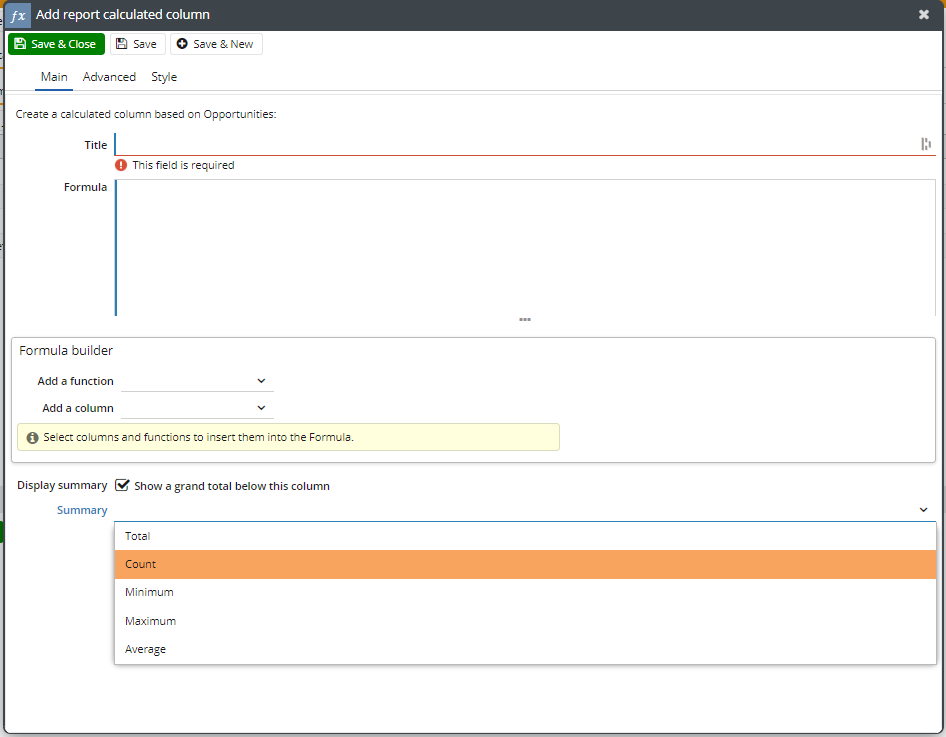
you can do this by adding a column for the amount and ticking the checkbox next to Summarise the values. This will open a field called Calculate where you can use the dropdown picklist to control what's being calculated, as illustrated in the screenshot below.
If you want to add a more complex calculation you should add a Calculated Column. The table below gives some MySQL statements that you might find useful when putting together Reports in Workbooks. It is not intended to be an exhaustive list but includes some of the more commonly used expressions. For more information on how these MySQL statements work, we recommend that you consult a specialised manual. Of course, if you need any help with reporting, try the reporting section on the forum.
Test if conditions are true or false |
IF( ) |
IF(logical_test, value_if_true, value_if_false) where logical_test: the condition you want to check value_if_true: the value to return if the condition is true value_if_false: the value to return if the condition is false eg, IF(activity_type LIKE 'Phone Call', 'True', 'False') on an Activity report would display a row populated with True for every Phone Call activity and False for any other activity type. |
Compare a value to a series of values and return a specified value
|
CASE
|
CASE column_name WHEN choice THEN return value ELSE value END eg, CASE status_name on a Case report would create a column which shows Not Started for any Case with a Status value of Open and Finished for any Case with a Status value of Closed. In addition, it will show In Progress for Cases that have a Status value of anything other than Open or Closed. |
Compare multiple values to a series of values and return a specified value | CASE |
CASE WHEN multiple conditions THEN return value ELSE value END eg, CASE on a Case report would create a column which shows Escalated for any Case with a Status value of Open that is assigned to Management, Requires engineering on any Case with a Status value of Bug or Enhancement, and Finished for any Case with a Status value of Closed. In addition, it will show In Progress for Cases that do not fit into the previous criteria. |
Add a specified amount of time to a date |
DATE_ADD( ) |
DATE_ADD(CURDATE(), INTERVAL 7 DAY) this adds 7 days to the current date NOTE: The following interval types can be used in place of DAY: SECOND, MINUTE, HOUR, WEEK, MONTH, YEAR |
Subtract a specified amount of time from a date |
DATE_SUB( ) |
DATE_SUB(CURDATE(), INTERVAL 1 MONTH) this subtracts 1 month from the current date NOTE: The following interval types can be used in place of MONTH: SECOND, MINUTE, HOUR, DAY, WEEK, YEAR |
Format a date |
DATE_FORMAT( ) |
DATE_FORMAT(column_name, '%D %M %Y') eg, DATE_FORMAT(created_at, '%D %M %Y') would show the date a record was created with the day displayed as an ordinal number followed by a four digit year, for example 1st January 2010. To display a date as numbers, use the same letters as above but enter them in lower case: eg, DATE_FORMAT(created_at, '%d %m %y') which would show the same date as 01 01 10. There are additional ways to format a date, which can include the weekday, as shown below: %a Shows the abbreviated weekday name according to the current locale. %b Shows the abbreviated month name according to the current locale. |
Calculate the difference in days between two dates |
DATEDIFF( ) |
DATEDIFF(first_column_name, second_column_name) eg, DATEDIFF(CURDATE(), created_at) would show the number of days between today and the date the record was created. |
Insert the current date |
CURDATE() |
CURDATE() Type in the above to return the current date. |
Insert the current time |
CURTIME() |
CURTIME() Type in the above to return the current time. |
Calculate the mean average of a group of numbers |
AVG( ) |
AVG(column_name) eg, AVG(amount) on an opportunity report would return the mean average of the opportunity amounts. |
Add numbers |
+ |
eg, first_column_name+second_column_name |
Subtract numbers |
- |
eg, first_column_name-second_column_name |
Multiply numbers |
* |
eg, first_column_name*second_column_name |
Divide numbers |
/ |
eg, first_column_name/second_column_name |
Find the total of a series of numbers |
SUM( ) |
SUM(column_name) eg, SUM(amount) on an opportunity report would return the total of the opportunity amounts. |
Display a specified number of decimal places |
FORMAT( ) |
FORMAT(column_name, integer) where integer is the number of decimal places you want to display eg, FORMAT(AVG(amount),5) on an opportunity report would return the average opportunity amount to 5 decimal places. |
Count the number of records |
COUNT( ) |
COUNT(id) Use COUNT(DISTINCT id) if you want to count the number of unique records within the grouping |
Display text in upper case |
UPPER( ) |
UPPER(column_name)
|
Display text in lower case |
LOWER( ) |
LOWER(column_name)
|
Truncate a string to a specific length | LEFT( ) |
LEFT(column_name, integer) where integer is the number of characters you want to limit the string to |
Combine two or more fields |
CONCAT( ) |
CONCAT(first_column_name,' ',second_column_name,' ',third_column_name) NOTE: If any of the fields that are concatenated together return a NULL value, the whole formula returns a NULL value causing your report to show blank rows in its results. If this is the case, see CONCAT_WS below or include a criteria on your report to exclude blank values. |
Summarise a column into a string
|
GROUP_CONCAT( )
|
GROUP_CONCAT(column_name SEPARATOR ', ') eg, GROUP_CONCAT( campaign_membership.campaign_name SEPARATOR ', ') On a Person report, this will join together all the Campaigns of which the Person is a member, separated by a comma. (Remember that you'll need to summarise this report in order to see each person on a separate row and we recommend summarising by the Object Reference.) |
Combine two or more fields | CONCAT_WS( ) |
CONCAT_WS(' - ', first_column_name, second_column_name, third_column_name) NOTE: This causes the formula to ignore NULL values thus you may see rows in your report that do not make sense e.g. CONCAT_WS(' - ', name, employer). If the employer is blank the formula will return "Jim Bob - ". Also, notice that the SEPARATOR is at the start of the formula and is in quotes. This string value will be added in between each field that is concatenated. |
More information on this is available at https://www.w3schools.com/, although of course if there are any issues please contact support@workbooks.com.