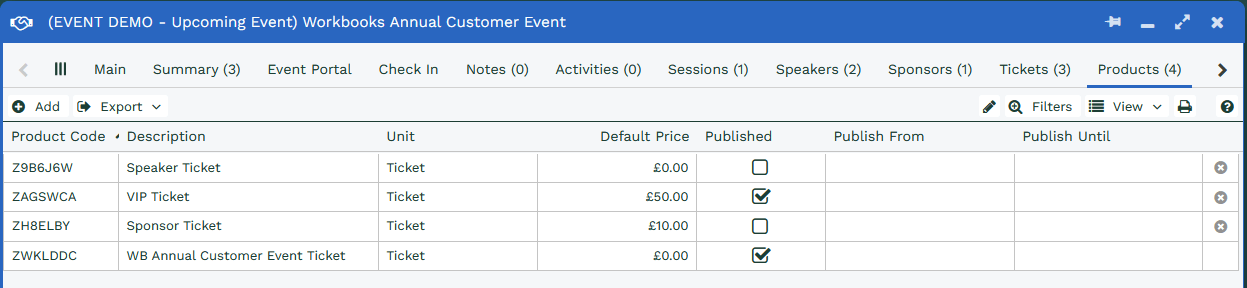
- Welcome to the Knowledge Base
- Introduction
- Training
- Desktop Environment
- Preferences
- Activities
- Cases
- Forecasts & Quotas
- Importing Data
- Leads
-
Marketing
- Introduction to Marketing
- Marketing Campaigns
- Mailing Lists
- Products
- Mailshots
- Upload Library
- Templates
-
Workbooks Web Insights
- Tracking Code
- Setting up the Plugin
- Viewing Web Insights Data on your Form Layouts
- Domain Names and Online Activities
- Gator Popup
- Reporting incorrect Leads created through Web Insights
- Reporting on Web Insights data
- Using UTM Values
- Why aren’t Online Activities being created in the database?
- Why is GatorLeads recording online activities in a foreign language?
- Using HubSpot with Workbooks
- Event Management
- Compliance Records
- GatorMail Integration
- Opportunities
-
Integrations
- Mapping
- Electronic Signing Tools
- Creditsafe Integration
-
Zapier
- Introduction to Zapier
- Available Triggers and Actions
- Linking your Workbooks Account to Zapier
-
Setting up Zaps
- Posted Invoices to Xero Invoices
- Xero payments to Workbooks Tasks
- New Case to Google Drive folder
- New Case to Basecamp Project
- New Workbooks Case to JIRA Ticket
- Jira Issue to new Case
- 123FormBuilder Form Entry to Case
- Eventbrite Attendee to Sales Lead and Task
- Facebook Ad Leads to Sales Leads
- Wufoo Form Entry to Sales Lead
- Posted Credit Note to Task
- QuickBooks Online
- Survey Monkey responses to Tasks
- Multistep Zaps
-
Email Integrations
- Email Dropbox
- Workbooks Exchange Server Sync
- Workbooks Outlook Connector
-
Event & Webinar Integration Tools
- GoToWebinar
- ON24
- Microsoft Office
- Outreach
- Scribe/Workbooks Connector
- People & Organisations
- Reporting
- Dashboards
- Transaction Documents
- Auditing
-
Configuration
- Introduction to System Administration
- Users & Security
- Database
- Accounting
- Email & Integration
- Customisation
- Automation
- PDF Configuration
- Contact Support
-
Releases & Roadmap
- Roadmap
- December 2020 Release
- September 2020 Release
- April 2020 Release
- January 2020 Release
- September 2019 Release
- February 2019 - Event Management Release
- January 2019 Release
- October 2018 Release
- May 2018 Release
- February 2018 Release
- January 2018 Release
- November 2017 Release
- September 2017 Release
- June 2017 Release
- March 2017 Release
- December 2016 Release
- August 2016 Release
- January 2016 Release
- Workbooks Glossary
Event Products
The Products Tab allows you to create new Products within Workbooks that are unique to the Event that they are created from. These Products can be anything from Ticket Bundles, Tables or discounted rates for specific attendees.
Note: Like all Products, Pricing and Supply Schemes can then be applied to them as well as tax codes for international purchase.
Products are created by selecting the Add button on the Products Tab. Once generated, you will notice that they look slightly different from other Products within Workbooks, as a number of new Fields will be available.
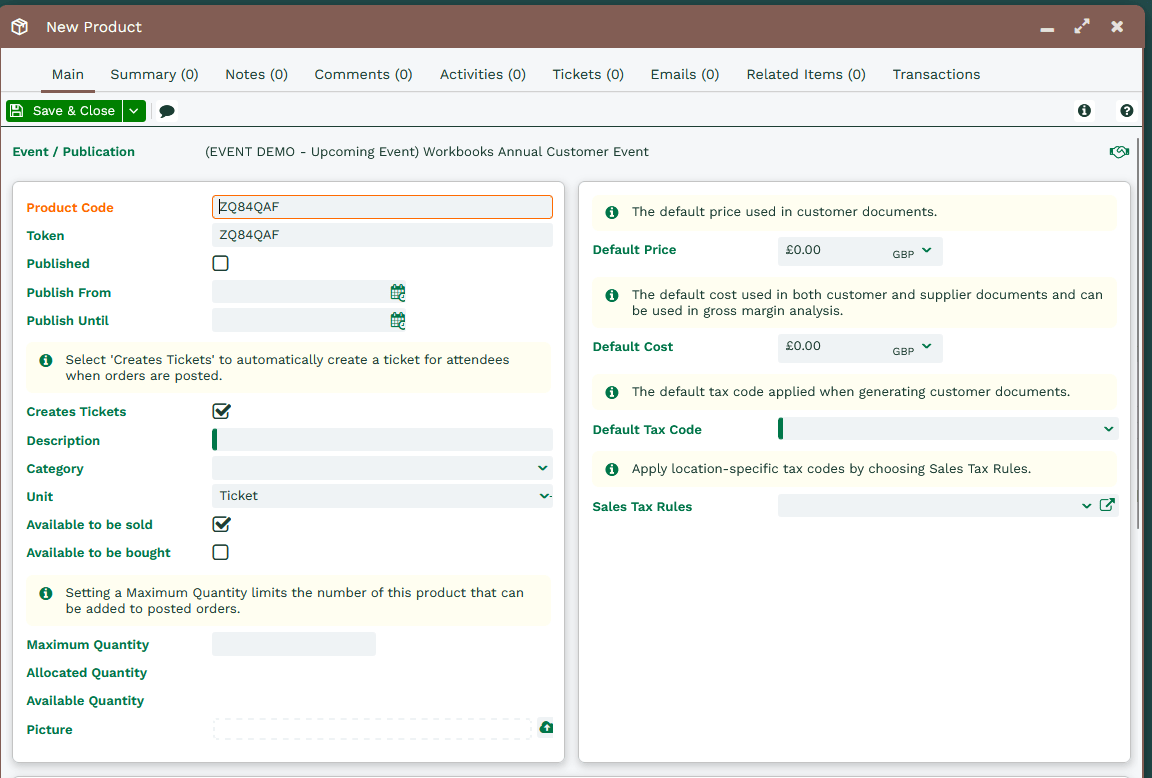
By default when creating a new Product from an Event the Event Field will be populated with the name of the event.
Published: When Checked this Product becomes available to purchase within the Portal.
Publish From & Until: You may want to limit when the Product is available, such as “early bird” Tickets for the event at a reduced rate.
Create Tickets: Once the Product is purchased and the Order has been Posted i.e. the Attendee has bought the Product, this will automatically create the appropriate Tickets for the Event.
Description: Product Description that Attendees will see in the Event Portal.
Maximum Quantity: You may only have a limited number of Products available so choose to apply to a Maximum Quantity, this information is then pulled into the Portal so Products cannot be oversold.
Allocated Quantity: How many of the Products have been purchased through the Portal, this number only updates once the Order has been confirmed and Posted
Available Quantity: The remaining quantity that is still available to be sold.
Token: This is a unique identifier for each product. This is used for setting up special discounts/hidden products, e.g. not a published product that is available to everyone, only those that enter the token onto portal. By default this will be set to the Product Code but can be replaced with any other token code.
Note: Tokens have a 7 character limit, this cannot be exceeded.