


Customising relationships between parties
Within Workbooks, you can create relationships between People and Organisation record types. These relationships are best known as “Party Relationships” and there are three different types available which are:
- Between two third parties on the People and Organisation tabs eg, employer/employee.
- Between a third party and an Own Organisation eg, customer/supplier/partner.
- Between two Own Organisations eg, parent/subsidiary company of your Own Organisation.
Each type of relationship is customisable to the point where you can specify information about the relationship relevant to how your business has adopted Workbooks. Customisation of relationships allows you to do the following:
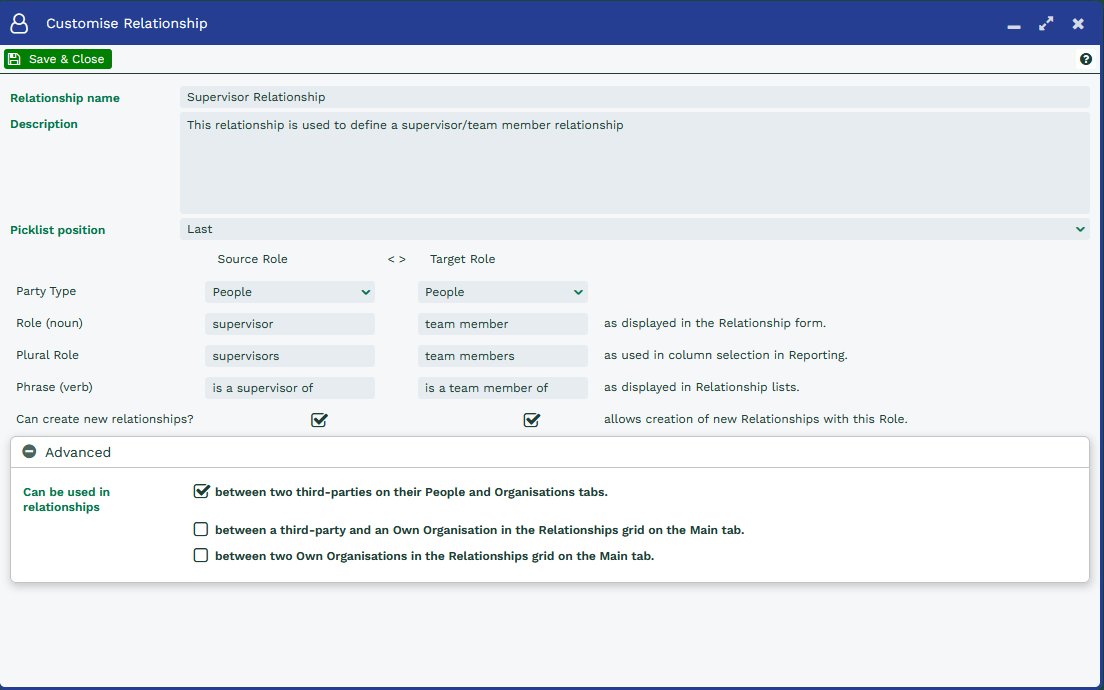
- Specify a name and description – This is not displayed to the user when selecting the Relationship, it simply helps to identify it so that you can modify the configuration at a later date if you wish.
- Where it is displayed in the picklist of Relationships (Picklist Position) – This is the ordering of the relationships in both the “Relationship Types” screen as well as the Relationship Picklist.
- Workbooks allows you to have customisable Relationships across People and Organisations so different types are all shown on the “Relationship Types” screen whereas on the actual picklist, you will only see relevant Relationships for that record type. This means that the ordering may appear to work differently than is expected depending on the record type that you are working with.
- Which record types the relationship is between (Party Type) – This can be set to People, Organisations and then People and Organisations. The “Source Party Type” is the type of record that you will be creating the Relationship from. The “Target Party Type” is the type of record that you are relating your source record to. For example, if you set the Party Type to be People and Organisations, you will see the relationship available in the Relationship picklist for both the People and Organisation tabs on both a Person and Organisation record.
- The naming conventions used on both sides of the relationship e.g. is a Supervisor of/ is a Team Member for. You only need to enter in the “Role (noun)” here as Workbooks will auto-populate the remaining fields.
Note
In some instances, this might be populated incorrectly depending on the wording used. If this is the case, you can manually overtype the values.
- Can create new relationships – This allows you to control whether the relationship is either one way or bi-directional between the source record and its target. For example a Person (Source) and their Employer (Organisation – Target).
- The type of relationship (see above) – These are hidden under the “Advanced” section.
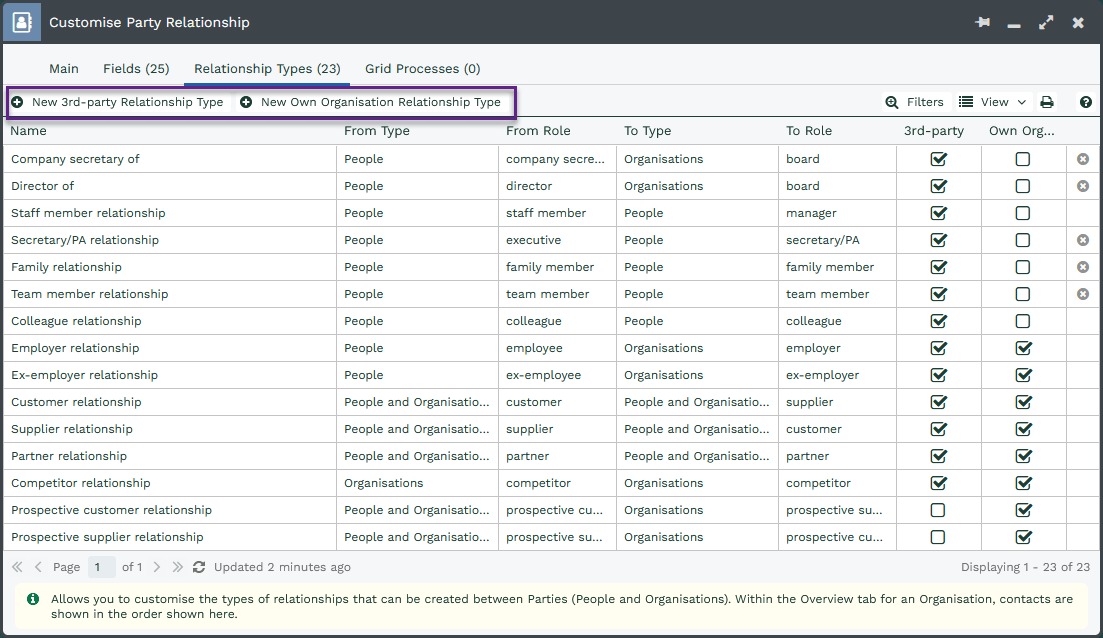
Workbooks includes 20 standard relationships which should be plenty for the majority of businesses but occasionally you may wish to add more.
You can do this easily by clicking Start > Configuration > Customisation > Record Types > Party Relationships > Relationship Types and then choosing “New 3rd Party Relationship Type” or “New Own Organisation Relationship Type“:
Note
You are unable to modify or delete some pre-existing Workbooks relationships as they are essential to how Workbooks functions. Other Relationships will allow you to modify the name which will cascade down to anywhere where the Relationship has been used.
It is also possible to configure the Relationship so that a user is unable to select that option from the Relationship Picklist. To do this simply un-check the "Can create new Relationships?" checkbox from within the Relationship configuration screen.