








Creating A New Project
To create a new Project, go to Start > Projects > Projects and click New Project. You can either create a blank Project or copy a Project Template.
Choosing a blank Project displays the screen below.
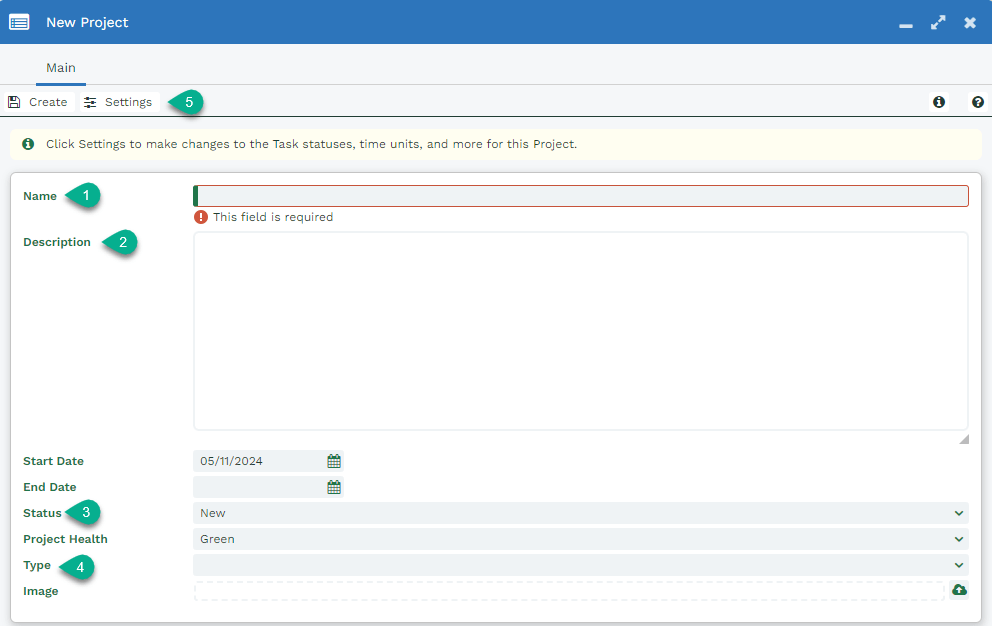
- Name: The name of your Project.
- Description: An overview of your Project that you can refer back to later.
- Status: Select a status. You can edit the options in the Project Statuses picklist within Configuration.
- Type: Specify the type of Project. You can edit the options in the Project Types picklist within Configuration.
- Settings: Lets you choose certain behaviors and values for your Project. The table below shows which options are available for Simple Projects and Advanced Projects.
| Settings | Sub-Section | Simple Projects | Advanced Projects |
| Time Units | |||
| Project Units | x | x | |
| Task Units | x | x | |
| Time Entry Units | x | ||
| Task Statuses | x | x | |
| Task Categories | x | x | |
| General | |||
| Task Behaviour | x | ||
| Time Entry Behaviour | x | ||
| Finance | x | ||
| Time Categories | x |
Settings
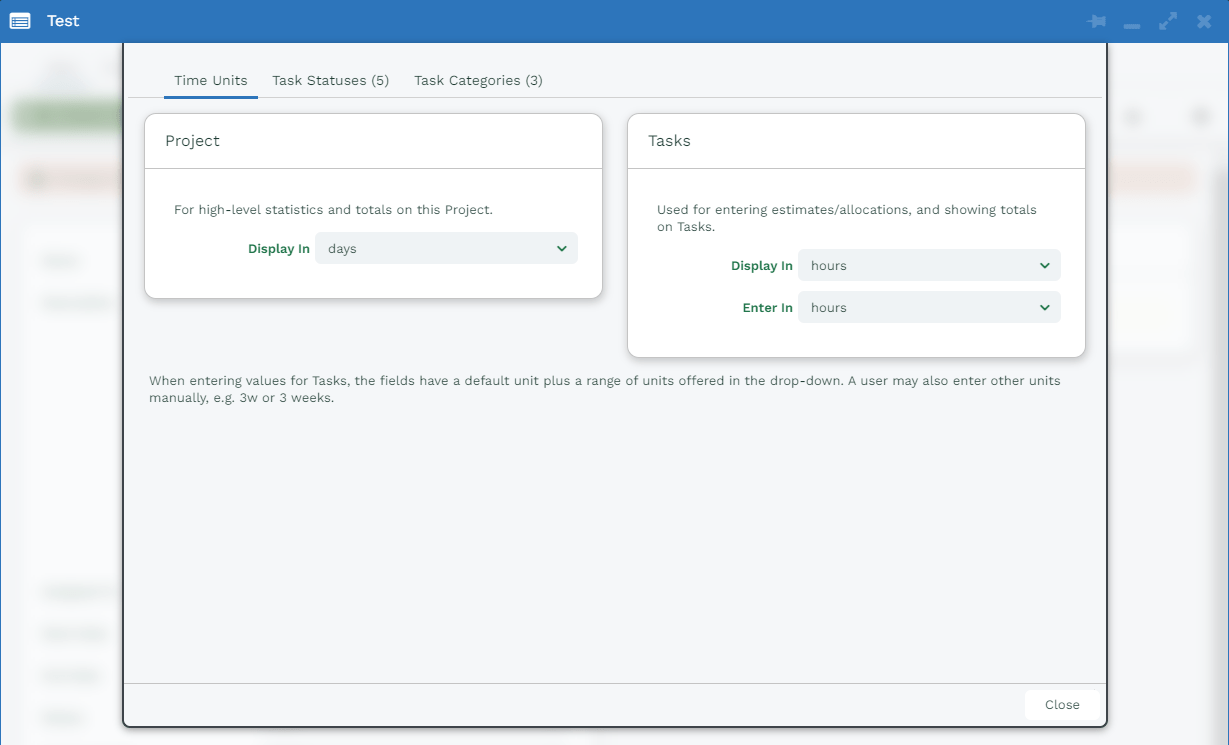
You can also change the Settings while you’re creating a Project. For a Simple Project, you can change the Time Units, Task Statuses and Task Categories.
Time Units
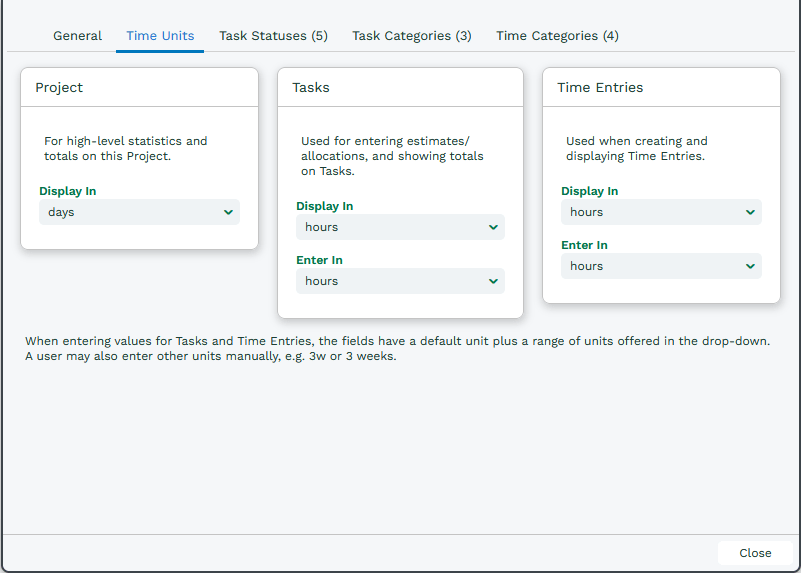
Time Units let you specify which units time is entered in and which units are displayed. For example, it may be easier to measure how the Project is being delivered in Days, while your Project Tasks are shown in Hours.
With Advanced Projects, you can also change the Time Units Users log their time in.
Task Statuses
Task Statuses let you track the progress of Project Tasks. A System Administrator can manage the default statuses by going to Start > Configuration > Customisation > Picklists and selecting Project Task Statuses.
However, it’s common to want different Task Statuses on different Projects, so you can click Add to create more. If you regularly run this type of Project, you can create a Project Template with the statuses you want.
Task Categories
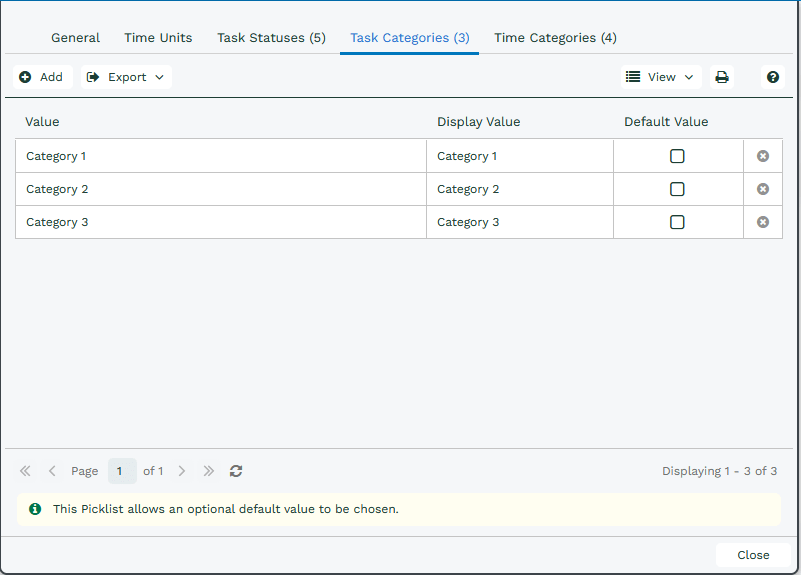
You may want to classify Tasks to suit your needs. A System Administrator can change the default values by going to Start > Configuration > Customisation > Picklists and selecting Project Task Categories. You can also add more categories that are specific to the Project by clicking Add.
General tab within Settings
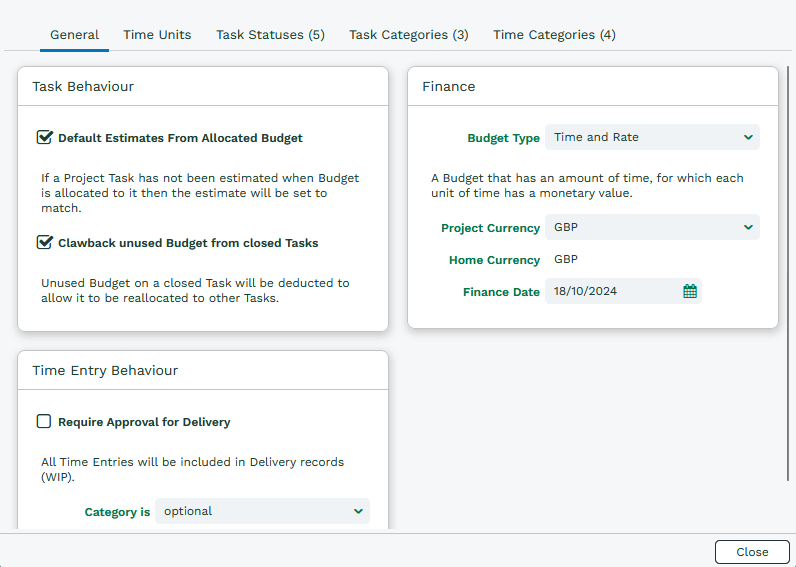
Task Behaviour
When starting a Project, you may want to add estimates for how long each Task will take. Checking Default Estimates From Allocated Budget means a Task’s estimate will match the Budget you allocate to it.
Some Tasks may take less time than expected to complete. Checking Clawback unused Budget from closed Tasks means that the Allocated Budget on a Task is reduced by the Remaining Budget, and the Remaining Budget is reduced to 0. This makes that Budget available to allocate elsewhere.
Time Entry Behaviour
A Project Manager may want to sign off on time that’s been logged before it’s marked as Delivered. Checking Require Approval for Delivery means Time Entries won’t appear in the WIP until they’ve been approved.
Finance
In the Finance section, you can set your Budget Type. The options are:
- Rate Only: A rate has been agreed for the Project, but there’s no agreed cap on the number of hours or days.
- Price Only: A set price is agreed for the Project. You can still give a potential timeframe, but if the Project runs over or under, the price stays the same.
- Time and Rate: A rate is agreed along with a cap on the number of days or hours.
- Time Only: Lets you track how long a Project takes.
Tip
The default Budget Type is Time and Rate. If you'll have a lot of Projects that need a different Budget Type, we recommend creating a Project Template that uses it.
For more information, see Budget.
Time Categories
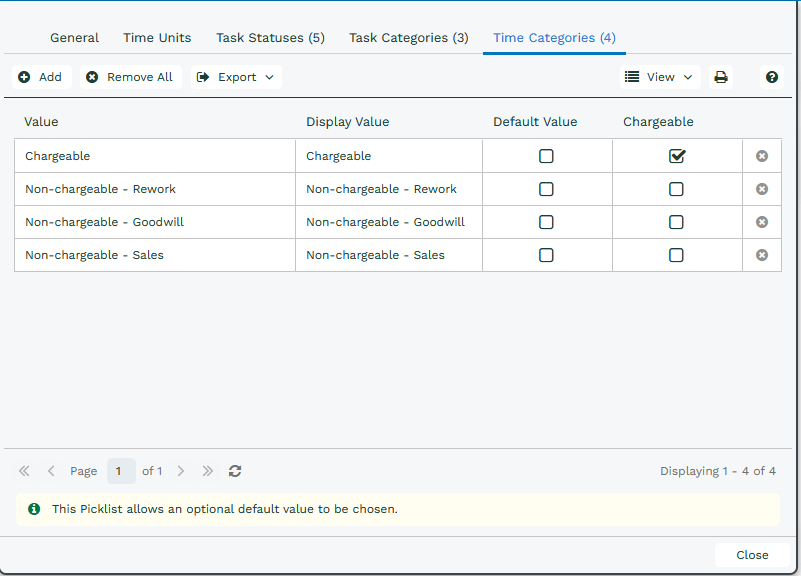
For some Projects, you may want to categorize how time is spent and mark whether it’s chargeable. For example, some logged time may not be chargeable because it’s a goodwill gesture, or because work needs to be redone. This tab lets you create different categories and mark whether each one is chargeable.
Project Tabs
Once a Project has been created, you’ll be taken to the Main tab. The table below shows which other tabs are available for Simple and Advanced Projects.
| Available Tabs | Simple Projects | Advanced Projects |
| Main | x | x |
| Project Tasks | x | x |
| Time Entries | x | |
| Delivered | x | |
| WIP | x | |
| Team | x | x |
| Budget | x | |
| Activities | x | x |
| Notes | x | x |
| Comments | x | x |
| Related Items | x | x |
| Emails | x | x |
| Files | x | x |
Project Team Members
The Project’s Team tab lets you manage and track which Users are part of the Project. Here you can add and remove Project Members, and control their Roles and Permissions within the Project.
For example, your Project team may have a Project Sponsor and a Project Manager who set the direction of the Project and make important decisions day to day. These members will likely need full permissions. A Resource Manager, on the other hand, may only be heavily involved in the early stages, making sure the right members are on the Project team, so they may only need permission to manage Roles and Members. Participants may only need permission to log Time Entries.
You can control all of this from this section of the Project, as described below.
Adding and Removing Project Members
When a new Project is created, the User who created it becomes the Project Manager by default and holds all permissions within the Project.
To add new Project Members, click Add member at the top left of the Team tab. To remove a Project Member, click the x at the right-hand end of their row.
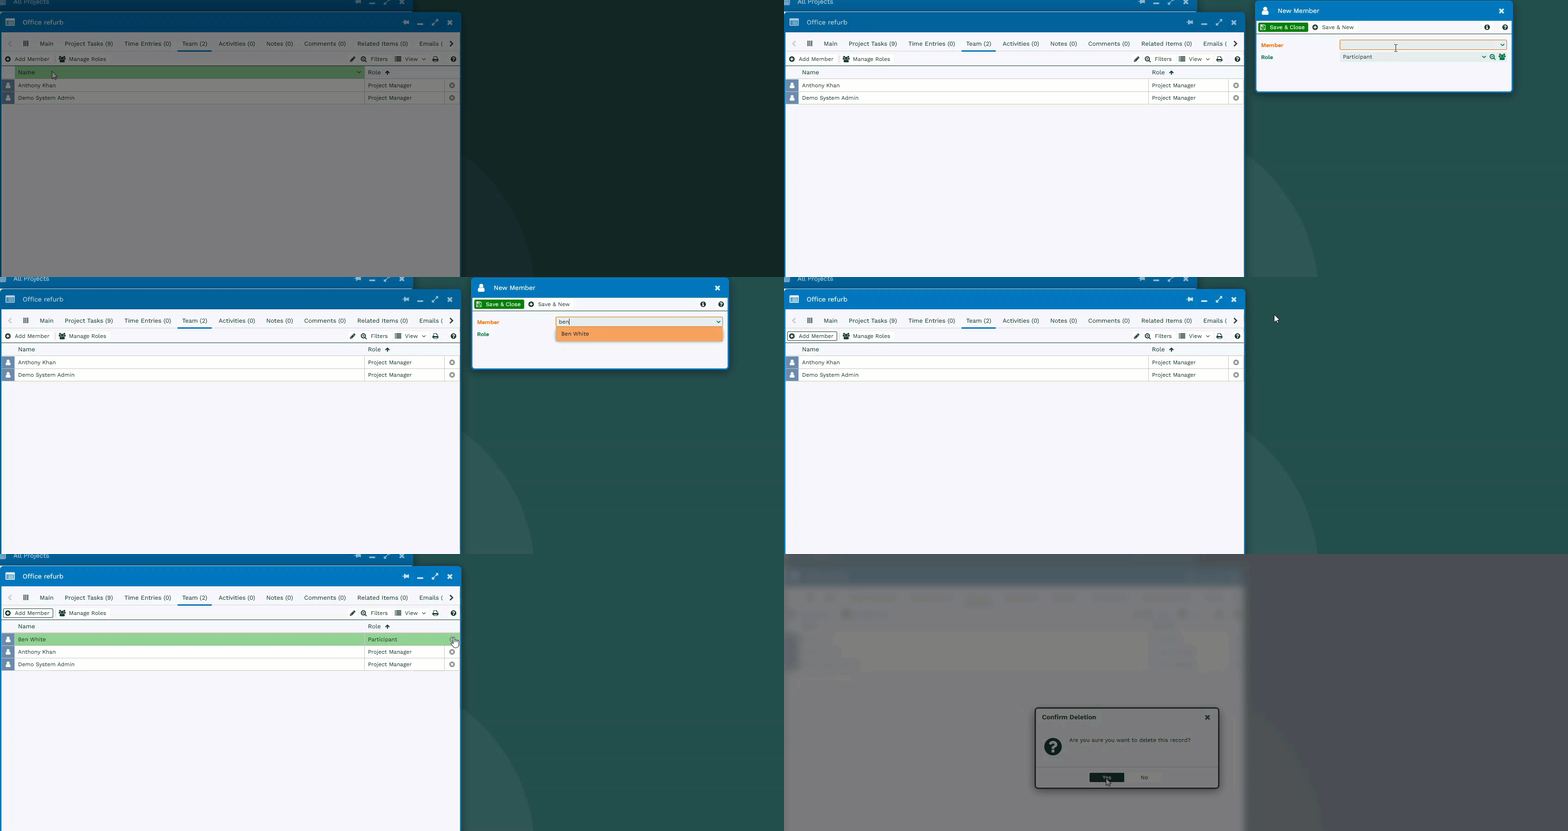
When new members are added to the Project, they’ll receive a notification, and they’ll also be notified whenever Project Tasks are assigned to them.
Members can also be added by assigning them Project Tasks. When they’re added this way, they’re automatically given the Participant role.
Tip
A Project Member can't be removed from the Project if they're the Project owner/assignee, if they have a Project Task assigned to them, or if they've logged time or delivered a Task.
Sometimes you may create a Project and then need to reassign it to someone who isn’t yet a Project Member. You can change the Assigned to field to that User, and when you save the change, they’ll automatically be added to the Project as a Project Manager.
Manage Roles
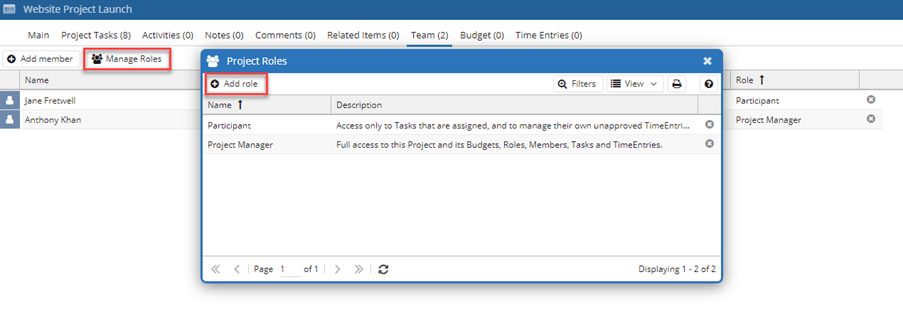
As standard, two roles are available when you start a new Project: Project Manager and Participant. You’re not limited to these, though. If you want to assign a role that isn’t on the picklist, you can create a new role for the Project by clicking Manage Roles > Add role, as shown in the screenshot below.
Tip
The Project Manager role can't be deleted. If you delete or rename the Participant role, it will be recreated and assigned to the next new member you add to the team.
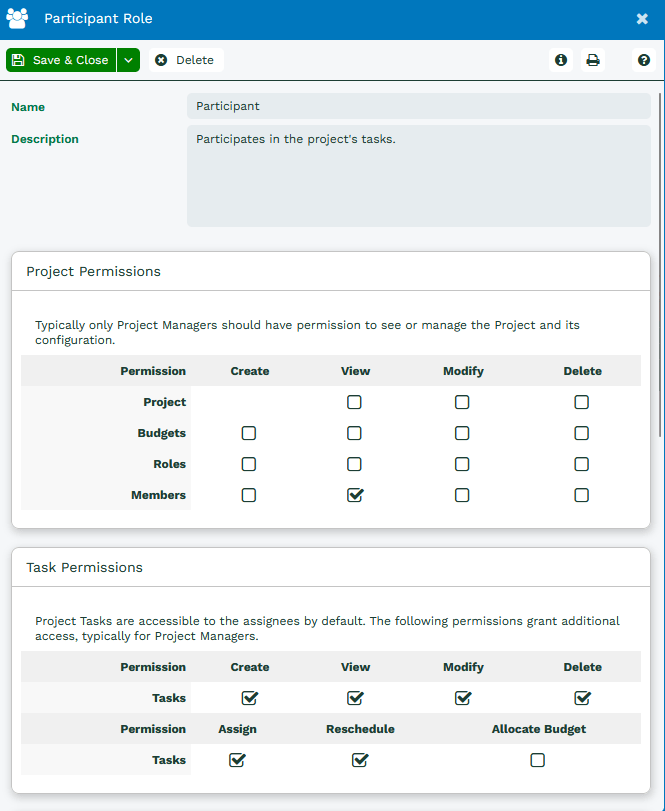
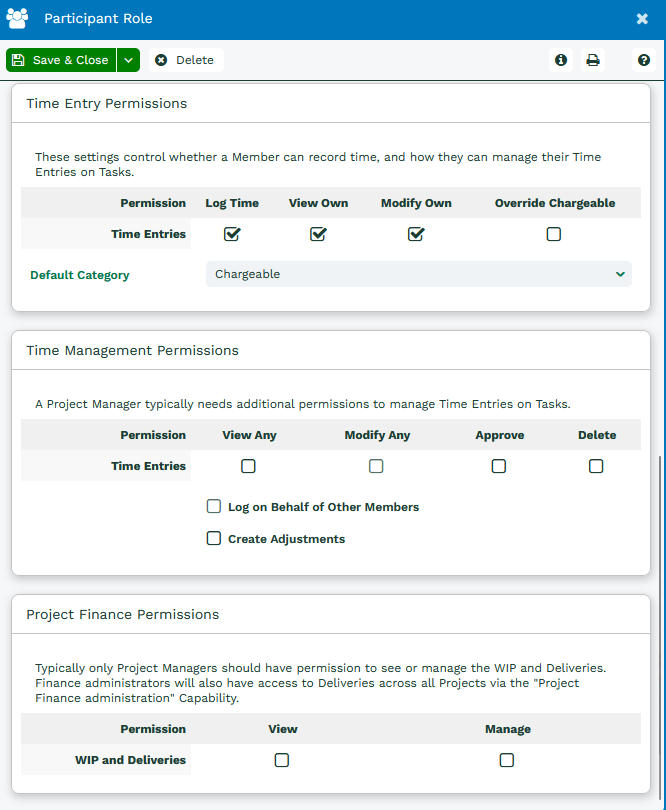
When creating or editing roles, you can also grant them specific permissions within the Project. In the example below, a Participant can view Project Members, and create, view, modify, delete, assign and reschedule Project Tasks. They can also log time for themselves and modify their own Time Entries, but they can’t view other members’ Time Entries and don’t have Project Finance permissions.
Creating Project Tasks
To define what needs to be done on a Project and assign work to the people involved, you’ll need to create Project Tasks.
When you open the Project Tasks tab, you’ll see an editable grid, where you can add columns for the key fields on your Project Tasks. This Grid View lets you see the current status of your Project Tasks at a glance, and edit fields quickly without opening each record.
Tip
Depending on which Budget Type you've selected, you may need to add a Budget before you can create Tasks and add a Budgeted Time.
To create a Project Task, click New Project Task. A new row is added where you can enter the details. You can also open the Task by clicking the icon to the left of the Name field.
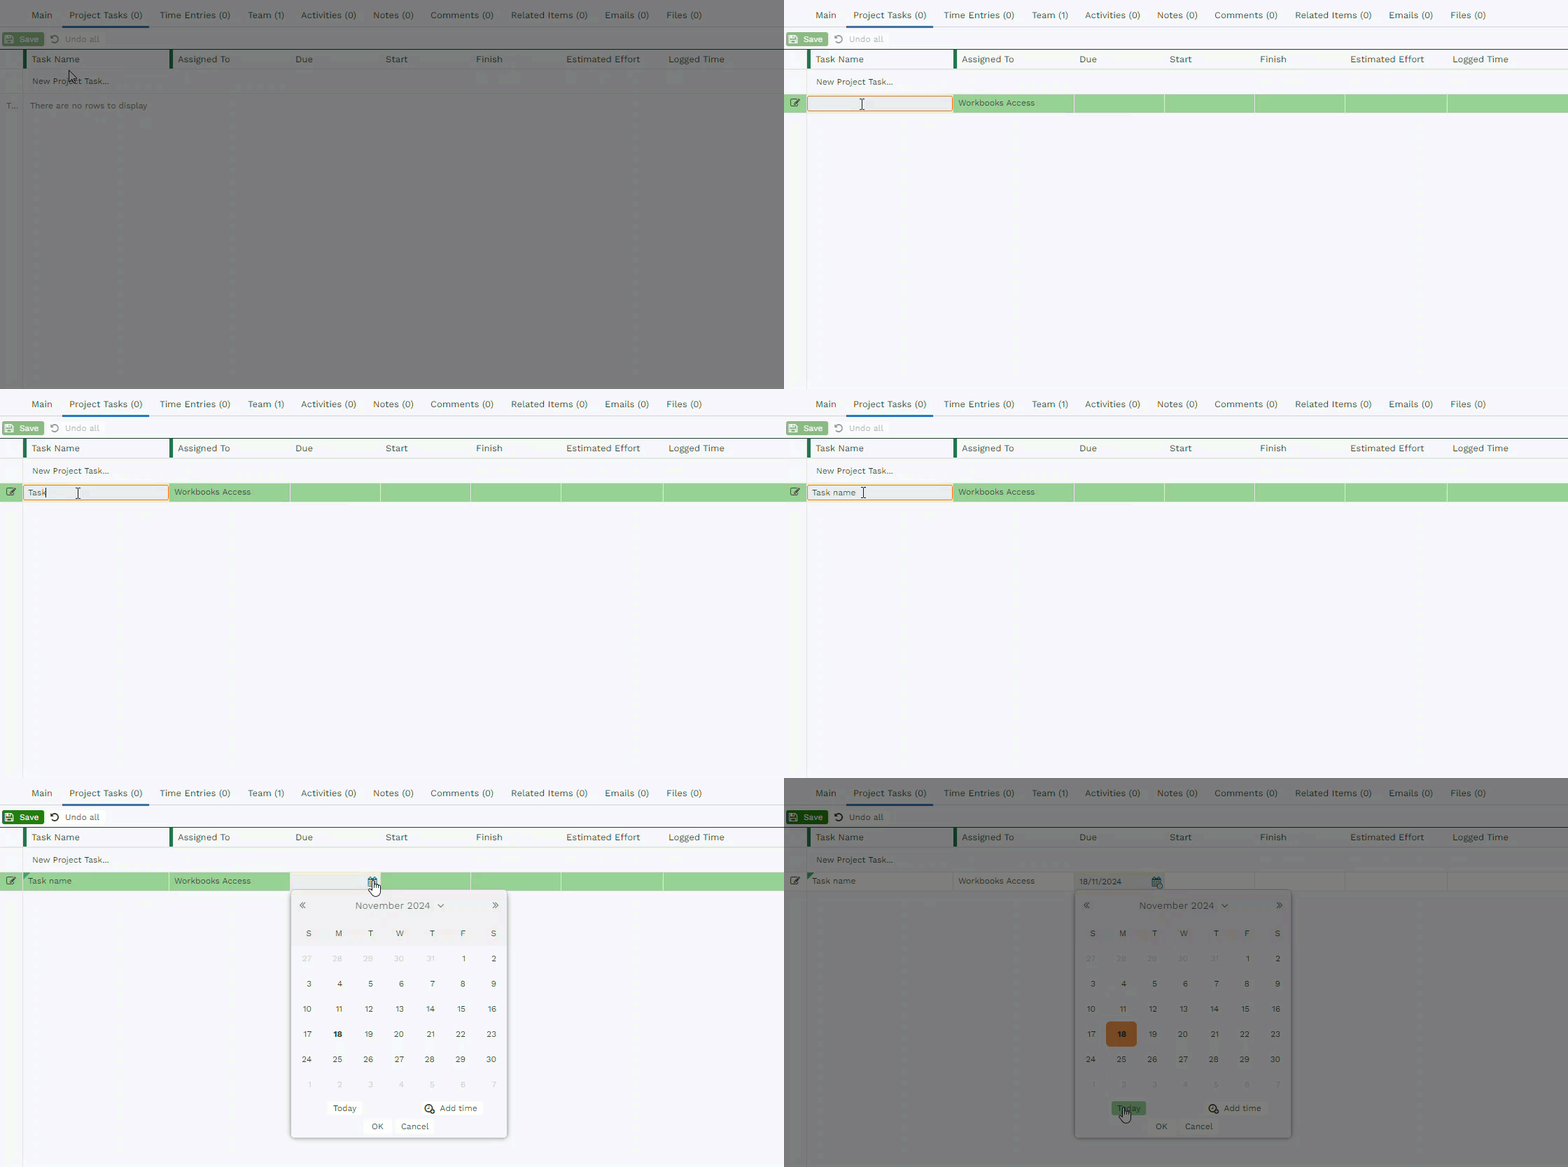
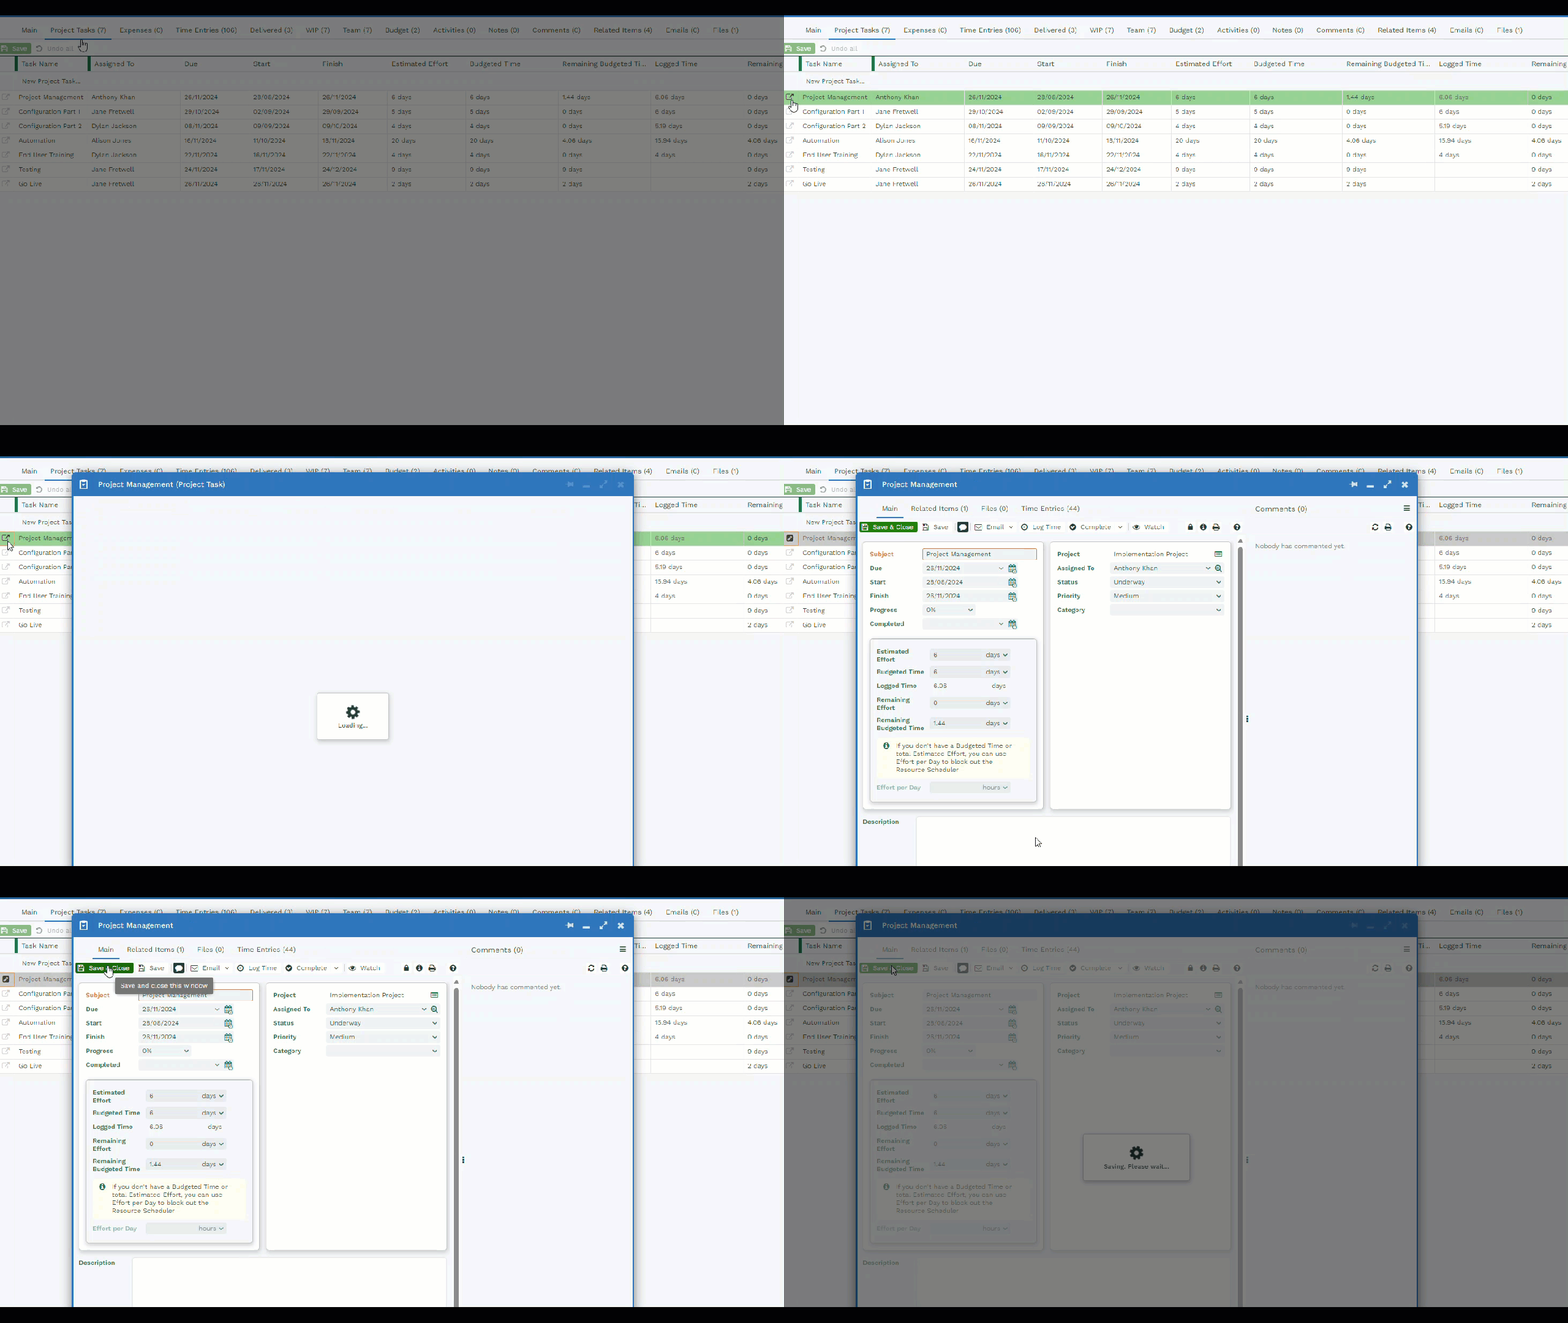
Here you can add the details of the Task. The Project’s Budget Type affects whether you can add a Budgeted Time.
When you add Budgeted Time and there’s no time remaining, you’ll see a message saying it exceeds the remaining Budget, and you won’t be able to save the Task. The same happens when you edit a Task. To add more Budget to a Task, you’ll need to either reduce the allocated Budget on another Task first, or increase the Budget for the whole Project.
Once you’ve finished creating the Tasks, click Save to create the records. Any view you save by clicking View > Save is saved for that Project only, so you can have the fields you want visible at a glance for each Project you manage.

Depending on the Project’s Budget Type, you’ll also see your total budget, allocated budget and remaining budget at the bottom of the screen.
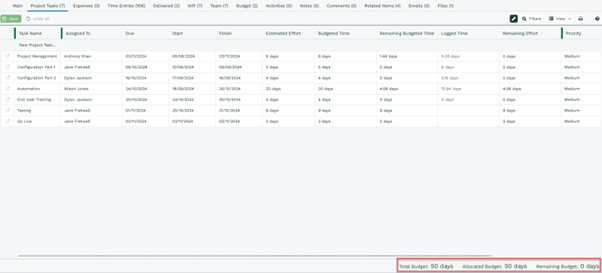
These figures update automatically if you change the allocated budget on a Task. If a Project Task is completed with unused budget and you checked Clawback unused Budget from closed Tasks in the Settings, this will be reflected in the Remaining Budget.
The columns available in the editable grid are the same as those on the Project Task form layout. You can customize these by going to Start > Configuration > Customisation > Record Types > Tasks.
Project Templates
You may have a lot of upcoming Projects that are very similar. Project Templates let you build a Project where the Tasks have already been created and a Team has already been added.
To build a template, go to the Projects Landing Page, select Project Templates and click New Project Template. This opens a new window that’s the same as creating a new Project. Adjust the settings as needed and click Create.
Once the template is created, you can add a Team, set roles, create Project Tasks and set a budget. When you’ve saved your changes, the template will be available to select from the dropdown list when you create a new Project.