Using Cognism Enrich
Enriching Organisations
On Workbooks Organisation Record, you should now see the ‘Cognism Data Enrich Tool’ tab. Once clicking on this tab, you will be presented with the UI for this tool. Within the UI, you will see the ‘Organisation Linker’ iFrame where any potential company matches that have been retrieved from Cognism will be listed.
NOTE: If there are no matches retrieved from Cognism, then no results will be displayed in the UI.
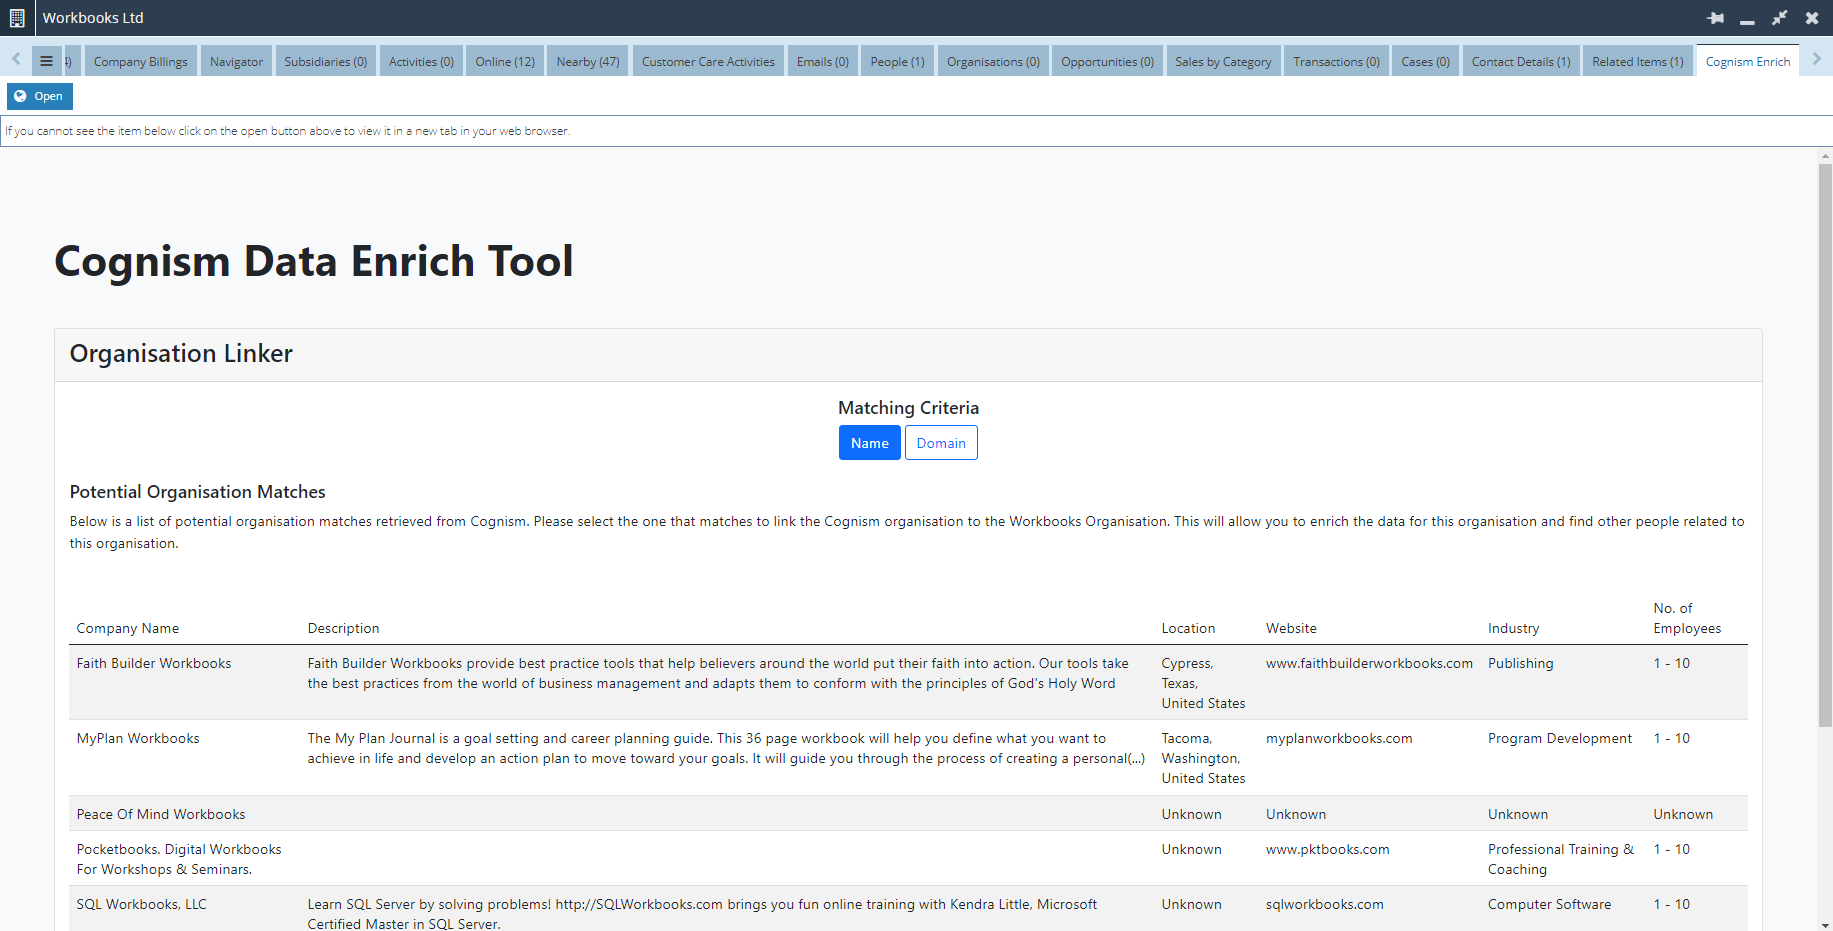
Under ‘Match Criteria’, you have 2 options for filtering between organisation matches. These are ‘Name’ and ‘Domain’.
Below is an example of matching by ‘Name’ which will present organisations that have been retrieved from Cognism that match with the Workbooks Organisation name. In the results table, you will see the following columns which are ‘Company Name’, ‘Description’, ‘Location’, ‘Website’, ‘Industry’ and ‘No of Employees’.
Below is an example of matching by ‘Domain’ which will present organisations that have been retrieved from Cognism that match with the Workbooks Organisation’s domain. The results table will be the same columns as matching by ‘Name’.
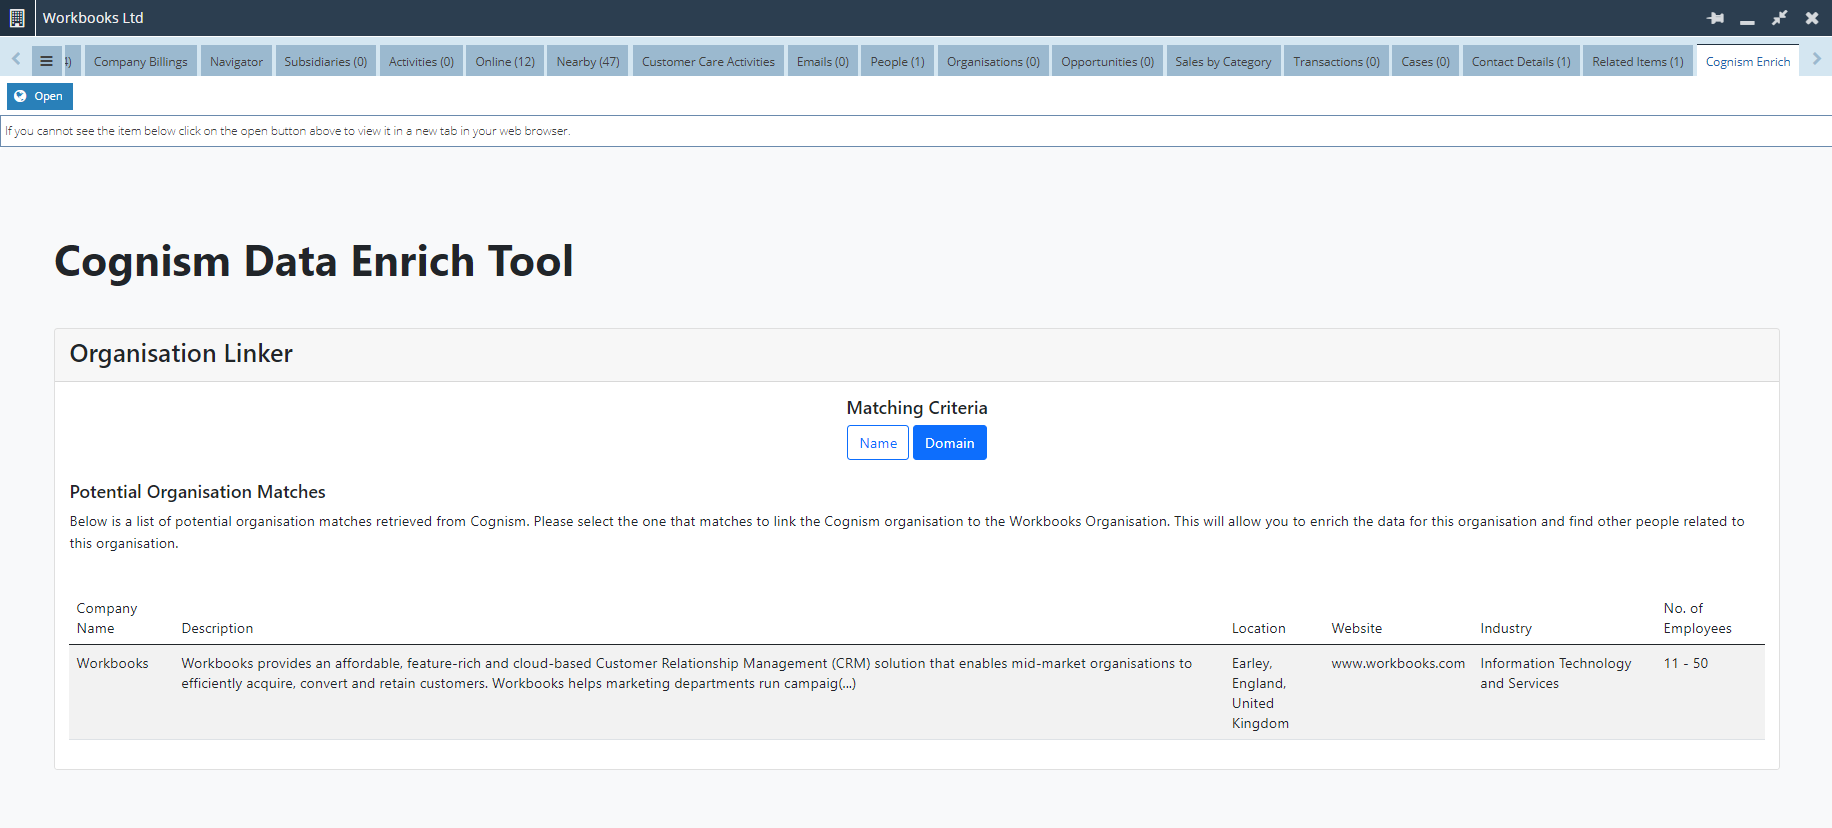
In either list, select the appropriate Cognism organisation that matches with the Workbooks Organisation record. This will now allow you to enrich the data for this organisation and find other individuals related.
NOTE: Please ensure you check that all the information for that specific organisation is valid before looking to enrich the data.
Once you’ve selected the relevant Cognism organisation to match with the Workbooks organisation, you will see a browser popup asking you to confirm if you wish to make the link. Click ‘Ok’ if you are happy to proceed.
Enriching People
Once the Organisation data between Cognism & Workbooks has been enriched thus merged, the next step is to look at the People that might be related to that organisation. Within the UI, you will see the ‘Person Finder & Enricher’ iFrame where any related people to that organisation will be listed.
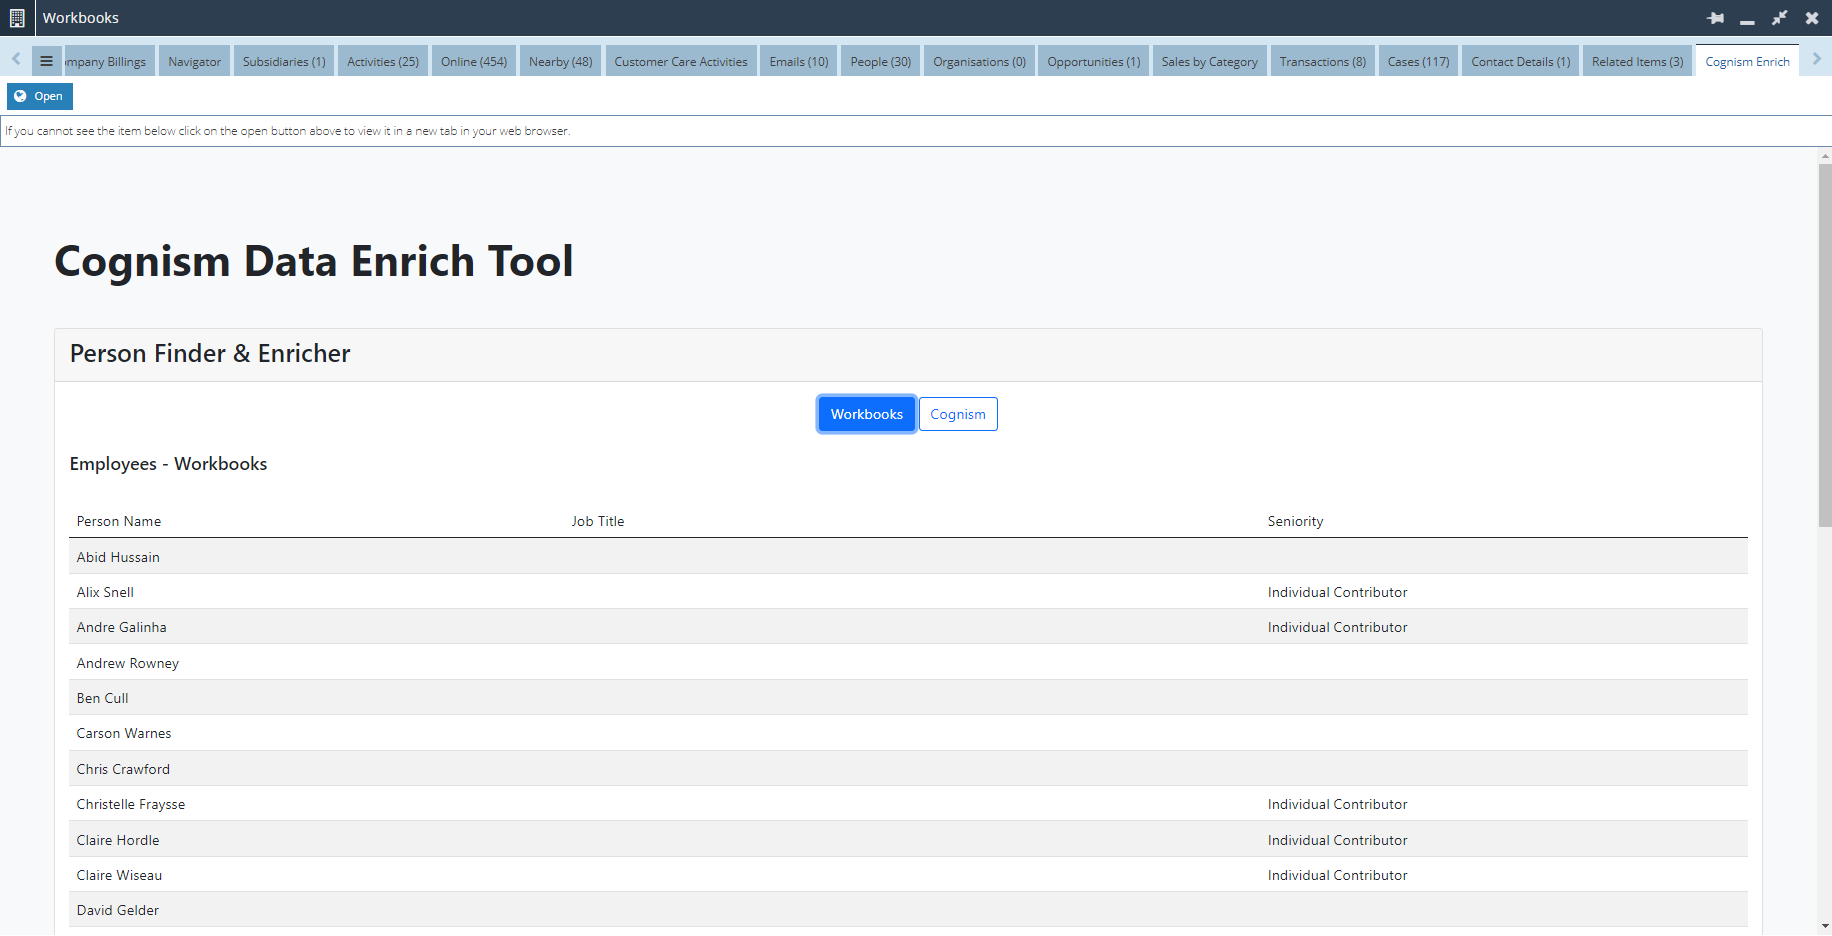
You are presented with 2 options for filtering between people for that organisation. These are ‘Workbooks’ and ‘Cognism’.
The ‘Workbooks’ filter displays a list of people that already exist under the organisation record in Workbooks. In the results table, you will see the following columns which are ‘Person Name’, ‘Job Title’ and ‘Seniority’.
The ‘Cognism’ filter displays a list of employees related to that organisation that have been retrieved from Cognism. The results table will be the same columns as matching by ‘Workbooks’.
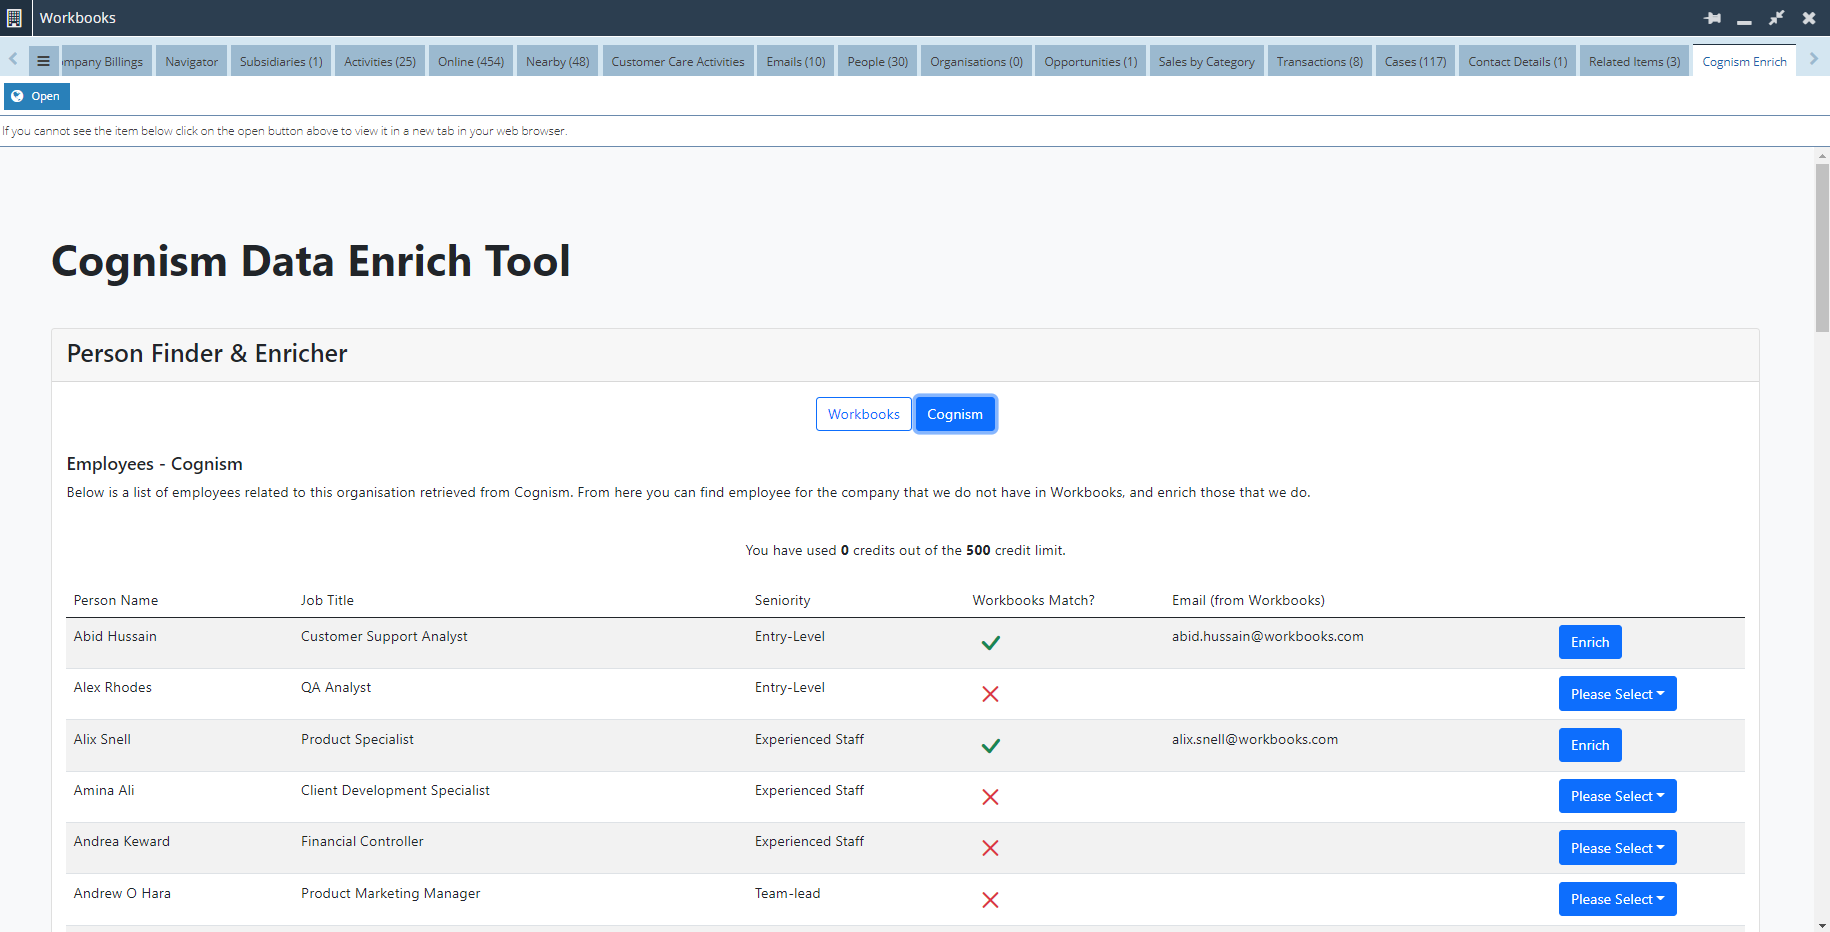
You will also see 2 additional columns which are ‘Workbooks Match?’ and ‘Email (from Workbooks)’. The ‘Workbooks Match?’ column will indicate if a person already exists in Workbooks. If you see an ‘X’, this means that this person doesn’t exist in Workbooks. Similarly, the ‘Email (from Workbooks)’ column will indicate if an email already exists in Workbooks. If the relevant field is left blank, this means that for this person, an email doesn’t already exist in Workbooks.
NOTE: Usually, if the ‘Workbooks Match?’ column is marked as ‘X’ then it is likely that the ‘Email (from Workbooks)’ column will also be blank
If you have spotted a person retrieved from Cognism that doesn’t already exist in Workbooks under that specific organisation, then you will need to create and/or enrich this person into the platform.
For that specific individual, you will need to click on the blue dropdown menu called ‘Please Select’. From there, you will be presented with 2 options for this person. These are ‘Create’ and ‘Create & Enrich’.
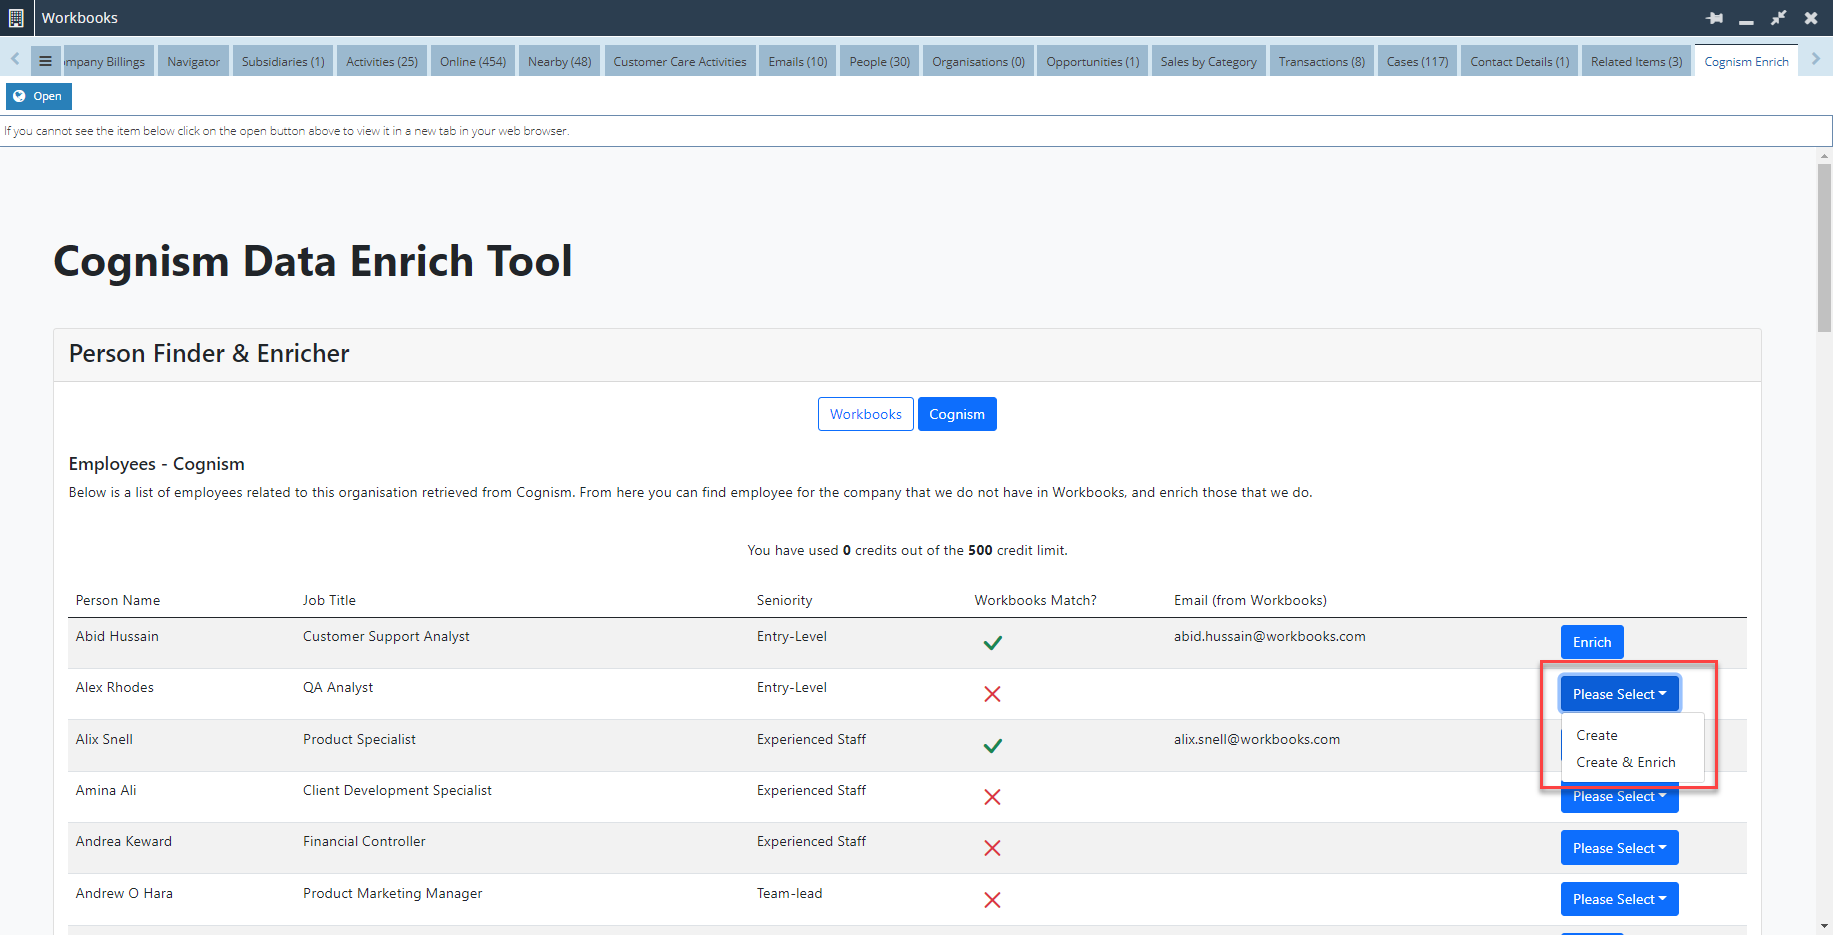
If you select the ‘Create’ option, you will be directed to the Person Creation iFrame where you will be presented with a list of fields found for that selected person that have been retrieved from Cognism. You will need to review ALL the data in these fields to ensure it is valid. For example, in the ‘Email Address’ field, you will have the option to select more than 1 email address (if applicable) and/or amend the email. Once you are happy with the data, click the ‘Create’ button to create a person record which is associated with this organisation.
You will then see a browser popup asking you to confirm whether “you wish to create a person record with the selected data”. Click ‘Ok’ if you are happy to proceed.
As prerequisite to using the ‘Create & Enrich’ option, you will be charged 1 credit per create & enrich of a record.
NOTE: The amount of credit that a client starts with will depend on much has been purchased initially as agreed with their Account Manager.
When selecting the ‘Create & Enrich’ option, you will see a browser popup asking you to confirm whether you wish to spend a credit to create and receive information on that specific person. Click ‘Ok’ if you are happy to proceed.
Then you will again be directed to the Person Creation iFrame where you will be presented with a list of fields found for that selected person that have been retrieved from Cognism.
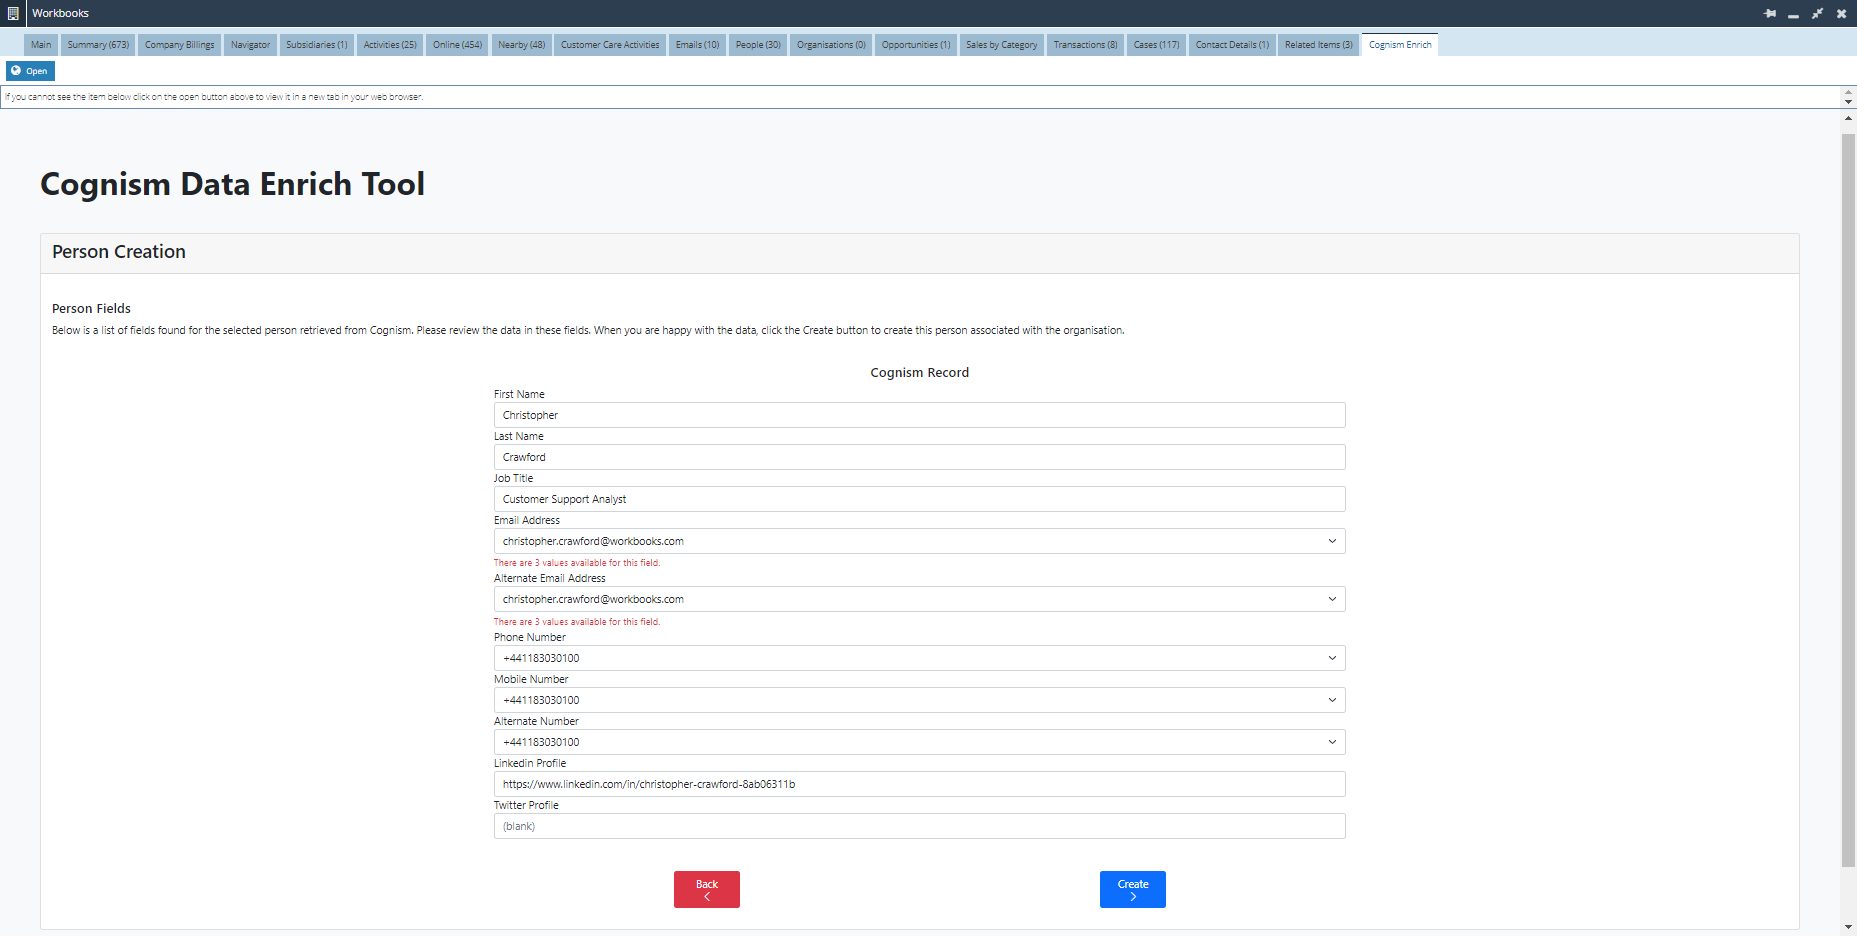
Similar to the ‘Create’ option, you will need to review ALL the data in these fields to ensure it is valid. Once you are happy with the data, click the ‘Create’ button to create a person record which is associated with this organisation.
You will then see browser popup asking you to confirm whether “you wish to create a person record with the selected data”. Click ‘Ok’ if you are happy to proceed.
Finally, you will again see a green validation message at the top of the screen confirming that this person has been created.

In the scenario where a person already exists in Workbooks and has also been retrieved via Cognism, you may choose to simply ‘Enrich’ the record with Cognism’s data. In the Cognism filter, you will see that a person has a ‘✓’ under the ‘Workbooks Match?’ column which will indicate that they already exist in Workbooks. Should you choose to then ‘Enrich’ this person’s record, you will be charged 1 credit per enrich of a record.
Next you will see a side-by-side comparison of Workbooks & Cognism fields for that specific person. You will now be able to compare each field and make any necessary additions & amendments. For example, the Cognism data may contain a job title for a person which does not currently exist in the Workbooks record. Click the ‘Select’ button on either the left side (to indicate that you wish select the Workbooks field) or the ‘Select’ button on the right (to indicate that you wish select the Cognism field).
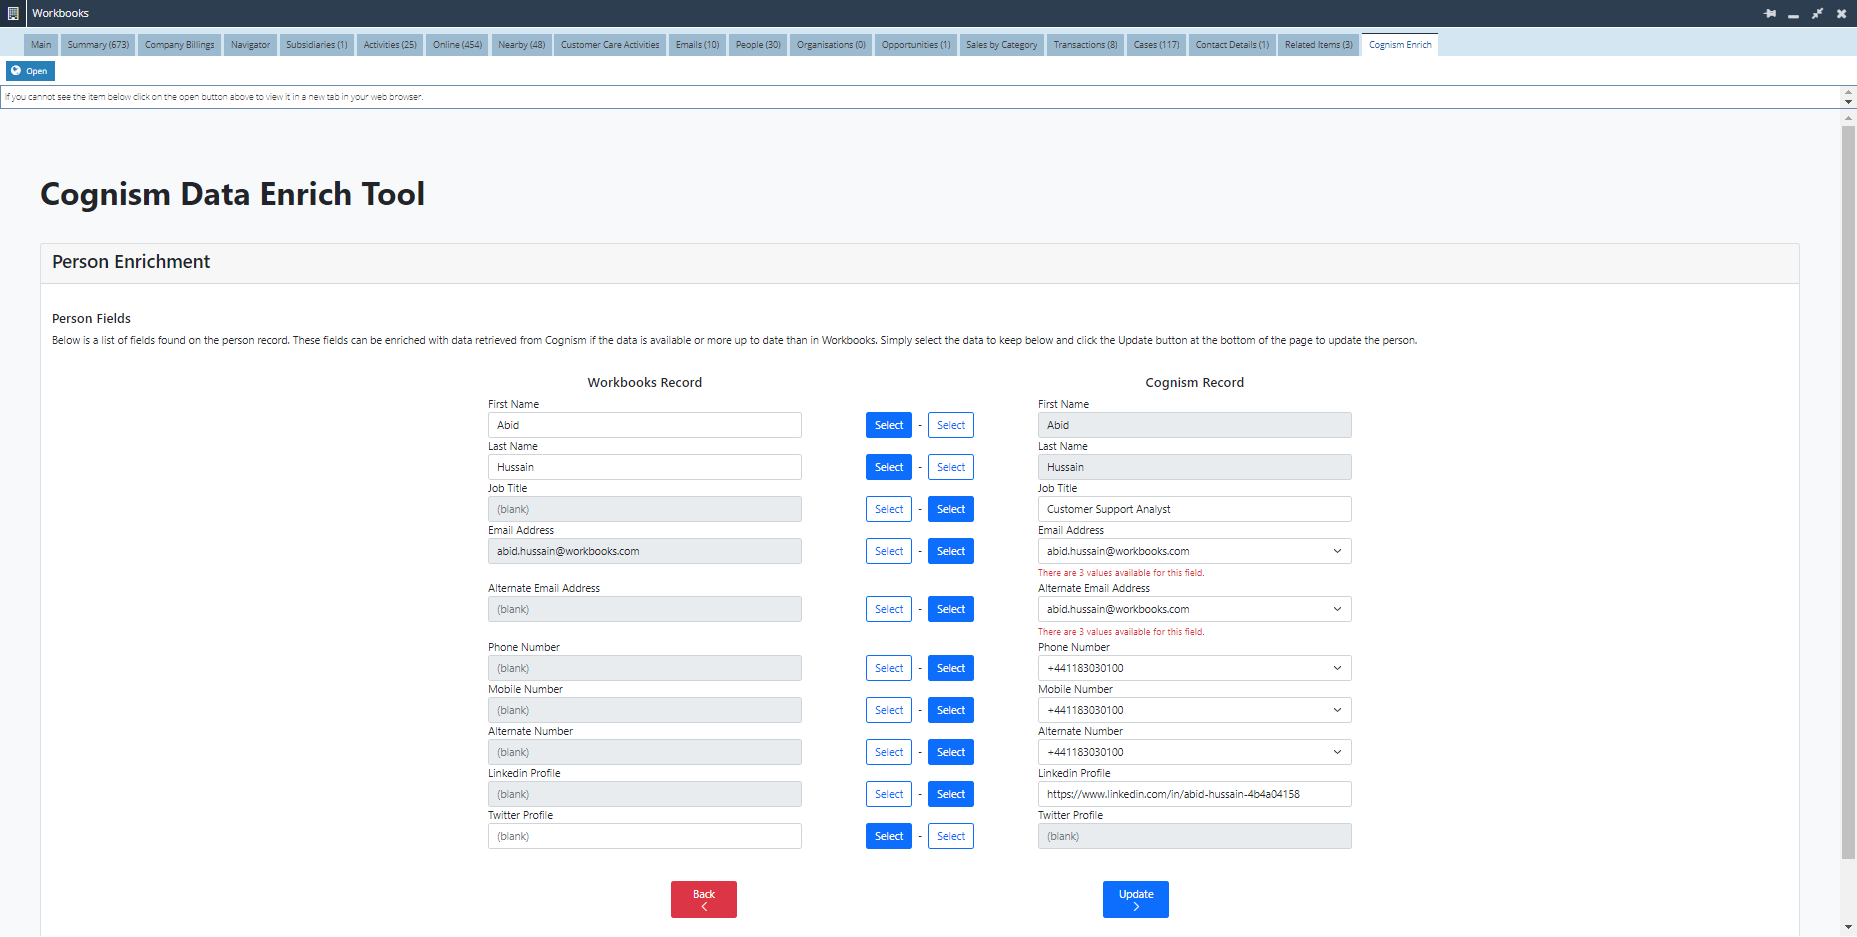
Once you are happy with the data, click the ‘Update’ button to update a person record which is associated with this organisation.