


Dynamic Linked Items & Picklists
Dynamic Linked Items (DLIs) or Dynamic Picklists are a type of custom field that allow you to link one record to another record by selecting values from a report-driven picklist, rather than a static list. DLIs are useful when there may not already be an out of the box link between two records types, or you’re getting creative with custom record types.
Key features of Dynamic Linked Item(DLI):
- Linking Records – Connect one Workbooks record(Current/Source record) to another such as an Opportunity to a Custom Record type(Target record).
- Drill-through in Reporting – DLIs can be used to access data from a different Record type whilst Reporting. For example your Report is based on Opportunities but you pull in data from a Custom Record type, you can do so by using the DLIs on Opportunities to Drill-through to the Custom Record type.
- Supports Relationships – DLIs can be configured to automatically create relationships between the Current/Source and Target records, so the link appears in the relevant related-record tabs and can be reported on.
- Report-based Picklist – On the record type the Custom Field type (DLI) is created, it will appear as Picklist with link buttons to let user to navigate directly to the selected records.
- Display as Tab – DLIs can be exposed as a Tab on the Target record i.e., on Opportunities(current/source record) it will be a report-driven picklist but on a Custom Record Type(Target Record) we can configure this to be a Tab.
Key Features of Dynamic Linked Item(DLI) & Dynamic Picklists:
- Auto-Populate Mapping: These Custom Fields can configured so that when a value is selected, some additional fields are also populated on the record with data from underlying Report used in the setting up on these Custom Field. (e.g. pulling in phone number, email address based off the person name selected in the list of drop-down option on DLIs/Dynamic-picklist).
- Constrain Results: Results can be constrained using mappings so that the picklist only shows values relevant to the record you are working on (e.g. only Contacts related to the selected customer). More information on this type of Dynamic Linked Item can be found here.
A Dynamic Picklist is built in the same way as a Dynamic Linked Item, the differences being that a Dynamic Picklist field doesn’t include a button on the field to allow you to get direct directly to the record and only a Dynamic Linked Item can be used as a drill through on a Report.
Dynamic Linked Items & Picklists give you values to select based on a Report.
Note
If a Dynamic Linked Item field on one of your records displays "X (not in list)", then the record that was stored in that field may have been deleted, or no longer meets the criteria of your report or the constraints on that field.
Basic Dynamic Linked Items & Picklists
Below are two worked examples to run through how to create a basic Dynamic Linked Item and Dynamic Picklist without using constraint mappings.
Example 1: Adding a primary contact to an Opportunity record and populating a field with their telephone number (Dynamic Linked Item)
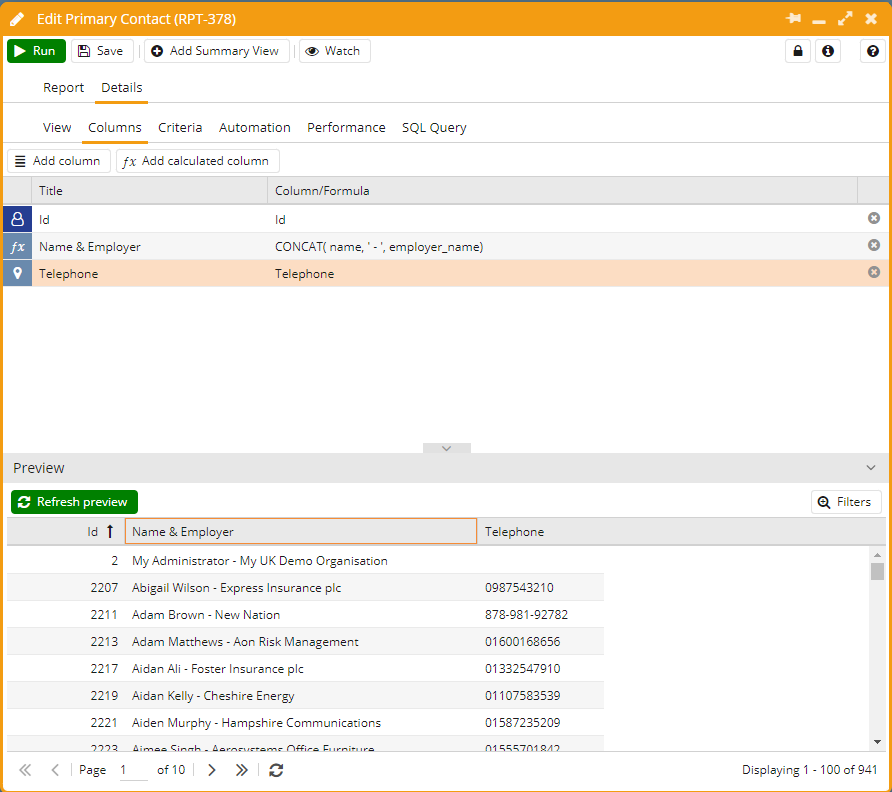
Step 1: create a Report based on a Person object that contains the following columns:
- The Person’s ID.
- The Person’s name and Employer concatenated together. (This makes it easier when using the picklist to make sure you are selecting the right person , especially if you have more than one person with the same name in your database.)
- The Person’s telephone number.
You can add other columns and apply criteria to narrow down the people to choose from if you like. Your resulting Report will look something like the one in the screenshot below.
Step 2: is to create two Custom Fields on an Opportunity record:
The first Custom Field is to hold the telephone number for the primary contact so simply create a text field called Telephone Number. (Start > Configuration > Customisation > Record Types > Opportunities > Custom Fields > New Custom Field.)
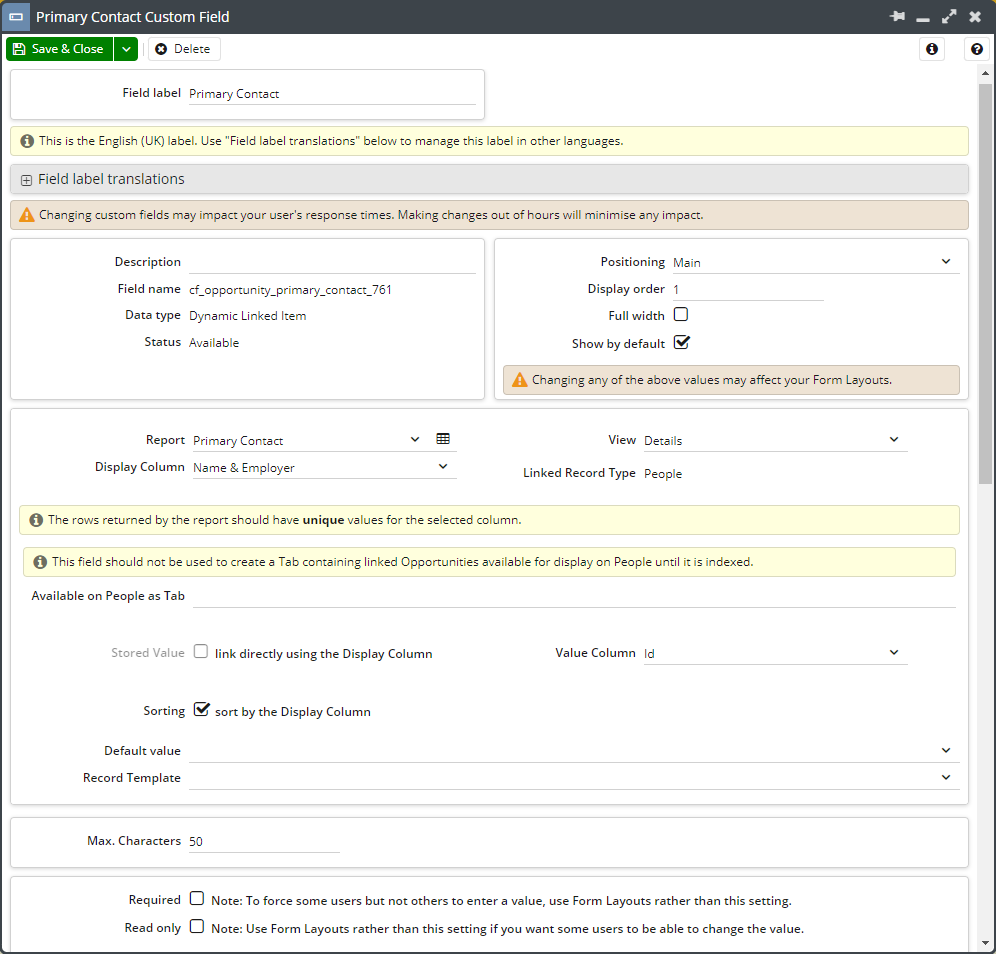
The second Custom Field is for the primary contact in the Opportunity and will be populated using the values in the Person & Employer column in the Report already created.
When creating the field, call it Primary Contact and choose a Data type of Dynamic Linked Item. Use the dropdown picklist next to Report to select the Report that was created earlier. Use the picklist next to Display Column to choose the Person & Employer column from the report.
Note
Choosing the Person & Employer column causes the Stored Value checkbox to be greyed out but opens a field called Value Column. Use the picklist next to Value Column to choose ID. (Workbooks has 'recognised' that you've chosen a concatenated field from your report and thus needs to be 'told' how to identify the right person record and uses the ID field to do this.)
Ensure there are values available in the field chosen for Value Column or the Dynamic Line Item cannot work properly – you will be unable to select records without a value in that field.
In order to populate the Custom Field called Telephone Number with the relevant number for the primary contact, click the Add mapped Field button and under Report Column choose Telephone and under Form Field choose Telephone Number.
With auto-refresh on, in this example, every time an Opportunity is opened, the telephone number will be refreshed to reflect the value on the linked Person record. A warning will be displayed at the top of the record if auto-refresh has changed a mapped value on your record.
In this example, we’ve pulled through the primary contact’s telephone number and used it to populate a custom field we’ve created. You can, however, use data from your underlying report to auto-populate standard fields within Workbooks if that achieves your business requirements.
Your Dynamic Linked Item field will look like this:
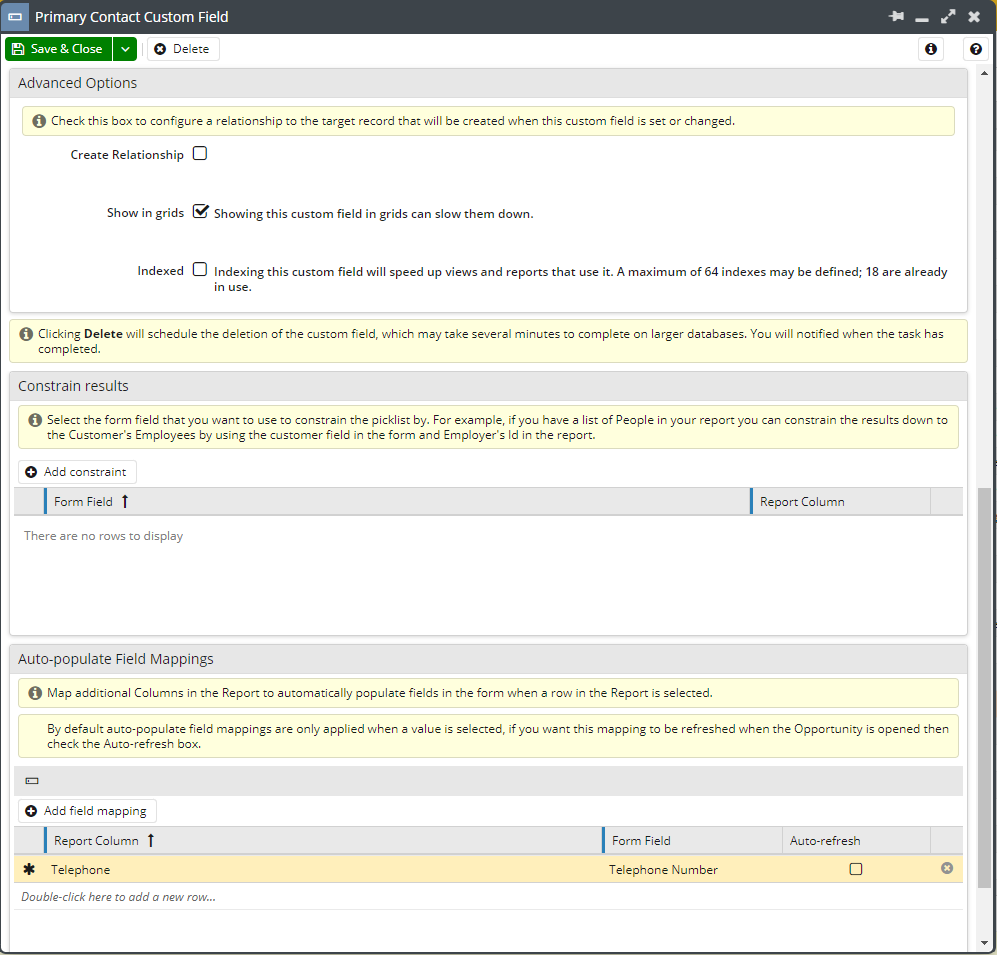 Dynamic Linked Item field
Remember to click Save & Close.
Now within an Opportunity record, you’ll see a Custom Field called Primary Contact. You can select a person from those already on your database and this will auto-populate the Custom Field called Telephone Number with the number stored in your database for that Person, as shown below.
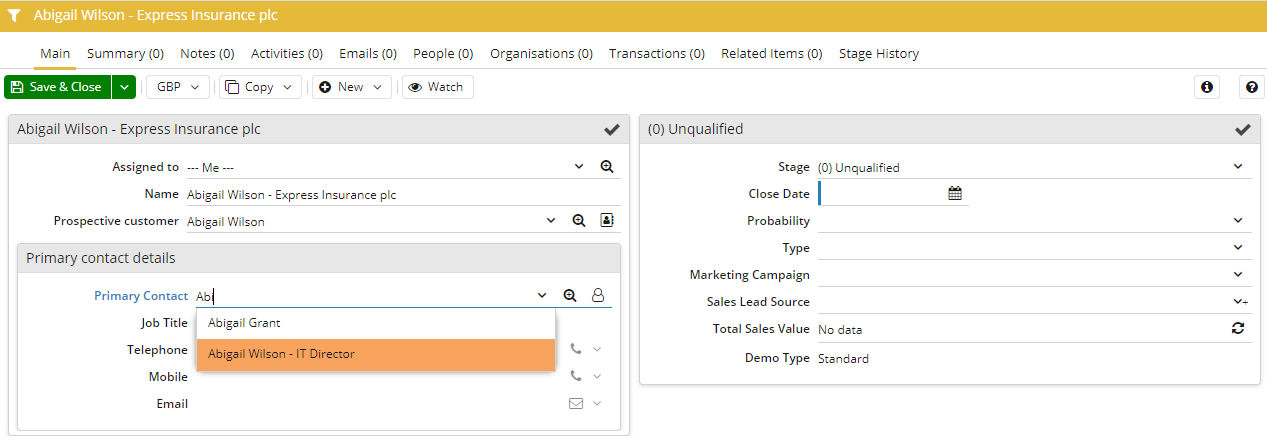
Notice that you can click on the button next to the Primary Contact’s name to open the relevant Person record.
NOTE: You can control the order in which these fields are displayed either using the numbers in the Display order field when creating the Custom Field OR using Custom Form Layouts.
Example 2: Adding Partner details to an Invoice and displaying their discount (Dynamic Picklist)
Some of our customers transact business via their partner network and offer different discounts to different Partners. In this example, a Custom Field has already been created on Organisation records to record the percentage discount that the Partner is entitled to. We want to record on an Invoice Line Item which Partner is involved in the deal and having chosen the Partner, have the Additional Discount field on the Opportunity Line Item automatically display the percentage discount agreed for the Partner.
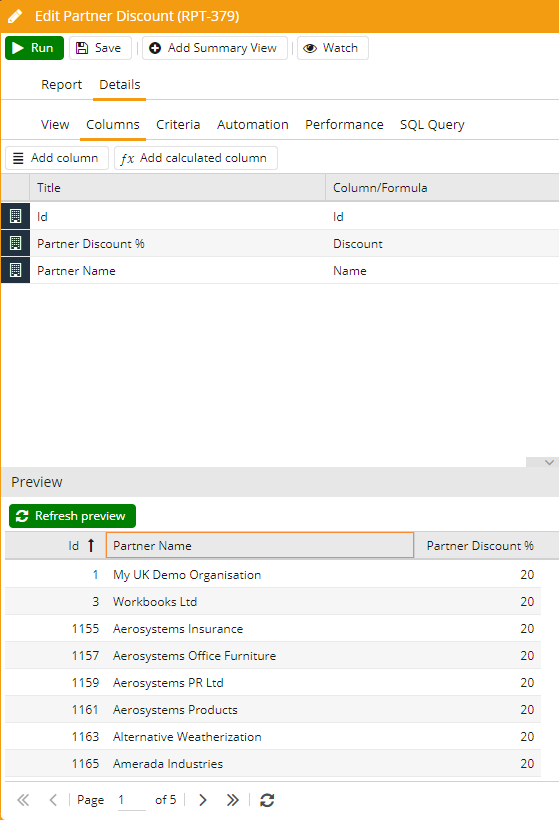
First create your Report, based on an Organisation object, showing columns for:
- The Organisation’s ID.
- The Organisation’s name.
- The Percentage Discount field.
To shorten the list to show only Partners you can then apply a criterion to limit the results to Organisations who are Partners of your Own Organisation.
Here’s our Report:
Follow the path Start > Configuration > Customisation > Record Types > Customer Invoices > Line Item Custom Fields > New Custom Field to ensure you have a simple percentage field labelled ‘Partner discount’ and if not then create it in the same way as above.
Now create your Dynamic Picklist. Through the same path as above create a new custom field:
When creating the new field, label it ‘Partner’ and set the Data Type to ‘Dynamic Picklist’. Use the picklist in the Report field to select the Report created above and select ‘Partner name’.
At the bottom of this window (scroll down) there is an option to ‘Add mapped field’. Select ‘Percentage discount’ for Report Column and ‘Partner discount’ for Form Field.
NOTE: Make sure you click Save!
This is what your Dynamic Picklist item field should now look like :
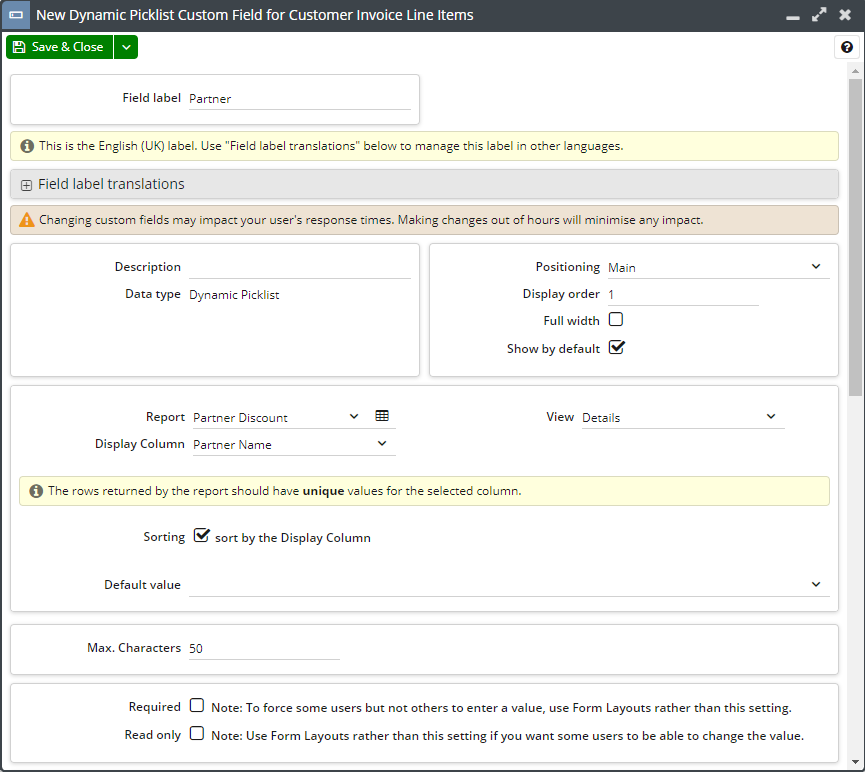
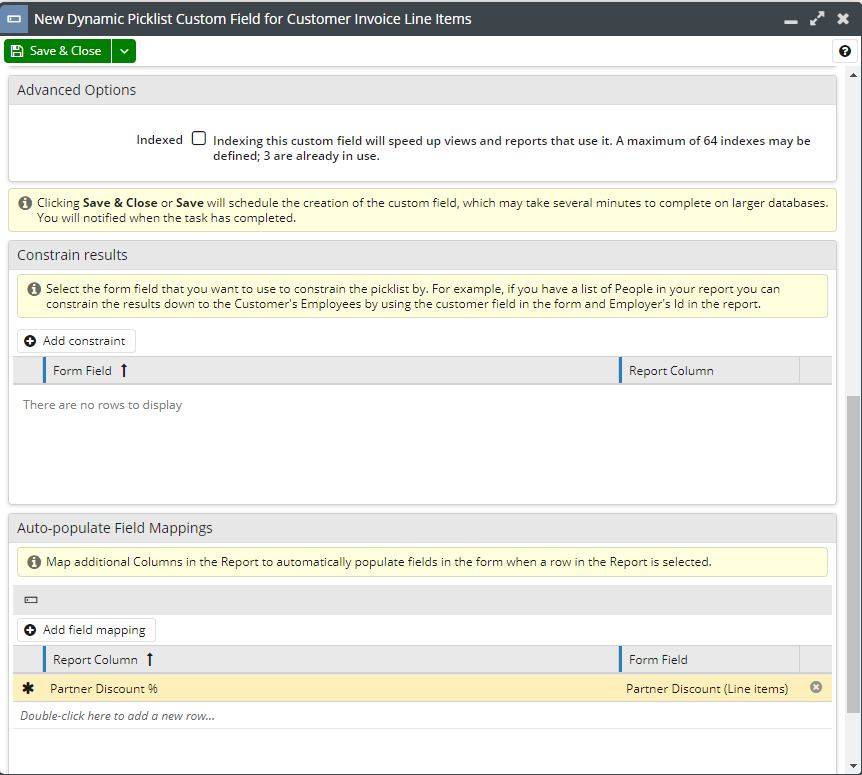 Dynamic Picklist item field – finished
Now, when you create a new Invoice Line Item there will be two new columns available: ‘Partner’ and ‘Partner discount’ (you may need to activate the columns within the Line Items view to see them). This means you can pick which partner the Invoice is associated with and if that Organisation has a discount associated to it, then the ‘Partner discount’ field will be auto-populated with that value.
Note
The discount column doesn't automatically apply that discount to the Line Item, it's simply designed to inform the User of the partner discount. If you want the discount to be applied, you might like to consider having a script written that will do this automatically for you.