


Setting up Mail Sync with Outlook
Mail Sync (formerly known as WESS) lets Workbooks connect directly to your email server so you can sync emails, contacts, tasks, and meetings. This page walks you through how to get set up with Mail Sync, including:
Purchasing the Mail Sync license
The Mail Sync license is purchased as an add-on per user. For pricing details, visit our website Pricing Calculator or contact our sales team.
Activating the Mail Sync module
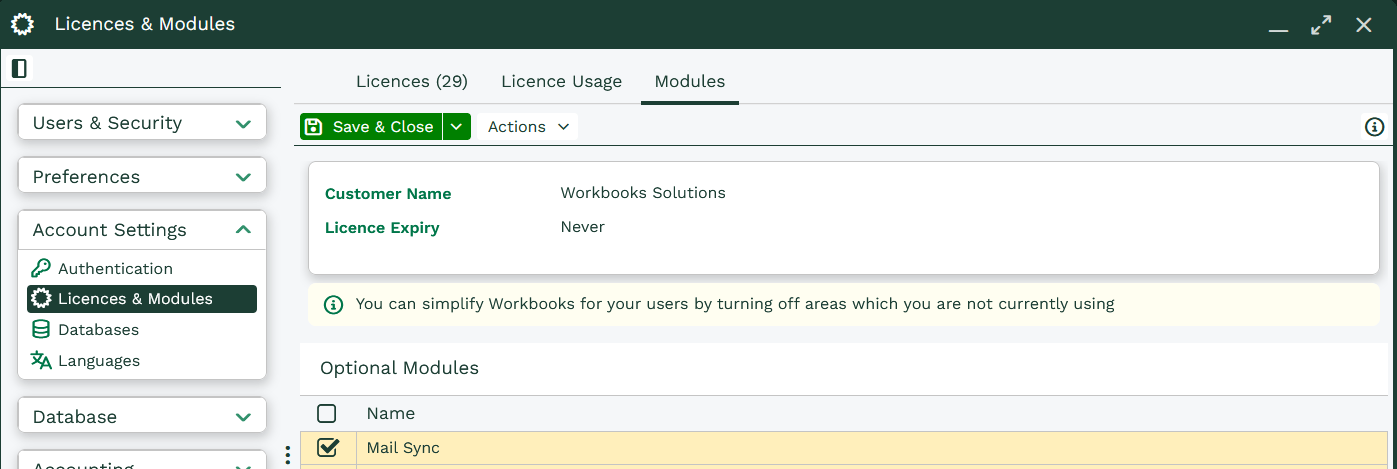
Once you’ve purchased the license, you’ll need to enable the Mail Sync module in Workbooks. Go to Start > Configuration > Account Settings > Licenses & Modules > Modules tab. Select Mail Sync, then click Save & Close.
Setting up Mail Sync for Users
Open the Mail Sync admin panel by going to Start > Configuration > Email Integrations > Mail Sync. You’ll see a prompt asking if you want to connect your database to the Mail Sync service. Select Yes to continue.

The next page confirms the connection has been successful. Click Continue to move on. You’ll then be taken to the Users tab, which will be empty at this stage. You’ll also notice the following three tabs across the top of the page:
- Users – you can manage users’ access to Mail Sync and quickly check their sync status.
- Configuration – you can manage how your Organization is set up and how Users connect to Mail Sync.
- Databases – shows which databases are connected to Mail Sync.
Note
Connecting more than one database to Mail Sync is technically possible. However, this isn’t recommended and we DO NOT support it.
Users
The Users tab shows all users with a Mail Sync license. At a quick glance you’ll see:
- If a Users’ sync is enabled or disabled
- A Users current sync status, including any errors
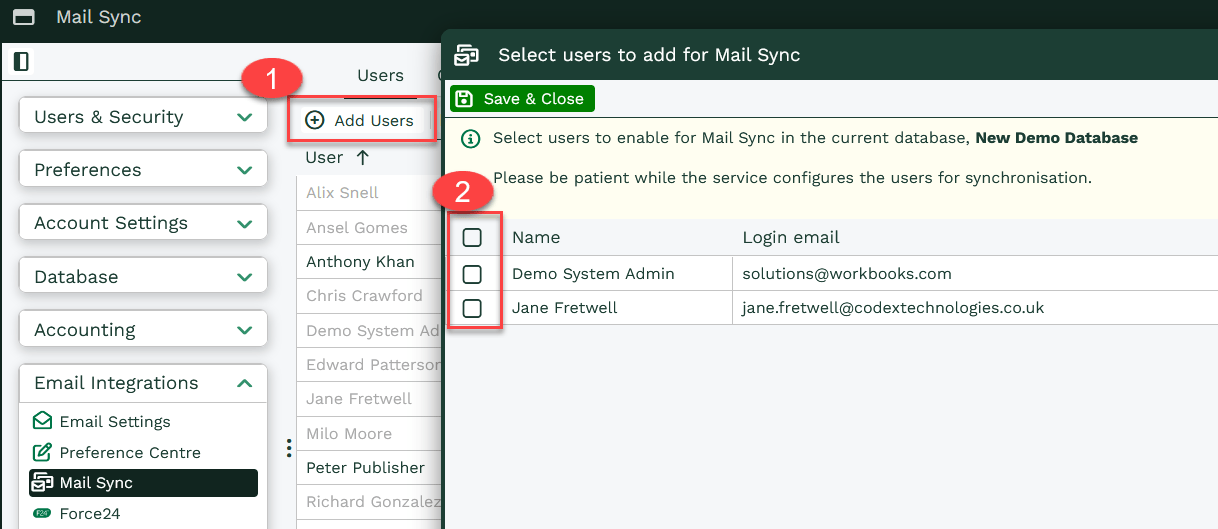
If a User already exists in Workbooks, you can add them to Mail Sync within this tab. Select ‘Add Users’ in the top left. This opens a list of all users in your database, where you can select one or more users to assign Mail Sync access in bulk.
Once a User has been added, they’ll appear in the list on the Users tab. If their sync is disabled, their entry will be greyed out.
To remove a user from Mail Sync, scroll to the right of the Users tab and select the X icon next to their name.
Configuration
Opening the Configuration tab, you’ll be prompted to select your default Organization. Once selected, you’ll see the following sections where you can manage your Mail Sync setup:
- Users – providing more detailed information than the Users tab, including sync status, initialization details, and any errors. We recommend using this section for reference only. Make any changes to users from the Users tab, as outlined above.
- Statistics – details for each Mail Sync User, including how many items were last synced.
- Activity – includes a log of all changes made in the Mail Sync admin panel, such as updates to how users access Mail Sync
- Email Configuration – choose how Users access Mail Sync.
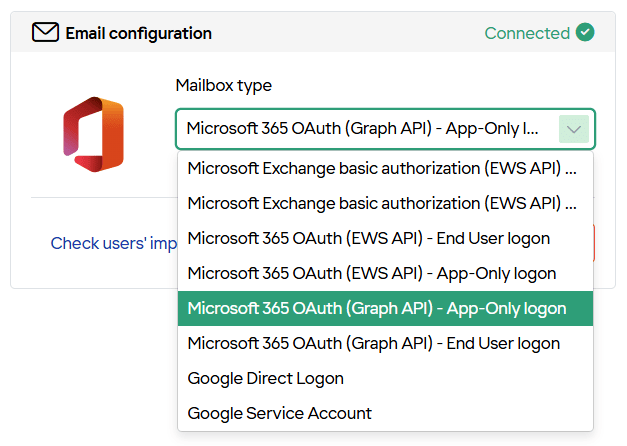
Mail Sync supports several Microsoft authentication methods, allowing you to select the option that best fits your setup.-
- Microsoft Exchange basic authorization (EWS API) – End User logon(only works for On-premise solutions, please refer to Deprecation of Basic authentication in Exchange Online | Microsoft Learn
- Microsoft Exchange basic authorization (EWS API) – Impersonated logon (only works for On-premise solutions, please refer to Deprecation of Basic authentication in Exchange Online | Microsoft Learn
- Microsoft 365 OAuth (EWS API) – End User logon (Please refer to Deprecation of Exchange Web Services in Exchange Online | Microsoft Learn)
- Microsoft 365 OAuth (EWS API) – App-Only logon (Please refer to Deprecation of Exchange Web Services in Exchange Online | Microsoft Learn)
- Microsoft 365 OAuth (Graph API) – End User logon
- Microsoft 365 OAuth (Graph API) – App-Only logon
- Google Direct Logon
- Google Service Account
-
Note
Microsoft are deprecating EWS in October 2026. We recommend selecting one of the Graph API options for Outlook connections or Google options for GMAIL.
- Customizations – manage your Mail Sync Add-in profiles. Here you can create, update, delete and apply Add-in profiles across your Organization.
Databases
This tab lists the databases configured to use Mail Sync. We recommend only connecting one database (your main database). Using multiple databases isn’t recommended and isn’t supported.
IT Checklist
If you’re using a Microsoft Exchange login method, you’ll need your Exchange server details.
For Microsoft Exchange Impersonation, you can use your impersonation user’s login details to automatically discover your Exchange Web Services (EWS) URL.
If autodiscover doesn’t work, you’ll need to enter the EWS URL manually. For Office 365, this is typically: https://outlook.office365.com/EWS/Exchange.asmx
Impersonation method for authentication can simplify setup, as users don’t need to authenticate their own accounts individually.
If you choose Impersonation:
- Your IT team must set up the impersonation user in Exchange
- User mailboxes must be configured to authenticate via the impersonation user
- You’ll need the impersonation user’s email address and password
Mail Sync supports multi-factor authentication (MFA) when using the Microsoft 365 OAuth (EWS API) login methods.
If you run into issues, use a Microsoft-generated app password in place of your standard password wherever a password is required.
If you’re using an on-premise Exchange setup, you’ll need to allow Mail Sync to connect through your firewall.
Make sure your Exchange server and any intervening firewalls accept HTTPS connections (TCP port 443) from the following IP addresses:
- 23.97.212.108 (sync service)
- 104.45.14.249 to 104.45.14.253 (provisioning system)
These IPs must be whitelisted to allow Mail Sync to communicate with your Exchange environment.
Supported Exchange auth methods:
Mail Sync supports several Microsoft authentication methods, depending on how you want users to connect.
End user logon
- Microsoft 365 OAuth (EWS API) – End User logon
- Microsoft 365 OAuth (Graph API) – End User logon
Users authenticate their own accounts directly from Workbooks. This is the simplest option.
To authenticate in this way, a User will need to:
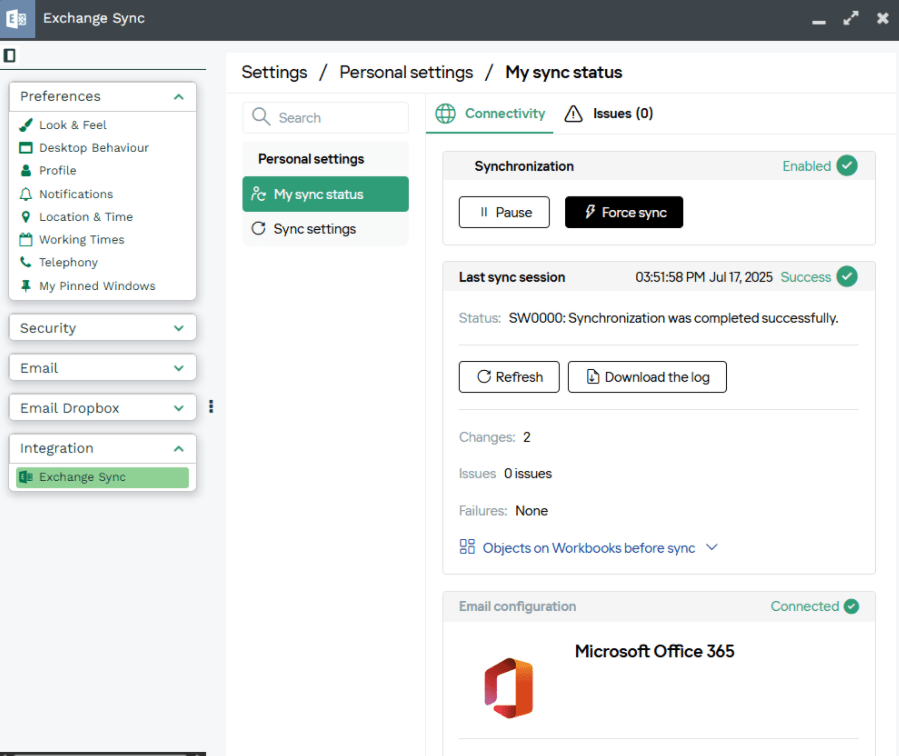
- Go to Preferences > Integration > Mail Sync > Click ‘Refresh’ under Email Configuration
- Sign in with Microsoft 365 credentials to authorize Mail Sync
App-only (Impersonation-style) logon
- Microsoft 365 OAuth (EWS API) – App-only logon
- Microsoft 365 OAuth (Graph API) – App-only logon
An administrator configures authentication for all users. Users don’t need to sign in individually. This is the most secure option.
To authenticate in this way, a 365 admin will need to:
- Make sure an Impersonation User is already configured in Microsoft
- Authenticate the Impersonation User when prompted
- Re-enable Users so sync can begin
Configure email authentication
- To set up your email configuration go to Start > Configuration > Email Integrations > Mail Sync
- Select your Organization (If you have more than one, repeat this for each one)
- Open the Details tab and find the Email Configuration section
- Choose your preferred authentication method
Note
When using the Domain\Username format, make sure you use a backslash (\) as shown. A forward slash (/) won’t be recognized and will prevent the connection to the Exchange provider.
Configuring Usernames, Passwords and Impersonation Users
An impersonation user allows Mail Sync to send and access emails on behalf of your users. It works by:
- Using a single set of credentials to manage all mailboxes
- Sending emails as the mailbox owner, so it appears unchanged to recipients
To use Impersonation:
-
- Enter the Impersonation user’s details in the Email Configuration section
- Once configured, all users who enable sync will use this setup automatically
User Preferences
If you don’t have an impersonation user, each user will need to enter their own password. Each user should follow the steps above about how to authenticate via End User Logon.
Depending on the login method you’ve chosen, users will see a prompt to sign in.
If Any is selected, users can choose from the available authentication options.
A system administrator can also view and update users’ Mail Sync login details. Passwords are encrypted to keep user data secure.
Next steps:
Now that Mail Sync is installed and configured, learn how to share emails, meetings, tasks and contacts between Workbooks and Outlook.