
Workbooks
  • Knowledge Base
  • Customer Forum
  • Training
  • Support Portal
  • Support Processes
Login
  1. Home
  2. Support
  3. Knowledge Base
  4. Knowledge base
  5. Integrations
  6. Electronic Signing Tools
  7. Docusign Integration
  8. DocuSign - Worked Examples
  9. Multiple Document Sends
Support

Knowledge Base

Browse our knowledge base articles to quickly solve your issue.

  1. Home
  2. Support
  3. Knowledge Base
  4. Knowledge base
  5. Integrations
  6. Electronic Signing Tools
  7. Docusign Integration
  8. DocuSign - Worked Examples
  9. Multiple Document Sends
  • Welcome to the Knowledge Base
  • Introduction
    • Using the Knowledge Base
    • Editions & Licensing
      • Renewing Licences
    • Workflow
      • Queues
    • Logging In
      • Configuring Security Policies
      • Google Authentication
      • Login Protection
      • Microsoft Azure Active Directory
        • Link Workbooks to Microsoft Azure
        • Setting up User Templates
        • Locking down your Workbooks
    • Support Processes
  • Training
    • Training Videos
    • Training Courses
  • Getting Started
    • Supported browsers
    • Introduction
    • Desktop
      • Tips & Tricks on the Desktop
      • Welcome Messages & Bulletins
    • Records
      • External Links to Workbooks records
      • Tabs
        • Default Tab Views
        • Summary Timeline View
        • Overview Tab
      • Watching Records
      • Notes
    • Landing Pages
      • Bulk Actions
        • Scheduled Bulk Actions
      • Customising Views
        • Customising Columns
        • Filtering
          • Custom Filters
        • Calendar Views
        • Card View
          • Report Card View
          • Worked Examples of Card Views
      • Deleted Items
      • Edit Grids
      • Exporting Data
      • Exporting to MS Excel
    • Workbooks on Mobiles and Tablets
  • Preferences
    • Introduction to Preferences
    • Setting your Preferences
      • Email Accounts
      • Notifications & Reminders
  • Activities
    • Introduction to Activities
    • Using Activities
      • Meetings
        • Integrating Workbooks and Google Calendar
          • Installing and Managing Workbooks and Google Calendar Integration
          • Synchronising your Google Calendar with Workbooks
      • Follow-on Activities
  • Cases
    • Introduction to Cases
    • Displaying & Adding Cases
    • Managing Cases
    • Case Portal
      • Installation
        • Custom Fields
        • Case Portal Configuration
          • Company Details
          • General
            • Case Portal Reports
          • New Case
          • Help Text
          • Emails
          • Advanced Features
          • Field Mappings
          • Help Dialog
          • Product Area Questions
        • Case Portal Additional Features
          • Setting up Public/Private Activity creation
          • Setup Registration Emails from a Person
          • Automatic Emails on Case Status Change
      • Using the Case Portal
        • Case Updates - Public & Private Activities
        • Inviting a Person to the Case Portal
  • Email
    • Introduction to Email
    • Working With Emails
    • Email Signatures
    • Sending Bulk Email
    • Common Email Errors
    • Email Integrations
    • Mailing Lists
  • Forecasts & Quotas
    • Introduction to Forecasts & Quotas
    • Sales Forecasts
      • Adjusting Forecasts
      • Included Forecasts
    • Sales Quotas
  • Importing Data
    • Introduction to Importing
    • Preparing your Import Data
      • Import Templates
      • Compulsory fields for Import
    • Workbooks Import Wizard
      • Uploading your data
      • Defining Field Mappings
      • Extending your Import to other Record types
      • Checking for Duplicates
      • Running and Reviewing your Import
    • Managing your Imports
      • Undoing an Import
  • Leads
    • Introduction to Leads
    • Displaying & Adding Leads
    • Converting Leads
  • Marketing
    • Introduction to Marketing
    • Marketing Campaigns
      • Displaying & Adding Campaigns
      • Campaign Management
      • Campaign Membership
      • Tracking URLs on Campaigns
      • Integrating DotDigital and Workbooks
        • Configuring Workbooks and Dotmailer
      • Integrating MailChimp and Workbooks
        • Configuring Workbooks and MailChimp
    • Mailing Lists
      • Creating Mailing Lists
    • Products
      • Pricing Schemes
      • Supply Scheme
      • Product Bundles
    • Mailshots
      • Creating a Mailshot
    • Upload Library
      • Using the Upload Library
    • Templates
      • Creating Templates
      • Creating a Template to show multiple lines
      • Extra Template Placeholders
    • Using HubSpot with Workbooks
    • Event Management
      • Introduction to Event Management
      • Enabling the Event Management Module
      • Using Event Records
        • Event Records
        • Event Sessions
        • Event Speakers
        • Event Sponsors
        • Event Products
        • Event Tickets
        • Event Attendees
      • The Event Management Portal
        • Introduction to the Event Management Portal
        • Prerequisites for installation
        • Accessing the Plugin
        • Installing the Event Management Portal
        • Amending Event Portal Parameters
        • Adding Custom CSS to the Event Portal
      • On The Day Registration App
      • Setup On the Day Registration App
    • Compliance Records
      • Introduction to Compliance Records
      • Enabling Compliance Records
      • Creating Compliance Records
      • Using Compliance Records
    • Spotler Integration
      • What is Spotler?
      • Navigating your Spotler homepage
      • GatorMail
        • Introduction to GatorMail
        • Managing your GatorMail Account
          • Domain Setup
        • GatorMail Configuration
          • GatorMail Field Mappings
            • GatorMail Hard Bounces
          • Preference Centres & Landing Pages
            • Preference Centre Setup
        • Creating Emails in GatorMail
          • Imbedding Images and Videos
        • Sending Emails in GatorMail
          • Sending GatorMail Campaigns
            • Campaign Action Types
            • Ramp-up
            • Testing Campaigns and Emails
          • Using SendForensics
          • Understanding your Campaign results
        • Advanced Features
          • Gator Smart Forms
          • GatorMail - Dynamic Content
      • GatorLeads / Web Insights
        • Tracking Code
          • Restricting Page Tracking
        • Setting up the Plugin
        • Viewing Web Insights Data on your Form Layouts
        • Domain Names and Online Activities
        • Reporting incorrect Leads created through Web Insights
        • Reporting on Web Insights data
        • Using UTM Values
        • Why aren’t Online Activities being created in the database?
        • Why is GatorLeads recording online activities in a foreign language?
      • GatorSurvey
      • GatorWorkflow
        • Spotler Data Sync
        • Triggered Mailshots
      • GatorPopup
  • Opportunities
    • Introduction to Opportunities
    • Displaying & Adding Opportunities
    • Opportunity Line Items
    • Opportunity Relationships
  • Integrations
    • Mapping
      • Introduction to the Mapping Module
      • Using the Mapping Module
      • Using Mapping in Reports
        • Changing the size/colour of Map Pins
    • Electronic Signing Tools
      • Docusign Integration
        • DocuSign Functionality
          • Copy Document on Signature
          • Update Related Records
          • Sending Multiple Documents
          • People, Organisations & Cases with DocuSign
          • Invoice Payments with DocuSign
          • Managing DocuSign Documents
        • Setting up the DocuSign Integration
          • Authentication with DocuSign
          • Production vs Sandbox
          • Creating a Document with a DocuSign Template
          • Creating a Document with a Workbooks PDF
          • DocuSign Fields
          • DocuSign Settings
          • Form Layout Configuration
        • DocuSign - Worked Examples
          • Taking Payments
          • Updating Related Records
          • Multiple Document Sends
          • Creating a Template for Cases
          • Creating a Template for Organisations
          • Creating a Template for People
          • Unified PDF for Transaction Documents
        • DocuSign - Reporting
          • Multiple Send Report Grid
          • Document Review Report
          • Monitoring Integration Errors
      • Adobe Sign Integration
        • Introduction to Adobe Sign
        • Authentication with Adobe Sign
        • Installing the Integration
        • Integration Monitoring & Error Handling
        • Setup of Adobe Sign
        • Adobe Sign Fields & Form Layout Configuration
        • Optional Custom Fields for Adobe Sign
        • Adobe Sign Button Process
        • Using the Adobe Sign Integration
    • Creditsafe Integration
      • Installing the Creditsafe Plugin
      • Configuring Organisations to use the Creditsafe Integration
      • An example of how to use the Creditsafe Integration
    • Zapier
      • Introduction to Zapier
      • Available Triggers and Actions
      • Linking your Workbooks Account to Zapier
      • Setting up Zaps
        • Posted Invoices to Xero Invoices
        • Xero payments to Workbooks Tasks
        • New Case to Google Drive folder
        • New Case to Basecamp Project
        • New Workbooks Case to JIRA Ticket
        • Jira Issue to new Case
        • 123FormBuilder Form Entry to Case
        • Eventbrite Attendee to Sales Lead and Task
        • Facebook Ad Leads to Sales Leads
        • Wufoo Form Entry to Sales Lead
        • Posted Credit Note to Task
        • QuickBooks Online
          • Initial Setup
            • Authentication with QuickBooks Online
          • People & Organisations to QuickBooks Customers
          • POSTED Workbooks Invoice to QuickBooks Online
          • QuickBooks Online Payment to Workbooks Invoice & Task
          • QuickBooks Sales Tax Code Lookup
        • Survey Monkey responses to Tasks
      • Multistep Zaps
    • Email Integrations
      • Email Dropbox
        • Setting up your Dropbox
        • Using your Dropbox
      • Workbooks Exchange Server Sync
        • Supported email clients
        • Set Up
          • Setting up the WESS
          • Setting up the Outlook Add-In
          • Customising the WESS Add-In
          • How to change Authentication setup for WESS
            • O365 Exchange authentication Troubleshooting
        • What gets synchronised?
          • Synchronising with the WESS
          • Synchronising with the WESS Add-in
          • How to force a sync
          • Best practice
        • WESS Troubleshooting
      • Workbooks Outlook Connector
        • Introduction to the Outlook Connector
        • Before downloading the Outlook Connector
          • System Requirements
          • Enabling the Outlook Connector
        • Download/update the Outlook Connector
        • Installing the Outlook Connector
          • Uninstalling the Outlook Connector
        • Using the Outlook Connector
          • Configuring the Outlook Connector's Settings
          • Identifying Records in Workbooks created in Outlook
        • Outlook Connector Troubleshooting
    • Event & Webinar Integration Tools
      • GoToWebinar
        • Installation
          • GoToWebinar Fields & Processes
          • Setting up Process Buttons for GoToWebinar
        • Authentication
          • Multiple GoToWebinar Accounts
          • Removing GoToWebinar Accounts
        • Create/Update & Cancel Webinars from Events
        • Event Attendees as Webinar Registrants
        • Event Speakers as Webinar Panelists
        • Retrieve Webinar Data
      • ON24
        • Installation
          • ON24 Fields & Processes
          • Setting Up Process Buttons for ON24
        • Authentication with ON24
          • Removing ON24 Accounts
        • Create Webcasts from Events
        • Event Attendees as Webcast Registrants
        • Retrieve Webcast Data
          • Reporting: Survey Responses
          • Reporting: Poll Responses
        • Retrieve Survey Data
        • Engagement Hub Interactions
    • Microsoft Office
      • Azure Active Directory
      • Excel
      • Outlook
      • Power BI
      • SharePoint
        • Authentication
        • Installation
          • Custom Fields & Processes
          • SharePoint Integration Settings
        • Using the SharePoint Integration
      • Word
        • Introduction to the Word Add-in
        • Deploying the Word Add-in
        • Creating Word Add-in Templates
          • Example Word Add-in Templates
        • Using Word Add-in Templates
        • Word Add-in Tips and Tricks
    • Outreach
      • Installation
        • Outreach Fields & Processes
        • Create Outreach Custom Field Mappings
          • Configure Outreach Field Dynamic Picklist
        • Sync Outreach Mappings
      • Outreach Authentication
        • Remove Outreach Account
      • Sync People to Outreach Prospects
        • People Field Mappings
      • Sync Organisations to Outreach Accounts
        • Organisation Field Mappings
      • Sync Workbooks Opportunities to Outreach
        • Opportunity Field Mappings
      • Sync Tasks/Activities from Workbooks to Outreach
        • Follow-Up Activities created via Scheduled Process
      • Sync Outreach Sequences to Workbooks
      • Sync Outreach Sequence States to Workbooks
      • Sync Outreach Sequence Step Numbers to Workbooks
      • Sync Prospects/Accounts/Opportunities from Outreach to Workbooks
      • Sync Outreach Tasks/Calls/Meetings to Workbooks
    • Scribe/Workbooks Connector
      • Connection Setup
        • Microsoft SQL Server Connection Requirements
      • Connector Control Blocks
      • Worked Example - Create, Read, Update & Delete
    • RingCentral
      • Installation
        • RingCentral Integration Fields and Processes
      • RingCentral Authentication
        • Remove RingCentral Account
      • Creating Phone Call Activities
      • Click to Dial
  • People & Organisations
    • Introduction to People & Organisations
    • Organisations
      • Displaying & Adding Organisations
      • Customers & Suppliers
    • People
      • Displaying & Adding People
      • Adding People to Outlook
    • Relationships
      • Change Employer Wizard
      • Direct Relationships
      • Third Party Relationships
    • De-duplication and Merge
      • Workbooks Merging
      • Workbooks DQ
      • Data Quality
    • Using Postcode Lookup
    • Data Enrichment
      • Introduction to Data Enrichment
      • Setting up Data Enrichment
  • Snippets
  • Reporting
    • Introduction to Reporting
      • Creating Reports
        • Standard Workbooks Reports
        • Creating a Pre-populated Report
        • Creating a Report from a Template
          • Report Templates
        • Creating a Blank Report
        • Auto-refreshing Report Views
      • Sharing Reports
    • Using Reports
      • Reporting Explained
        • Adding Targets, Conditional Formatting and CSS Styling
          • Calculated Targets
          • Target Sets
            • Creating a Target set for Closed Cases per Customer Support Agent
            • Creating a Target set for Closed Sales amount per Sales Person by quarter
        • Reporting with multiple currencies
        • Drilling into Summary Views
        • Improving Report Performance & Run Time
      • Displaying reports within Record Views
      • Displaying Reports
        • Reporting Views (Reports on Landing Pages)
      • Adding a Report view to a Dashboard
    • Charts
      • Creating & Using Charts
        • Bar Charts
          • Targets on Bar Charts
        • Line Charts
        • Pie Charts
        • Dial Charts
    • Exporting Reports
      • Emailing Scheduled Reports
    • Advanced Reporting
      • Types of Split Columns
      • Using Calculated Columns
        • Introduction to the IF Statement
        • Introduction to the CASE Statement
        • Applying Search filters in Calculated Columns
        • Comments in Calculated Columns
        • Financial Year Reporting
        • Introduction to Date Functions in Reports
        • Using Calculated Criteria
        • Reporting on empty fields
      • Audit Reporting
  • Dashboards
    • Adding Elements to Dashboards
      • Configuring Dashboard Elements
    • Dashboard Views
    • Dashboard Fields
    • Creating a Sales Dashboard
    • Springboard
    • Adding a Dashboard as a Record Tab
  • Okta Authentication
  • Transaction Documents
    • Introduction to Transaction Documents
      • Displaying & Adding Transaction Documents
      • Copying Transaction Documents
      • Transaction Documents Fields Help
      • Transaction Documents Line Items Help
      • Printing & Sending Transaction Documents
      • Managing Transaction Document Currencies
      • Managing Transaction Document Statuses
      • Setting a Blank Default Currency on Transaction Documents
    • Credit Notes
    • Customer Orders
    • Invoices
    • Quotations
    • Supplier Orders
    • Contract Management
      • Displaying & Adding Contracts
      • Using Contracts with Cases
    • Sagelink
  • Auditing
    • Auditing
  • Configuration
    • Introduction to System Administration
      • Quick Start Wizard
    • Users & Security
      • Users
        • Setting up your Users
        • Disabling Users
        • Profile Pictures
      • User Groups
        • Capabilities
        • Creating & Modifying User Groups
      • Permissions
        • Sharing Policies & Mandatory Permissions
          • Configuring the Advanced Security Module
            • Configuring the Advanced Security Module: Segmenting Users by function
            • Configuring the Advanced Security Module: Segmenting Users by location
      • Account Settings
      • Licences & Modules
        • Multi Language
    • Database
      • Databases
      • Storage Usage
      • Prefixes & Numbering
        • Modifying Object References
      • Export Database
      • Database Settings
    • Accounting
      • Accounting Periods
      • Exchange Rates
        • Setting Exchange Rates
      • Tax Regimes
        • Setting Tax Rates
        • Sales Tax Rulesets
          • Using Sales Tax Rulesets
      • Own Organisations
        • Setting up your Own Organisation
    • Email & Integration
      • Email Settings
        • Setting up your Email Server
        • Using Workbooks Server to send Emails
      • API Keys
      • Web to Case and Web to Lead
        • Setting up a Web2Case Form
        • Setting up a Web2Lead Form
        • Using Web Forms in Workbooks
        • Editing a Web Key Form
      • Preference Centre
      • MailChimp & dotMailer
      • Loqate
      • Bank Account Validation
    • Customisation
      • Creating & Modifying Picklists
      • Desktop Preferences
      • Theme
      • Record Types
        • Creating Custom Fields
          • Dynamic Linked Items & Picklists
          • Constrained Dynamic Linked Items (DLI) & Picklists
          • Creating relationships with Dynamic Linked Items (DLIs)
          • Linking Custom Field Values
          • Showing Linked Records in Tabs
        • Report-based Custom Fields
          • Improving the Performance of Report Cells/Grids
        • Linked Fields & Reference Fields
        • Record Templates
        • Form Layouts
          • Customising an Organisation form
          • Displaying a Tab as a Side Panel
          • Card View
          • Read-only Assigned to Fields
        • Customising relationships between parties
          • Configuring Custom Party Relationships
        • Opportunity Stages
      • Custom Records
        • Enabling Custom Records
        • Creating Custom Record Types
          • Editing Custom Record Types
        • Using Custom Records
    • Automation
      • Plugins
        • Field Updater Plugin
        • File Storage Plugin
          • Using File Storage
          • Using SharePoint File Storage
        • Cognism Enrich Plugin
          • Using Cognism Enrich
        • Email to Case Plugin and Process
      • Processes
        • Process Logging
      • Workbooks Scripts
        • Script Library
        • How Workbooks Runs Scripts
        • Workbooks Script External Access
      • API Data
      • Triggers and Webhooks
        • Configuring Triggers and Webhooks
    • PDF Configuration
      • Modifying Document Templates
        • Adding Terms & Conditions to your Documents
        • Multi-line Value Tags
      • Modifying Default Colours & Images
      • Creating Custom Document Templates
  • Contact Support
    • Contacting Workbooks Support
    • Workbooks CRM Advisory Packs
    • Introduction to the Administrator Service
  • Releases & Roadmap
    • Roadmap
    • September 2022 Release
    • June 2022 Release
    • March 2022 Release
    • October 2021 Release
    • June 2021 Release
    • March 2021 Release
    • 2020 Releases
      • December 2020 Release
      • September 2020 Release
      • April 2020 Release
      • January 2020 Release
    • 2019 Releases
      • September 2019 Release
      • February 2019 - Event Management Release
      • January 2019 Release
    • 2018 Releases
      • October 2018 Release
      • May 2018 Release
      • February 2018 Release
      • January 2018 Release
    • 2017 Releases
      • November 2017 Release
      • September 2017 Release
      • June 2017 Release
      • March 2017 Release
    • 2016 Releases
      • December 2016 Release
      • August 2016 Release
      • January 2016 Release
  • Workbooks Glossary

Docusign Example - Multiple Document Sends

This example will show you how to use the Multiple Send setting when sending documents with the DocuSign integration. For this example you will create two different documents that use the Multiple Send setting, both of these will be generated from a Person record using a DocuSign Template as follows:

The two Documents will be a “Confirmation of start date” and the other will be a “Contract of Employment”.

  • Confirmation of start date
  • Signing employment contract

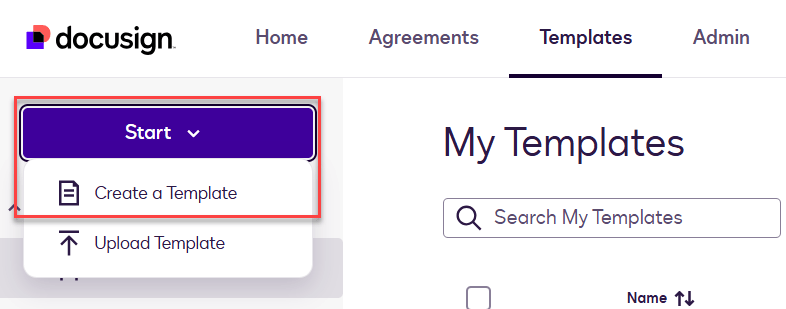
To create a new Template you will first need to login to DocuSign. Once logged in from the New menu select Create Template.

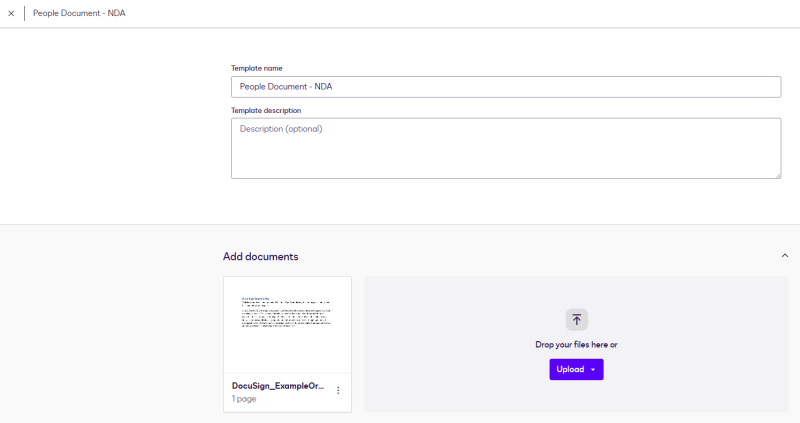
On the new Template, give it an appropriate Name & Description, then upload the file that will be sent out for Signature.

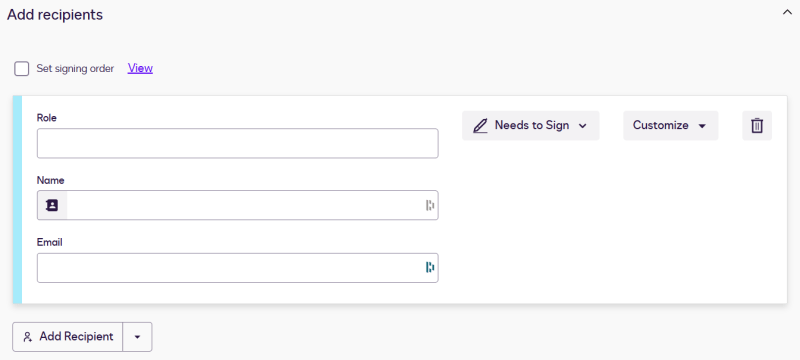
Add a recipient with a “Signer 1” Template Role, then save & close the Template. Do not fill out the Name and Email fields within the Template Role, these should be left blank - the integration will set these when a new envelope is generated from within Workbooks. In the following steps, we will configure field mappings and then return to this screen once the integration has been configured in Workbooks.

These steps will then need to be replicated again in order to create the second DocuSign Template.

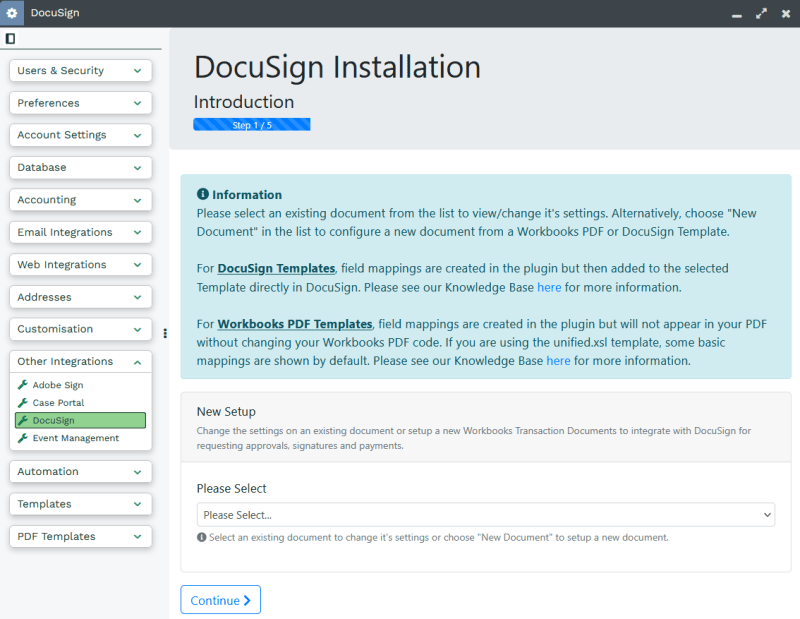
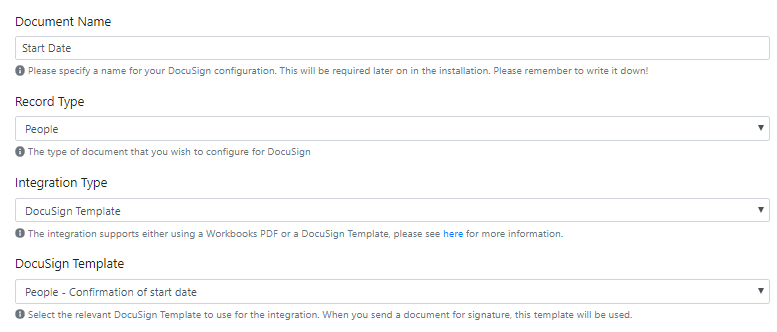
Create a new document from the DocuSign integration Menu, which is accessed from Start > Configuration > Email & Integration > DocuSign. Select New Document then Continue.

Configure the document to your specifications, giving it an appropriate name and selecting People as the Record Type.

This example is using a DocuSign Template so for Integration Type, select DocuSign Template. This will show a new option where you should select the DocuSign Template that you want to use. Select the Template that was configured in Stage 1.

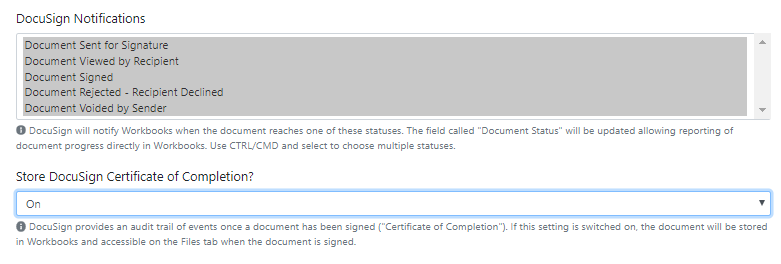
We recommend that you set up your template so that you receive all DocuSign Notifications enabling you to be kept fully updated on all customer actions. We always recommend that you turn on the Certificate of Completion setting so that you can see a full audit of what happened to the document. If you have the Workbooks Audit module, you will also be able to see some of this detail in the Summary tab on the Workbooks record.

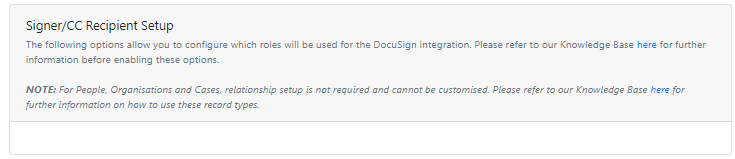
As the Signer for this document will be the Person, the Signer/ CC Recipient Setup will not contain any information. A relationship is not used for a Person document, the Person simply needs an email address stored on their record in the Email Address field.

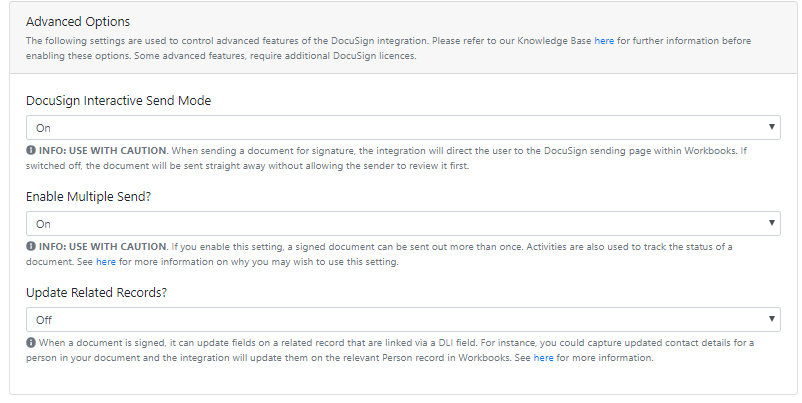
For this example, the Interactive Send Mode is turned on so that the Draft Document can be reviewed before it is sent out, and the Enable Multiple Send setting is also turned on. The Update Related Records settings can remain turned off.

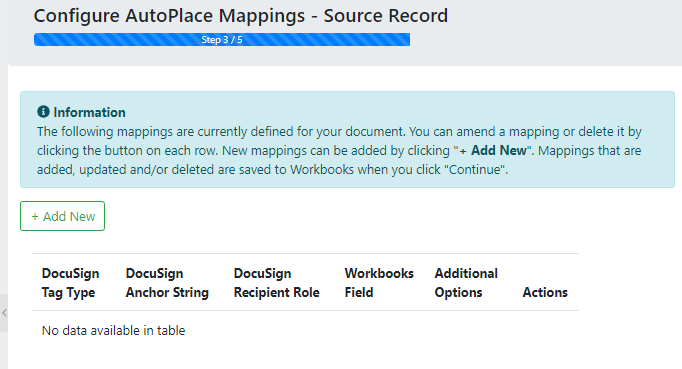
Once this stage has been completed you will be taken to the AutoPlace Mappings stage, for this example you do not need to configure anything so can leave the settings blank and continue.

You will need to repeat this again for the Employment Contract document, once these are both completed the Template to be setup for use.

Note: Keep this window open as you will need to refer back to the Parameters set here when setting up the Button Process.

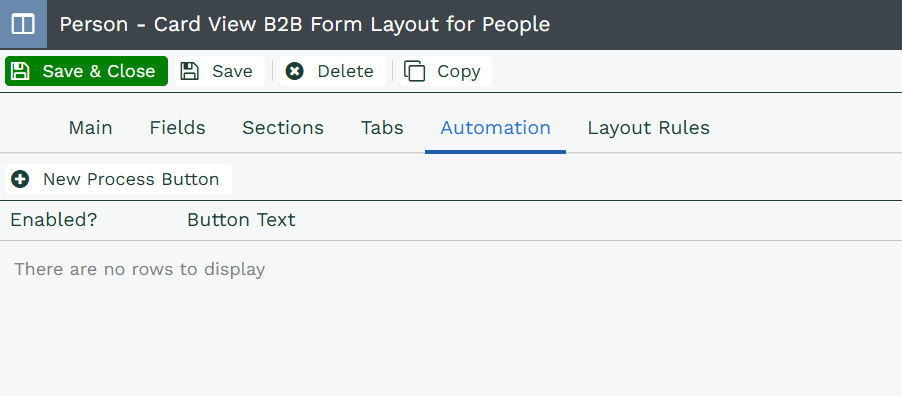
Once the Template has been configured, you will need to configure any Form Layouts with the Docusign Fields and the Button Process in order to generate the Document Envelope for sending.

To configure this go to Start > Configuration > Customisation > Record Types > People. On the Form Layouts Tab select the Form Layout that you want to generate the DocuSign Envelope from. Go to the Automation Tab and select New Process Button.

In the dialogue box that appears, you will need to configure your Button Process. Set the following details to configure a new Process Button:

  • Button Text: Ensure that your Button Text identifies the correct document, especially if you have different documents that will be sent from the same record.
  • Script Location: Select Script Library 
  • Script: Select DocuSign Integration
  • Enabled: Ensure the Enable checkbox is checked 
  • Run as: Set as the appropriate User, for this example select the Current User so that they receive notifications for the Document

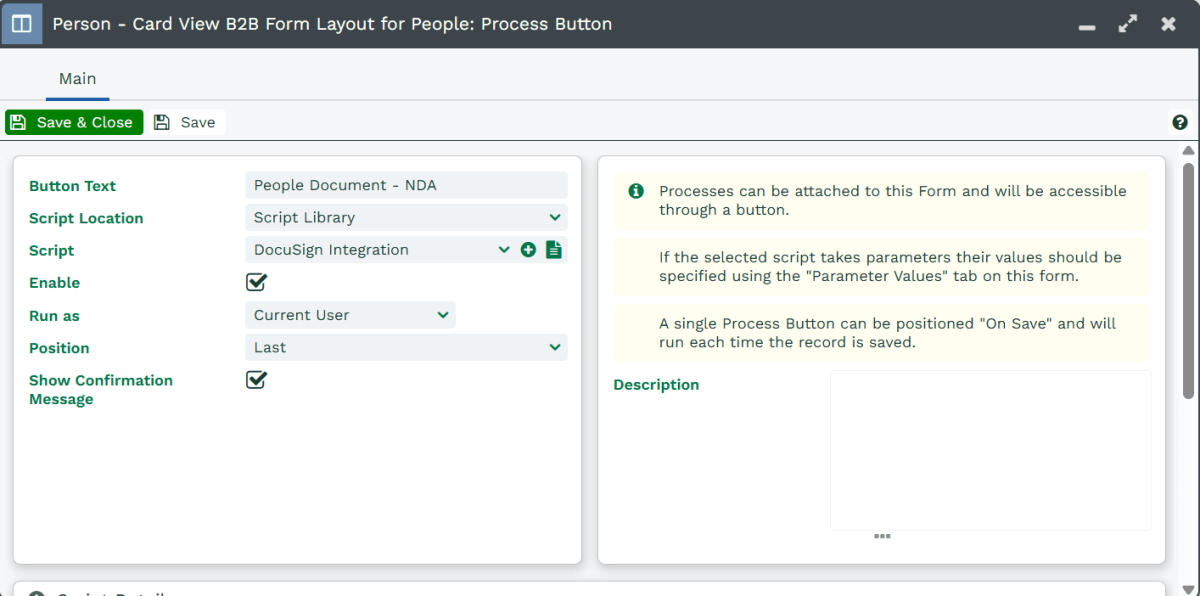
Once this page has been configured press Save and then go to the Parameter Values Tab.

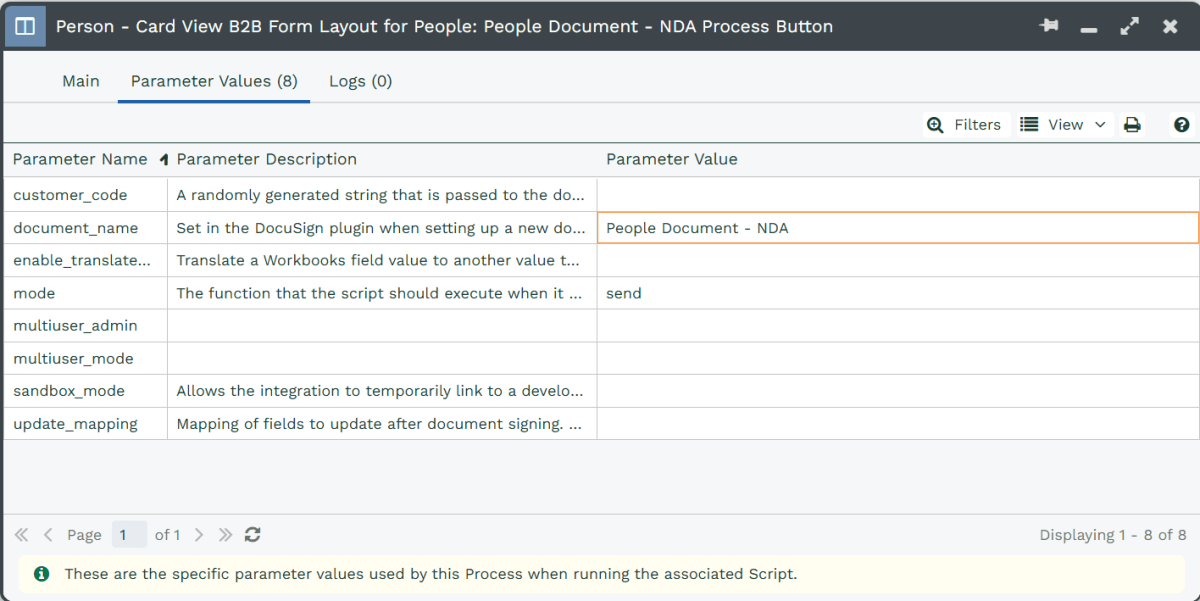
Add in the values for the document_name and mode parameters, which were defined on the completion of the Template setup.

Once completed repeat this again for the Employment Contract document so that you have both Processes listed on the Automation Tab of the Form Layout.

Once the Button Processes have been configured, you will then need to ensure that there is a Form Layout configured for Activities to display the DocuSign Fields. To do this go to Start > Configuration > Customisation > Record Types > Tasks, first go to the Field Tabs and check to see that all of the DocuSign Fields have been created. These can be found by filtering for Field Label starts with DocuSign.

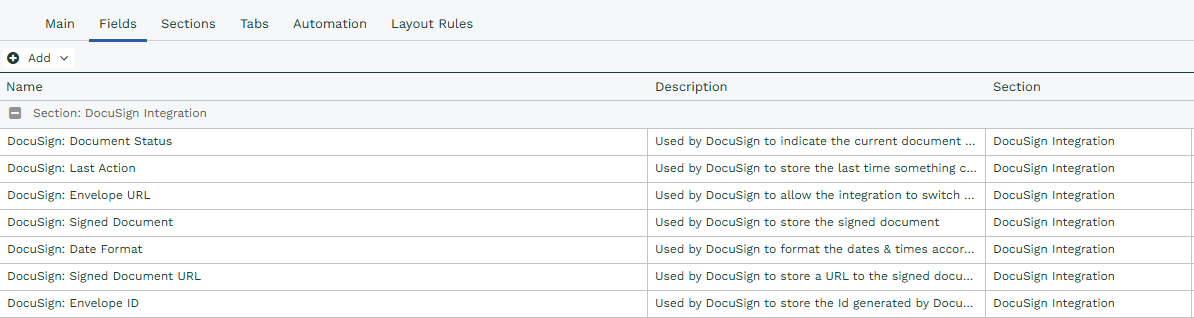
You may want to create a completely new Form Layout for the DocuSign Activities, on the Form Layout tab select New Form Layout and provide this with a suitable name such as “Task - DocuSign” .Create a new Section called DocuSign and add all of the Fields to this section.

Finally on the Layout Rules tab add a Layout Rule so that the Activity Type is equal to DocuSign, to ensure that this Form will only apply for DocuSign Activities.

Once the Form Layout has been configured you are able to make the final amendments to the DocuSign Template.

Note: The fields will not be available in DocuSign until the DocuSign Maintain Fields Process has ran successfully.

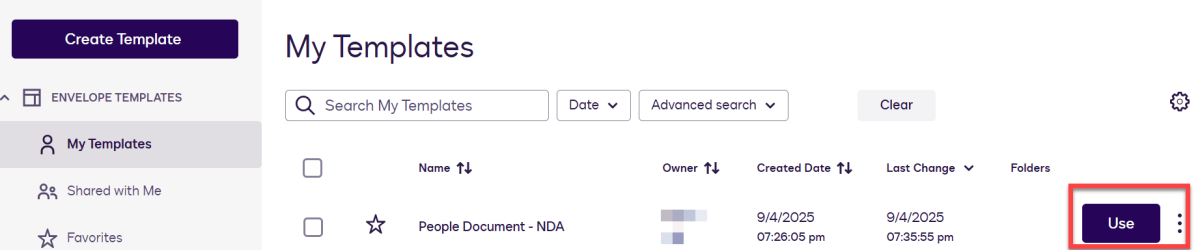
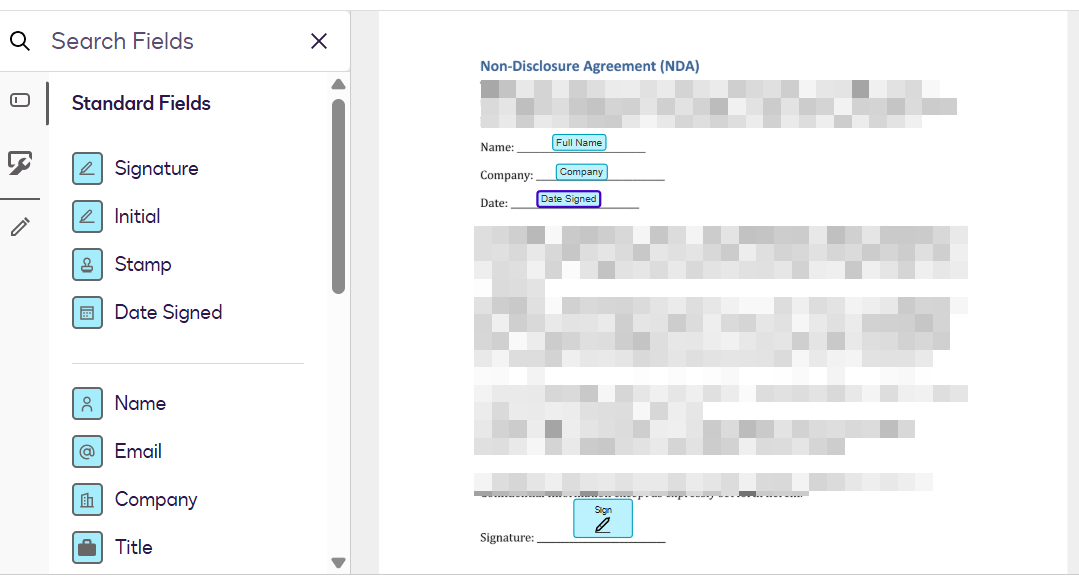
Return to DocuSign to configure any fields on the Document, such as a Signature or the recipient’s name. In DocuSign, select the Templates option and use the dropdown on the Use button to select the Edit option.

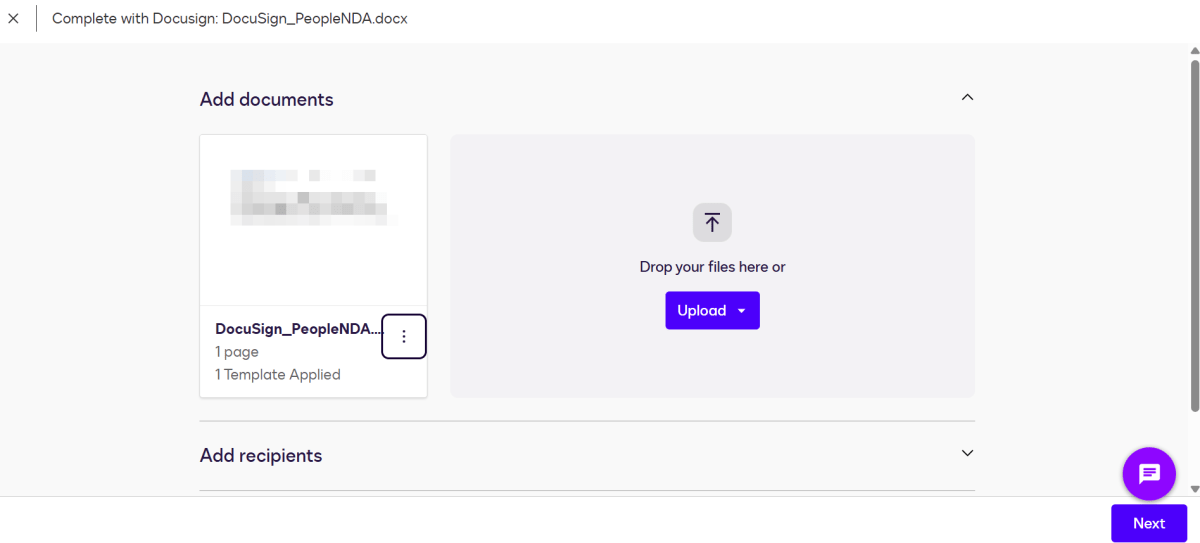
Here you can review your initial template setup and make any final changes to the Template. Once you are happy with the changes select the Next button to start configuring the Fields.

Fields such as Signature and Name can be found in the Standard Fields menu and these can be placed on your document where needed. The Full Name will be automatically populated when opened by the recipient, displaying what is in the Person Name field within Workbooks.

Once these Fields have been configured in both Templates then they are ready to send.

Stage 6 - Send Documents

Once you have set up the Form Layout with the Button Processes, you will be able to generate the new documents via DocuSign. Before sending the documents you will need to ensure that the Person has a valid email address or the Process will fail.

Once you have checked this, click Run Process and select the appropriate Process to run.

The Process will then switch to a DocuSign tab (only if you left Interactive Send set to “On” during the document setup) allowing you to review the details on the document and see how it will be presented to the Customer.

If you are happy with the document, click Send.

Once the document has been sent it will create an Activity against the record that can be reviewed at any time from the Activities tab. The DocuSign: Document Status Field will provide you with a live update as to where the document is with the recipient and the DocuSign: Last Action will tell you when the Last Action occurred. From here you can see the progress of all documents sent out against the Record.

Note: We have created a Forum Post that provides a step-by-step guide to building a Report that allows you to review DocuSign Templates at any stage specifically for Multiple Send emails.

  • Updating Related Records
  • Creating a Template for Cases

© 2023 Workbooks.com - privacy & terms
  • Linkedin
  • Twitter
  • Youtube
  • Facebook