June 2022 Release
Release date: 18th June 2022
In common with our releases over the last year, this one includes enhancements to the appearance of the platform, as well as improvements to usability:
- New ‘Clean’ Theme
- Word Add-In enhancements
- B2B and B2C modes
NEW ‘Clean’ Theme! (BETA)
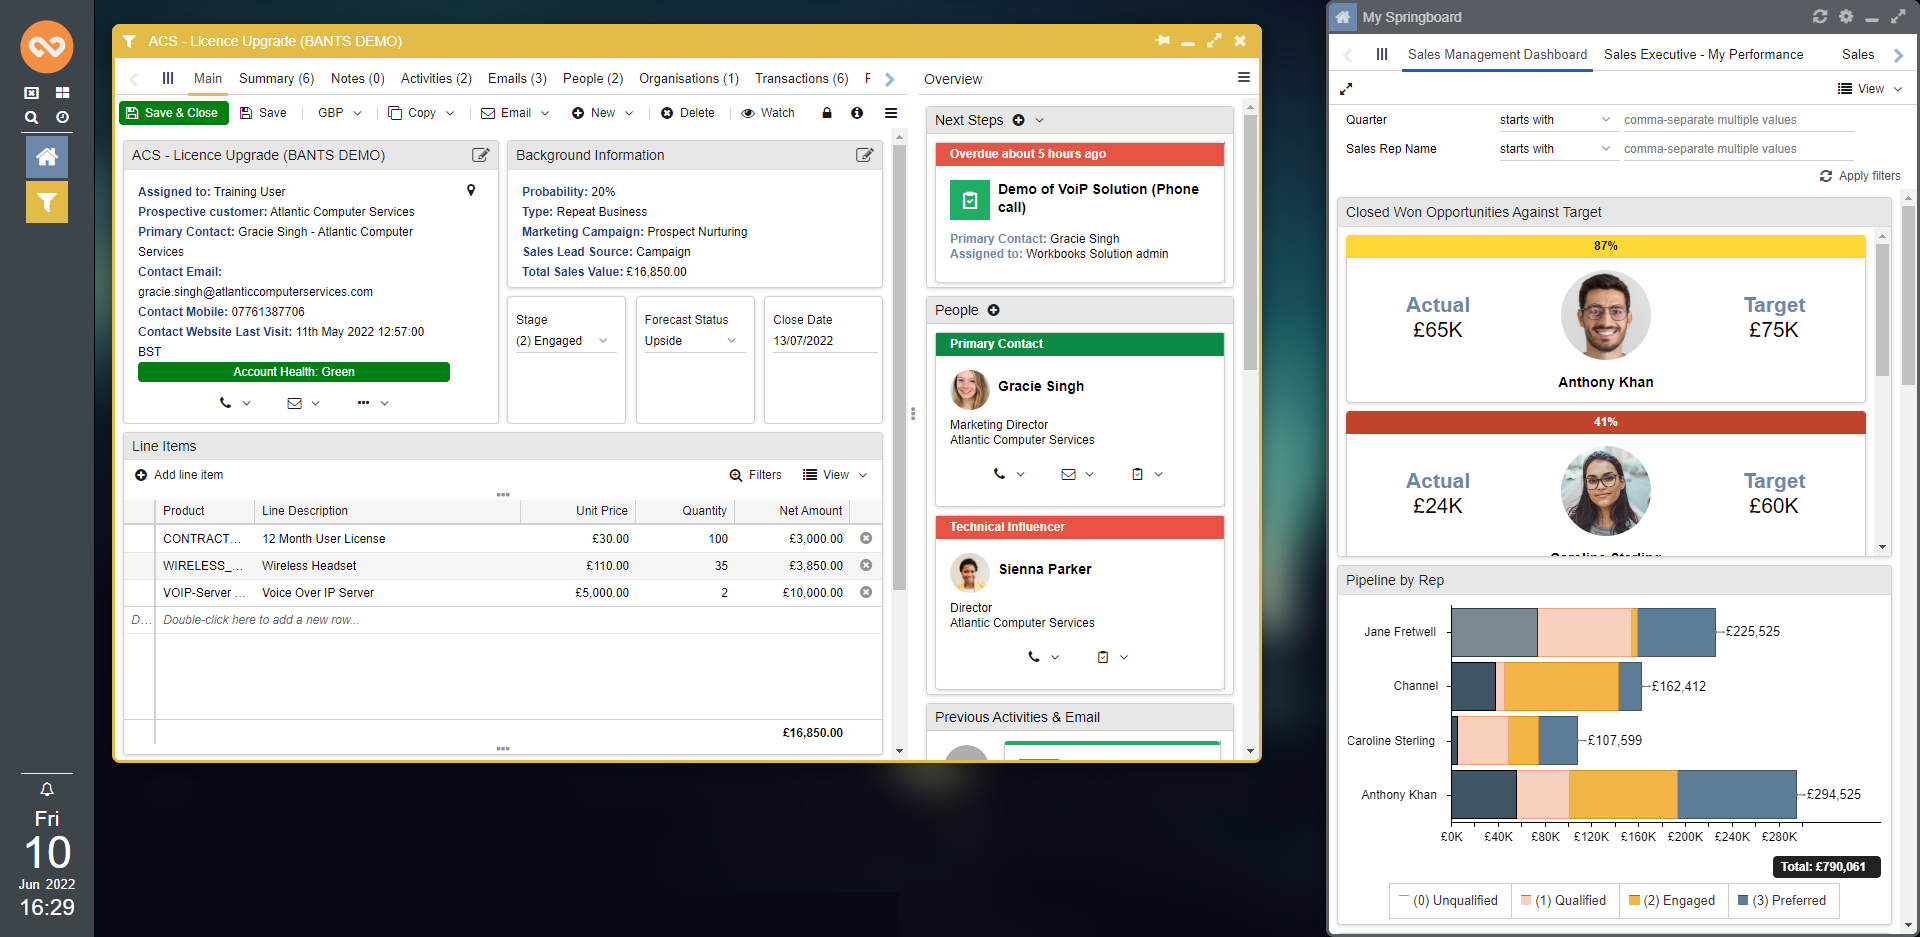
Feedback from our customers has told us that you’d love Workbooks to look more streamlined, with a crisper, cleaner feel. As a result, we’ve reworked our pages to create the ‘Clean’ theme. The general behaviour remains the same, but the appearance is enhanced. Changes include:
- Rounded corners on records;
- Colours have been removed from most buttons and from the background of forms to make it easier to focus on the important details, but we’ve left a coloured border around windows, making it easier to differentiate between record types (especially transaction records);
- An option for a compact version that allows you to fit more on the screen, whilst still adjusting its size so that it’s touch friendly on mobiles and tablets.
You can turn the new theme on in your Preferences. If you do spot anything that doesn’t look right in the new theme, please let us know by raising a ticket with Support, so we can incorporate your suggestions before it is enabled fully later in the year.

Word Add-In Enhancements
The Word Add-In has new features to make it more flexible and enable you to build more sophisticated templates.
The first thing to note is that we have changed the way you add multi-line tables into the documents. You will no longer have to ‘bind’ the tables, and instead simply add tags either side of the table. If you already have Word Templates, they will continue to work as they do now, but if you make any amendments to them or create new templates, you will have to move over to the new way.
The new approach for tables now allows us to:
- include data from multiple reports in your documents. For example, if you’d like an Organisation Account Plan document that has a table of recent Activities and a table of related People;
- split the data from one report across multiple tables. For instance, you might want to split your Line Items into a separate table for each Product Category.
Also, you can now control the name of the Document that is generated, instead of it defaulting to the Object Reference of the record. If you choose, you have the option to edit the name further before uploading as a PDF to Workbooks.
Last but not least, editing your templates has become easier – there is now an option within the Add-In to open the template, amend it, and then save back into Workbooks, without having to go into Workbooks to do so.
For more information, see our Knowledge Base.
B2B or B2C
A new ‘Customer Transaction Type’ setting has been added into Database Settings, which will allow you to specify if your business sells to organisations (B2B, “Business to Business”) or directly to consumers (B2C, “Business to Consumer”). This setting will control the behaviour of the Customer field on Transaction Documents, restricting it to show only Organisation records or show only People, instead of the default behaviour of showing both.
For more information, see our Knowledge Base.
Primary Contacts and Finance Contacts
Two new fields are available to add to your Transaction Documents: ‘Primary Contact’ and ‘Finance Contact’. You may already be using custom versions of these fields – please speak to our Support Team if you’d like to replace the custom field with our standard fields. One benefit of doing so is that the Primary Contact field will be populated automatically when you convert a Lead to an Opportunity.
For more information, see our Knowledge Base.
Customer Default Addresses
We’ve made it much easier for users who regularly deal with transaction records to set the default Invoice & Delivery addresses, saving time and ensuring consistency.
It’s already possible to set up multiple addresses for a Customer and to use these addresses on Transaction Documents, but we’ve now added the ability to set Defaults. When updating a Contact Detail record on an Organisation or Person, there will now be 2 checkboxes, “Preferred billing location” and “Preferred delivery location”, which will change the behaviour of the Billing and Delivery Address fields on Transaction Documents.
There is also now a “Delivery Address same as Billing” checkbox and a “Delivery address” location picker on Transaction Documents to make it easier to populate the Delivery Address.
For more information, see our Knowledge Base.
Reporting and Dashboards
We’ve made multiple changes to reports and dashboards, that may seem small but will make a big difference to the way you view and edit reports:
- When setting up Reports on Dashboards, you’ll see a new Element Height option of ‘Auto’. This will adjust the height of the report element based on the number of rows in the report, reducing the amount of white space you see on reports with few rows, or increasing the height of longer reports to allow you to see the full list.
- When adding targets to your reports, you can choose to show the Actual, Target and Achieved columns. We’ve now added another option, to allow you to show the Difference; the amount needed to hit Target. This means you no longer need to create calculated columns to see this!
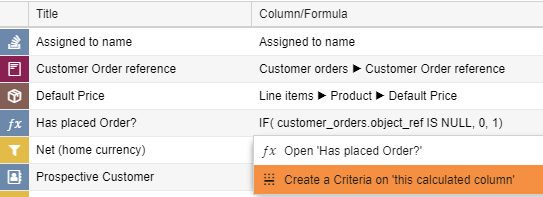
- Reports will now have additional detail in the ‘Columns’, and ‘Criteria’ areas, allowing you to see the paths you’ve used to create a column or criteria, or the formula used in calculated columns. You can also now click here to quickly add new columns with the same path, or criteria based on that column.

- Reporting on People who have attended your events has become more straightforward, as we’ve added a new reporting drill through, from People directly to their Event Attendance.
- All new reports will have ‘Wrap column headers’ turned on by default.
Complete and Follow-On Activities with Custom Fields
Multi-line and Rich Text Custom Fields on Tasks and Meetings will have a new flag, ‘Copy on follow-on’. This will let you copy the values in those fields onto new Activities when you Complete & Follow-on. For example, this is especially useful for WESS (Workbooks Exchange Server Synchronisation) users who synchronise Meetings into Outlook, as it will let you have an ‘Internal Notes’ field that is held separately from the Description that is shared on meeting invites.
Preferences
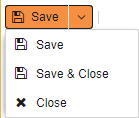
- If you have your Preferences set to combine the ‘Save’ and ‘Save and Close’ buttons, the dropdown will now include ‘Close’.

- Within the ‘Desktop Interface’ section of your Preferences, you can now choose to ‘Maximise all new windows’.
Overview Tab
We’ve had great feedback about how useful the Overview Tab is on Opportunities and Cases, so you can now add the Overview Tab to any Transaction Document and to People and Organisations. You can find more details on the Overview Tab on our Knowledge Base.
Email Templates
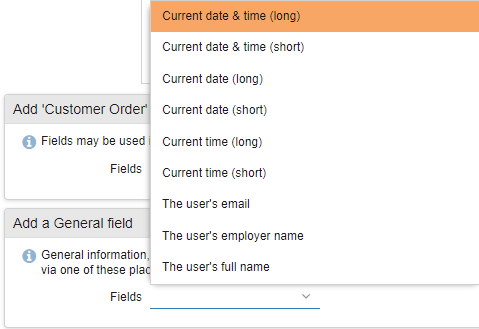
You probably didn’t know that Email Templates could already contain placeholders for the current date or current user, and so we’ve made them easier to add! There is a new ‘Add a General field’ section on Email Templates to add them:

For more information, see our Knowledge Base.
Some other small changes …
You can now edit the Title of the Springboard for all your Users, under Configuration > Customisation > Desktop Preferences. Find more information on Springboards on our Knowledge Base.
• A new ‘Auto-size all columns’ setting on Views and Reports, which will automatically adjust the size of the columns to the size of the content and to fit the size of the screen if appropriate. The best place to use this setting is in Reports on your Dashboards.
• Processes now have a ‘Description’ field, allowing you to add more detail about what your Processes do.
• Replying to or forwarding emails in Workbooks will no longer add additional ‘RE’ or ‘FW’ to the subject.
• Clicking on the ‘Filters’ button when a filter has been applied will no longer simply hide the filters, it now collapses the filter into summary text. Saving the View remembers the current state, so you can gain some space on any Saved Views you’ve created that have multiple filters.
• Long View names will now wrap so that you can see the full name in the left-hand panel.
• When reporting on Line Items that have Product Bundles and Components, there is now a column ‘Is Component?’ that can be added to identify the Component Line Items.
• The built-in Constant Contact integration has been deprecated.