





Gantt
Projects can quickly become hard to follow when tasks, deadlines, and dependencies are spread across different records and team members. The Gantt view brings everything together in a visual timeline, making it easier to manage your projects, track progress, and spot potential issues before they impact delivery. For example, you might use a Gantt view to:
- Plan and manage a customer implementation project
- Coordinate activities across multiple teams before a product launch
- Track delivery milestones and deadlines for a large piece of work
A Gantt chart helps answer questions such as:
- Are we on track to meet our deadline?
- Which tasks are dependent on other work being completed first?
- Where are delays likely to impact the rest of the project?
- Are we using our project budget and effort as expected?
Having the Gantt view built into Workbooks, project information remains connected to the People, Organizations, Opportunities, and Activities you work with every day. This gives project teams and stakeholders a single, central place to monitor progress, collaborate, and ensure the Project is on track.
This page will highlight the various elements of the Gantt tab such as:
- Understanding the timeline
- Navigating the Gantt chart
- Task Structures
- Adding and Editing Tasks
- Creating and managing Dependencies
- Milestones and Deadlines
- Tracking Progress
- Managing Budgets
Understanding the timeline
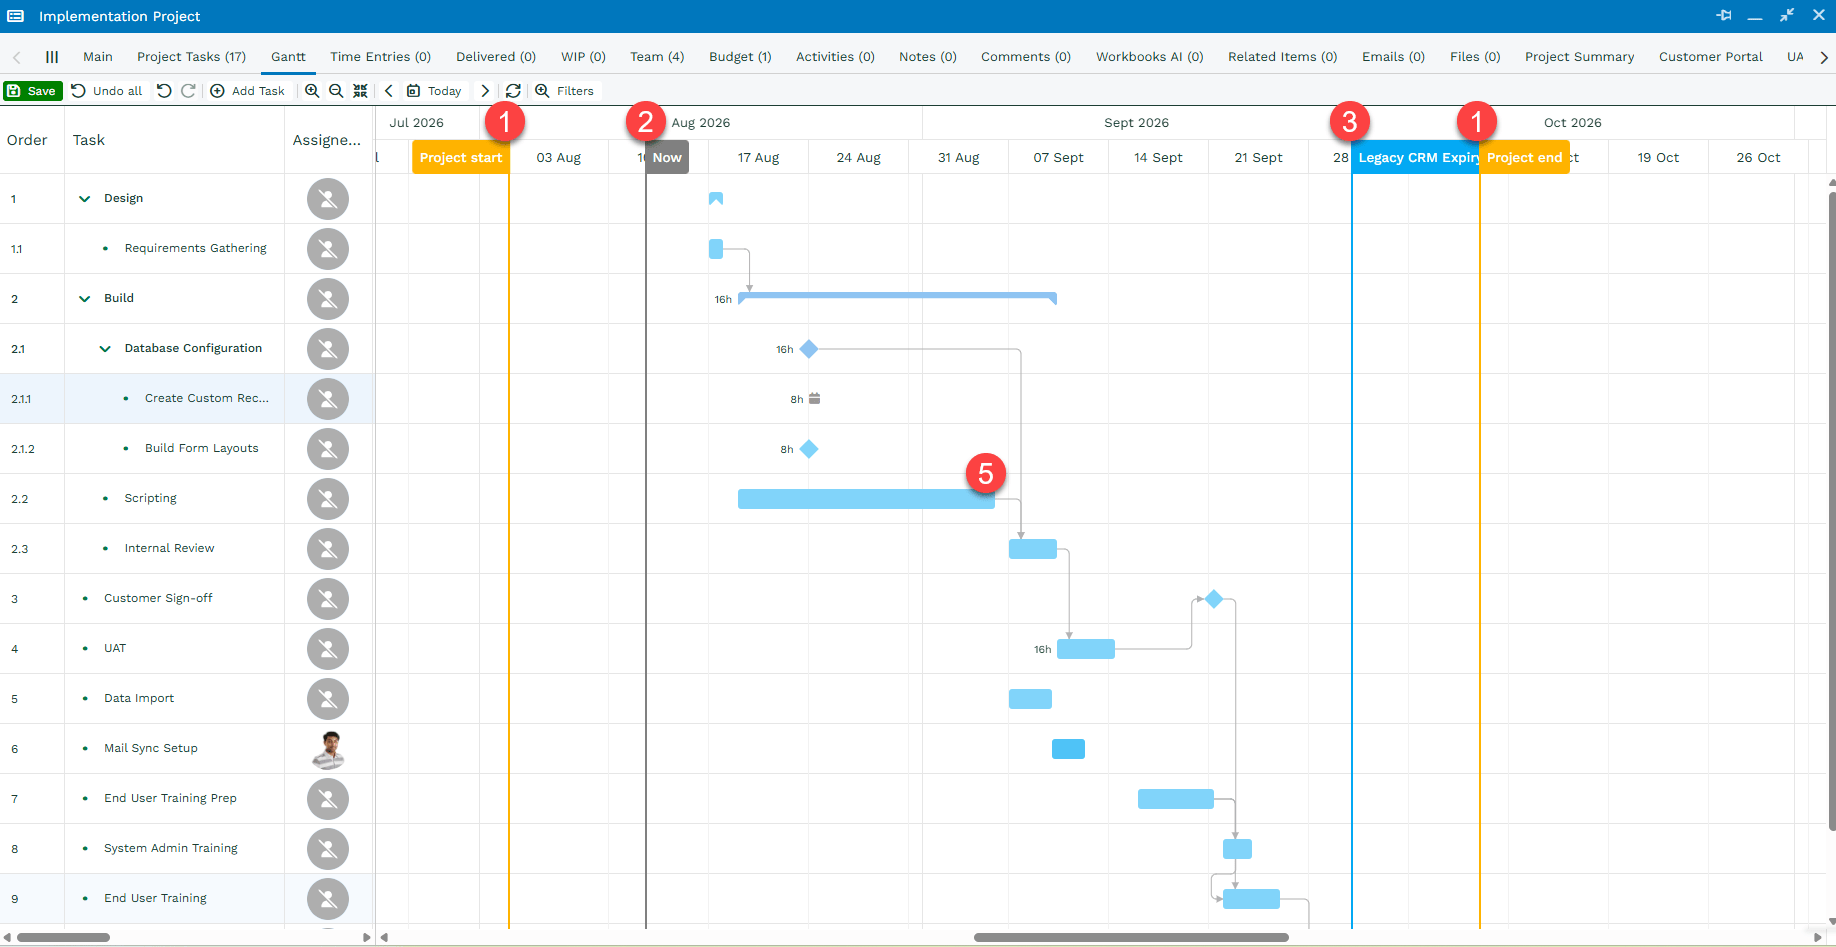
At the top of the Gantt view, you’ll see the Project timeline, which provides a visual overview of your Project. The timeline includes:
- Project start and end dates so you can see the planned duration of the project
- A Now line that highlights today’s date, making it easy to compare planned work against the current day
- Important date lines to represent deadlines and milestones, such as release dates, major deliverables, and important deadlines
- Visual Project Task bars showing when work is scheduled to start and finish
Using these visual indicators, project managers and team members can quickly identify upcoming work, track progress against the plan, and spot potential delays before they impact the project, helping all stakeholders stay on schedule.
Navigating the Gantt Chart
The Gantt view includes a range of tools to help you focus on the information that matters most and view your project at the right level of detail.
Zooming in/out of the timeline
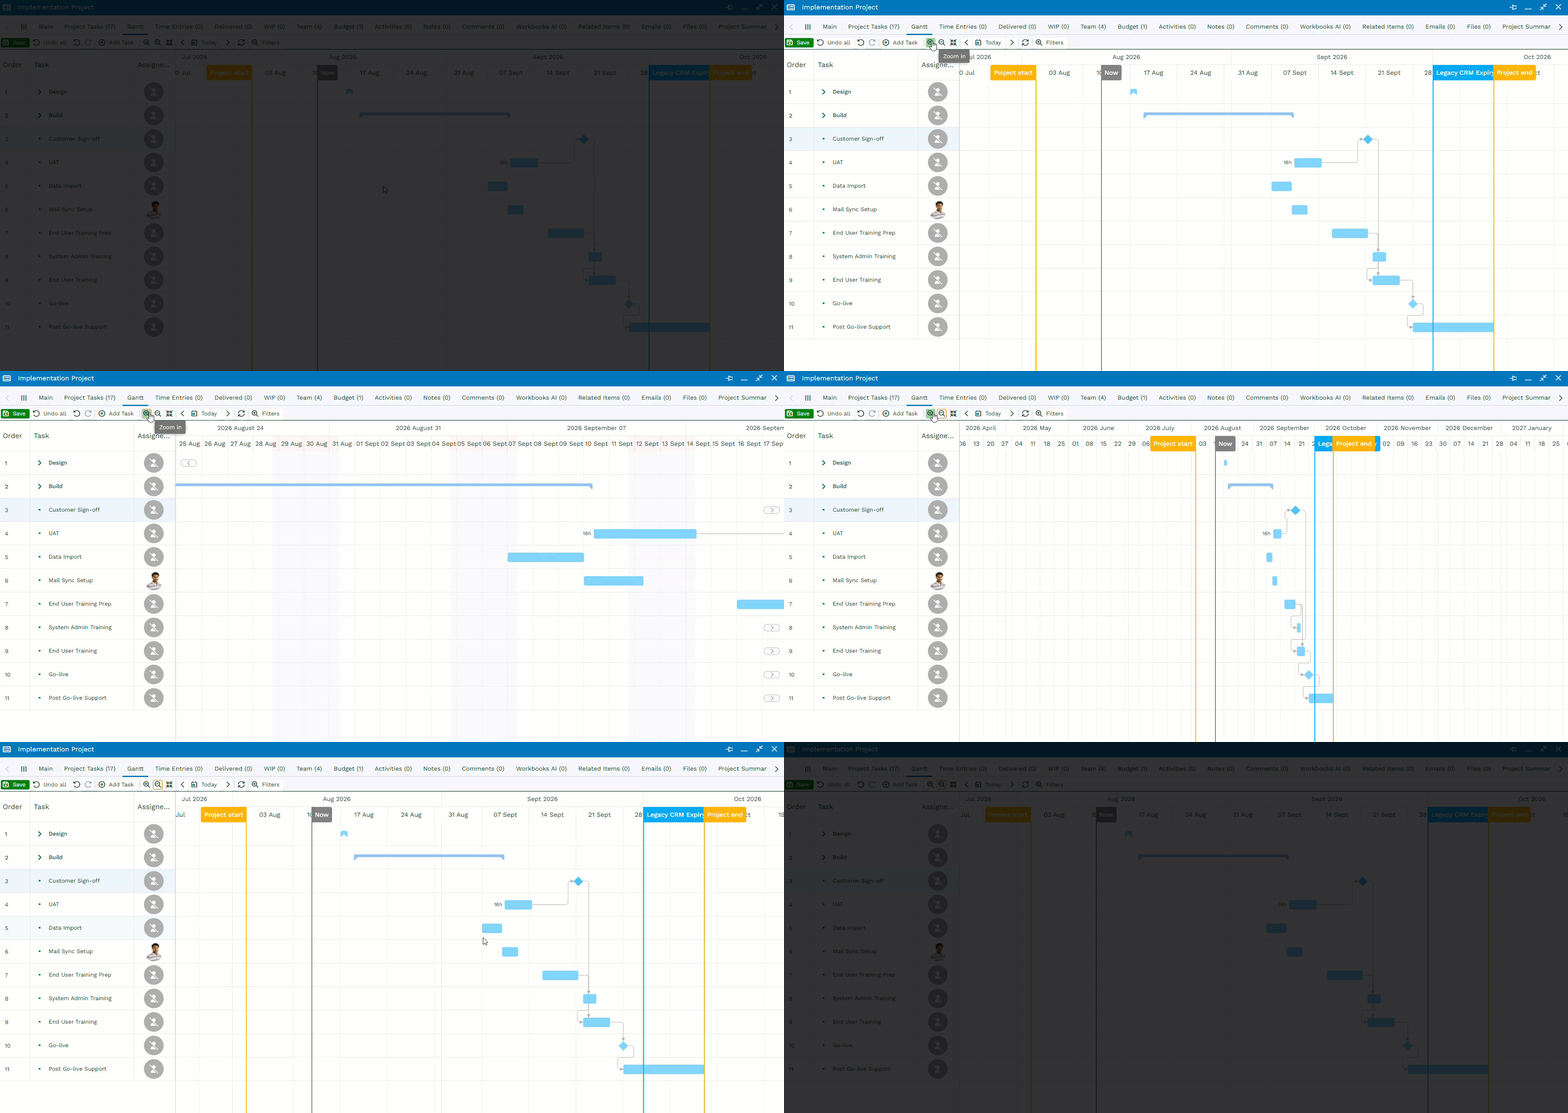
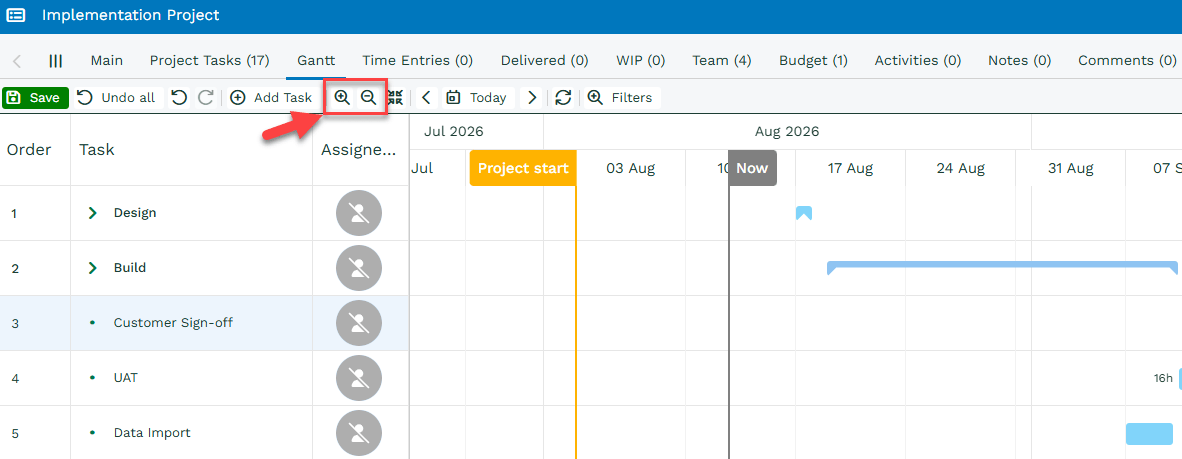
You can zoom in/out of the timeline by pressing CTRL and scroll or by clicking the magnifying icons at the top of the Gantt chart view. Doing this will adjust the timeline to show:
- Days
- Weeks
- Months
- Quarters
You can also click the Zoom to fit button next to the magnifying icons.
This is extremely beneficial to easily switch between detailed task scheduling and a high-level view of your project.
Moving through the timeline
You can move forward or backward in the Project timeline by using the navigation arrows above the timeline calendar. This allows you to quickly review work planned earlier or later in the project without manually scrolling through the timeline.
Applying a Filter
You can apply a Filter to help identify specific areas of your Project. For example, you can filter the Gantt view to display:
- Tasks assigned to a particular team member
- Milestones only
- Tasks that match specific criteria
Note
Filters are applied to your current view only and aren't saved. If you leave the Gantt view or refresh the page, you'll need to reapply the filter.
Undo/Redo
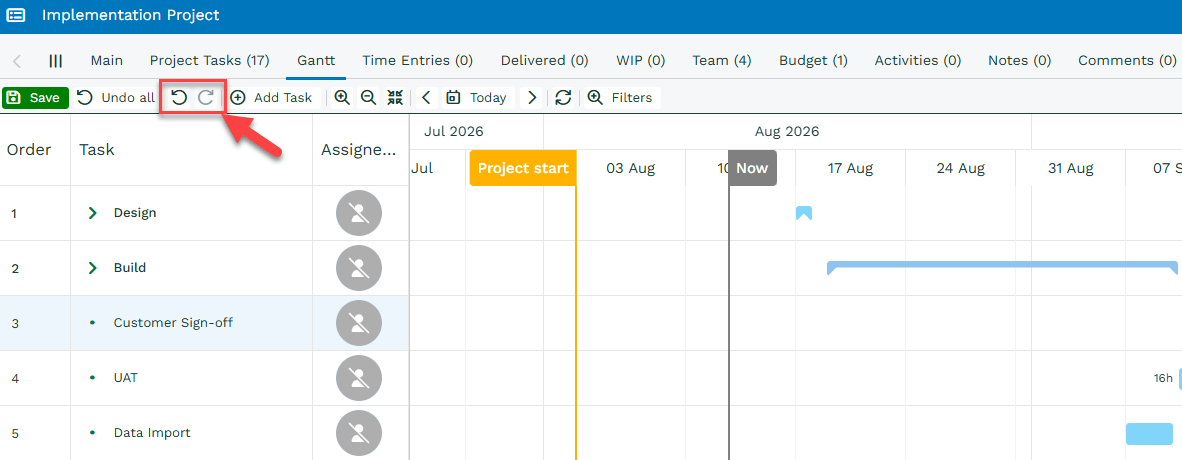
If you’ve made a change by mistake, you can quickly reverse it using Undo in the top-left corner of the Gantt view. If you change your mind, select Redo to reapply the change.
This makes it easy to experiment with task scheduling, dependencies, and timelines without worrying about making permanent changes.
Task Structures
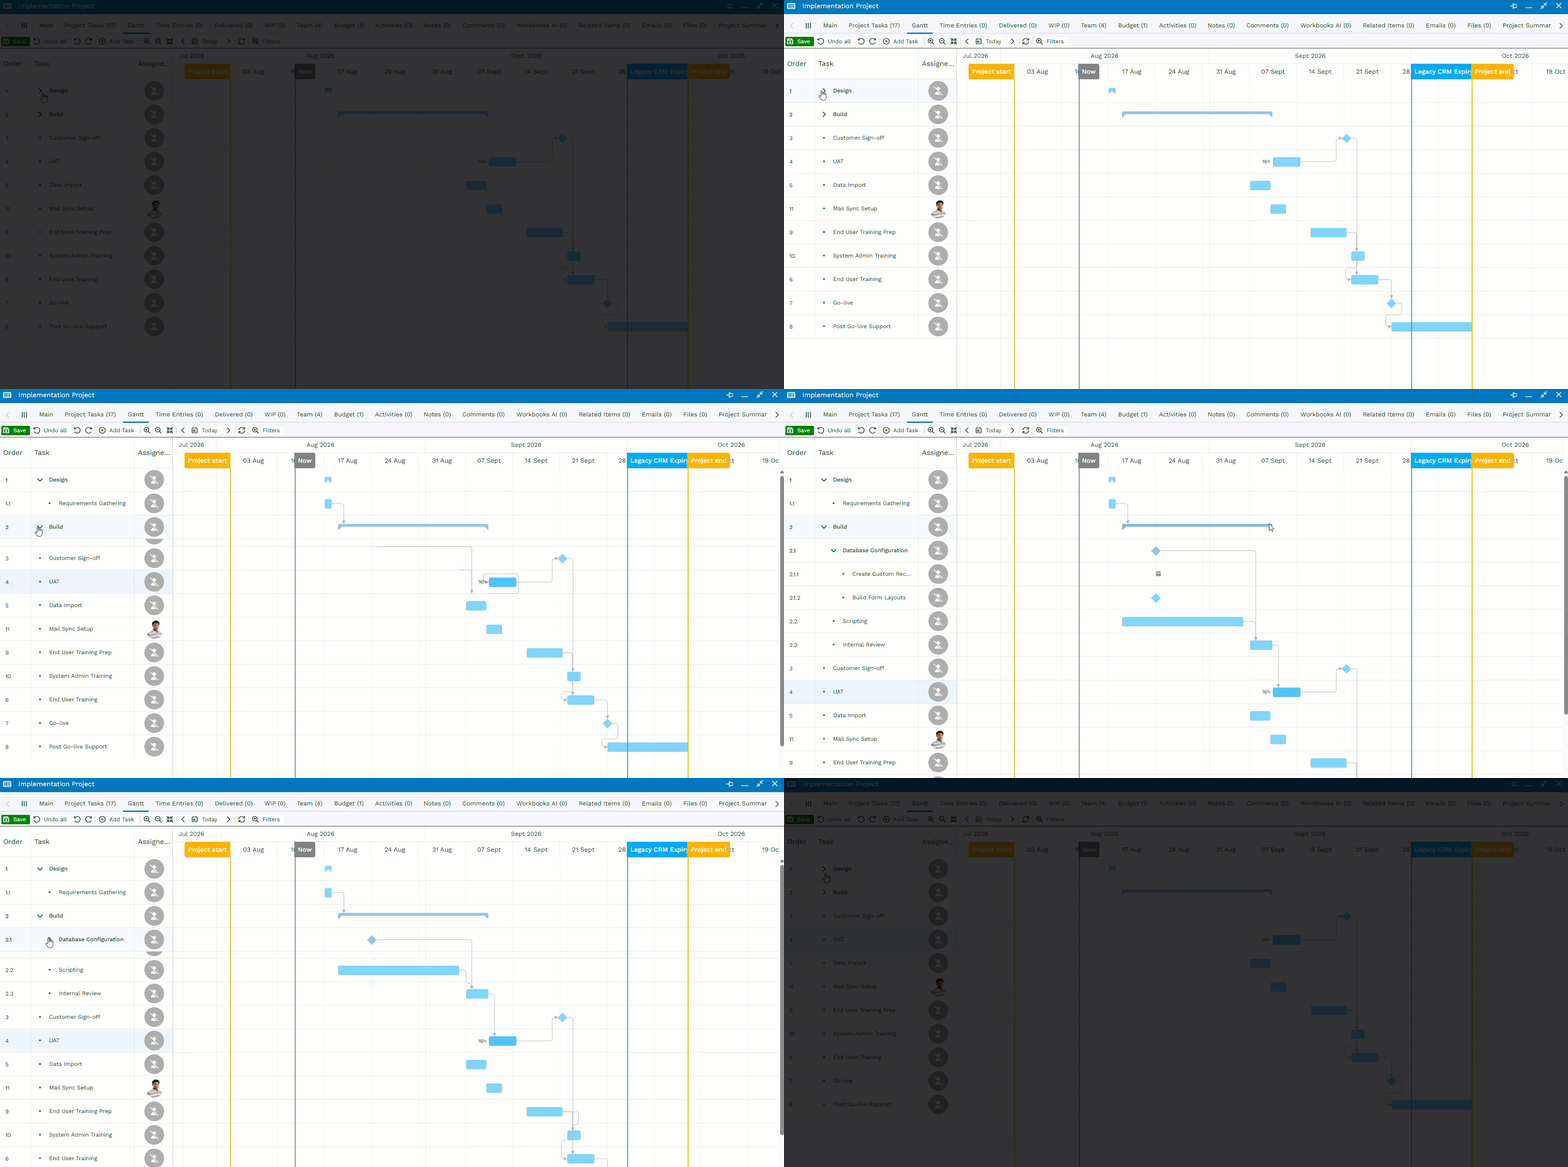
All Tasks will be displayed within the Gantt view and can be managed directly from the timeline.
Tasks can be organized into a hierarchy using parent and child tasks. While a parent task can contain child tasks. Those child tasks could also contain their own child tasks. This helps break large pieces of work within the Project, into smaller, more manageable activities.
Adding and Editing Tasks
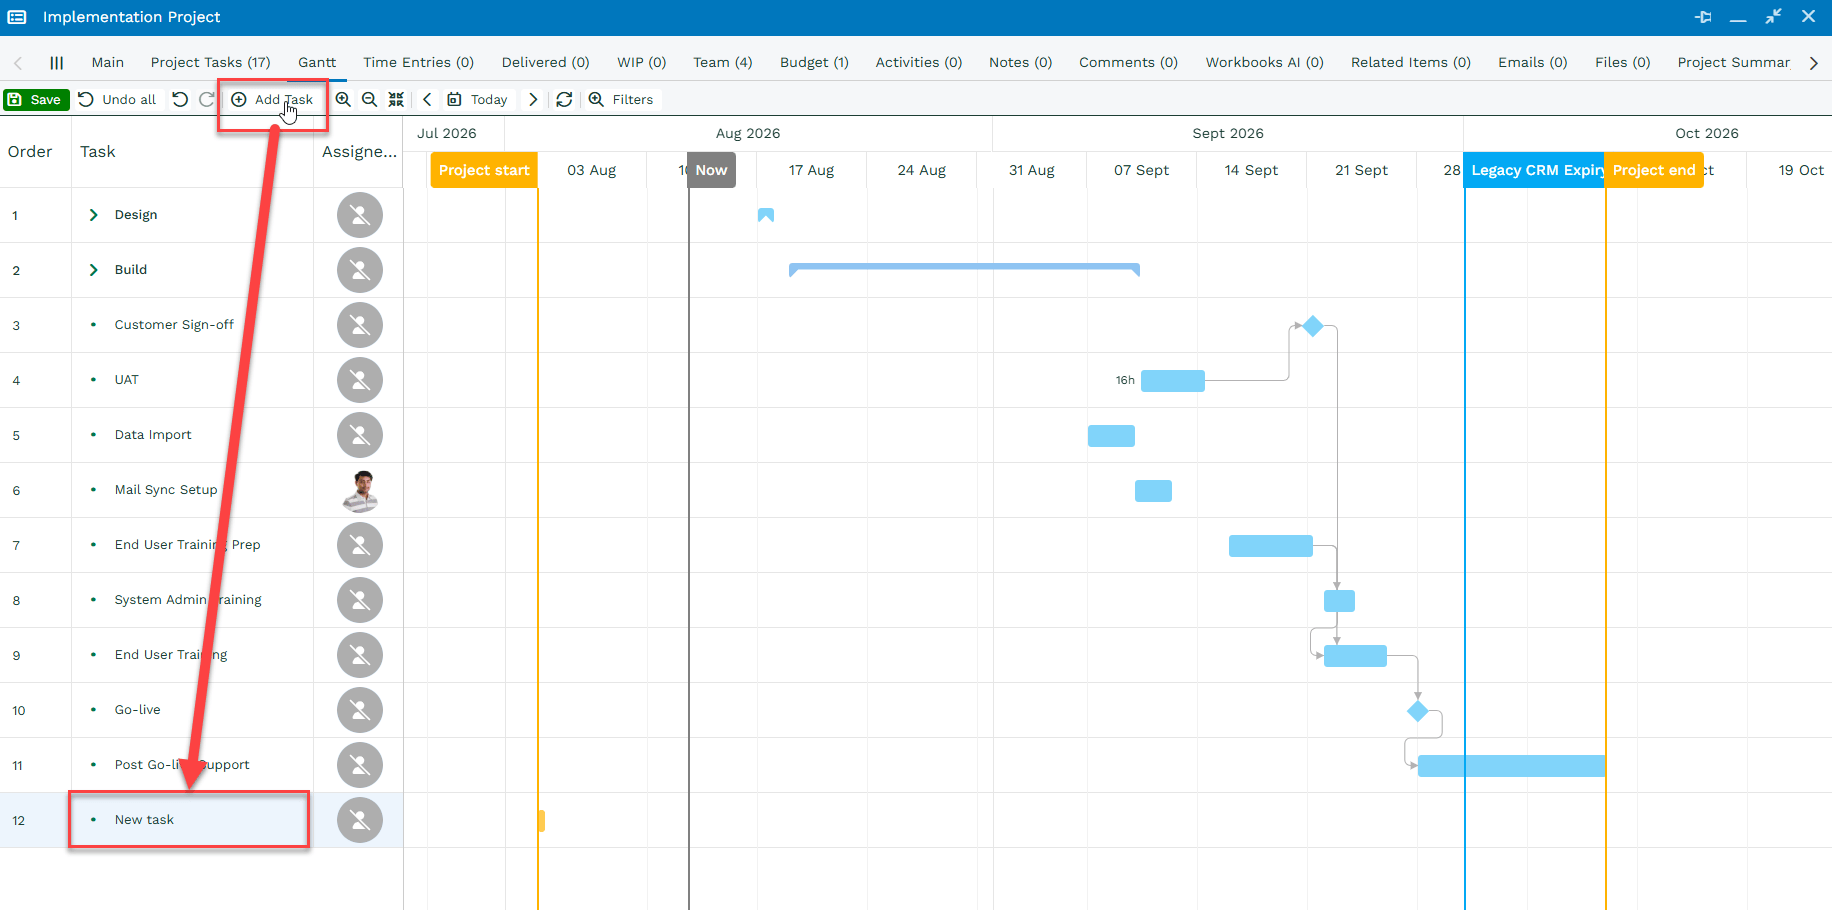
To add a task in the Gantt view, select Add Task in the top-left corner. The new task is added to the bottom of the task list and automatically assigned the next available order number:
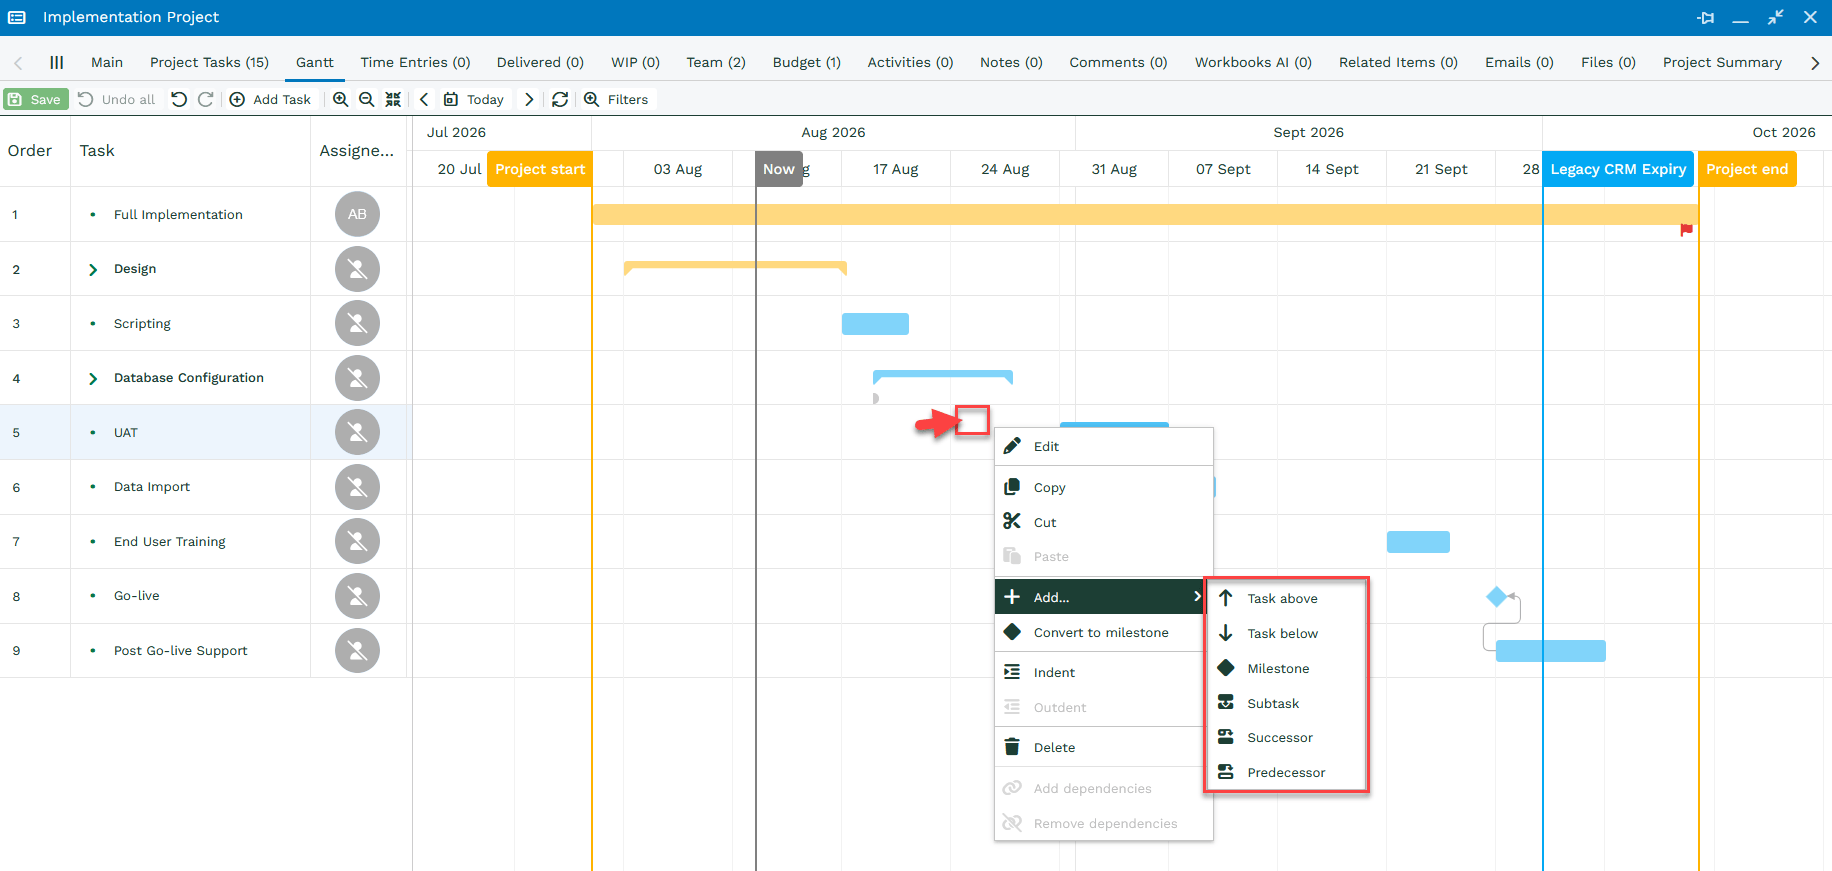
Alternatively, you can also add a Task by right-clicking where you’d like it to appear in the calendar and selecting Add… > Task Below
The new Task is inserted above or below the nearest task, depending on where you click. It’s position is also reflected in the Task list and is assigned the appropriate Order number. Any tasks that follow are automatically renumbered.
New tasks are created as one-day tasks by default and start on the project’s start date.
You can quickly update details such as:
- Assigned to
- Budget
- Effort
- Dependencies
- Start & Finish dates
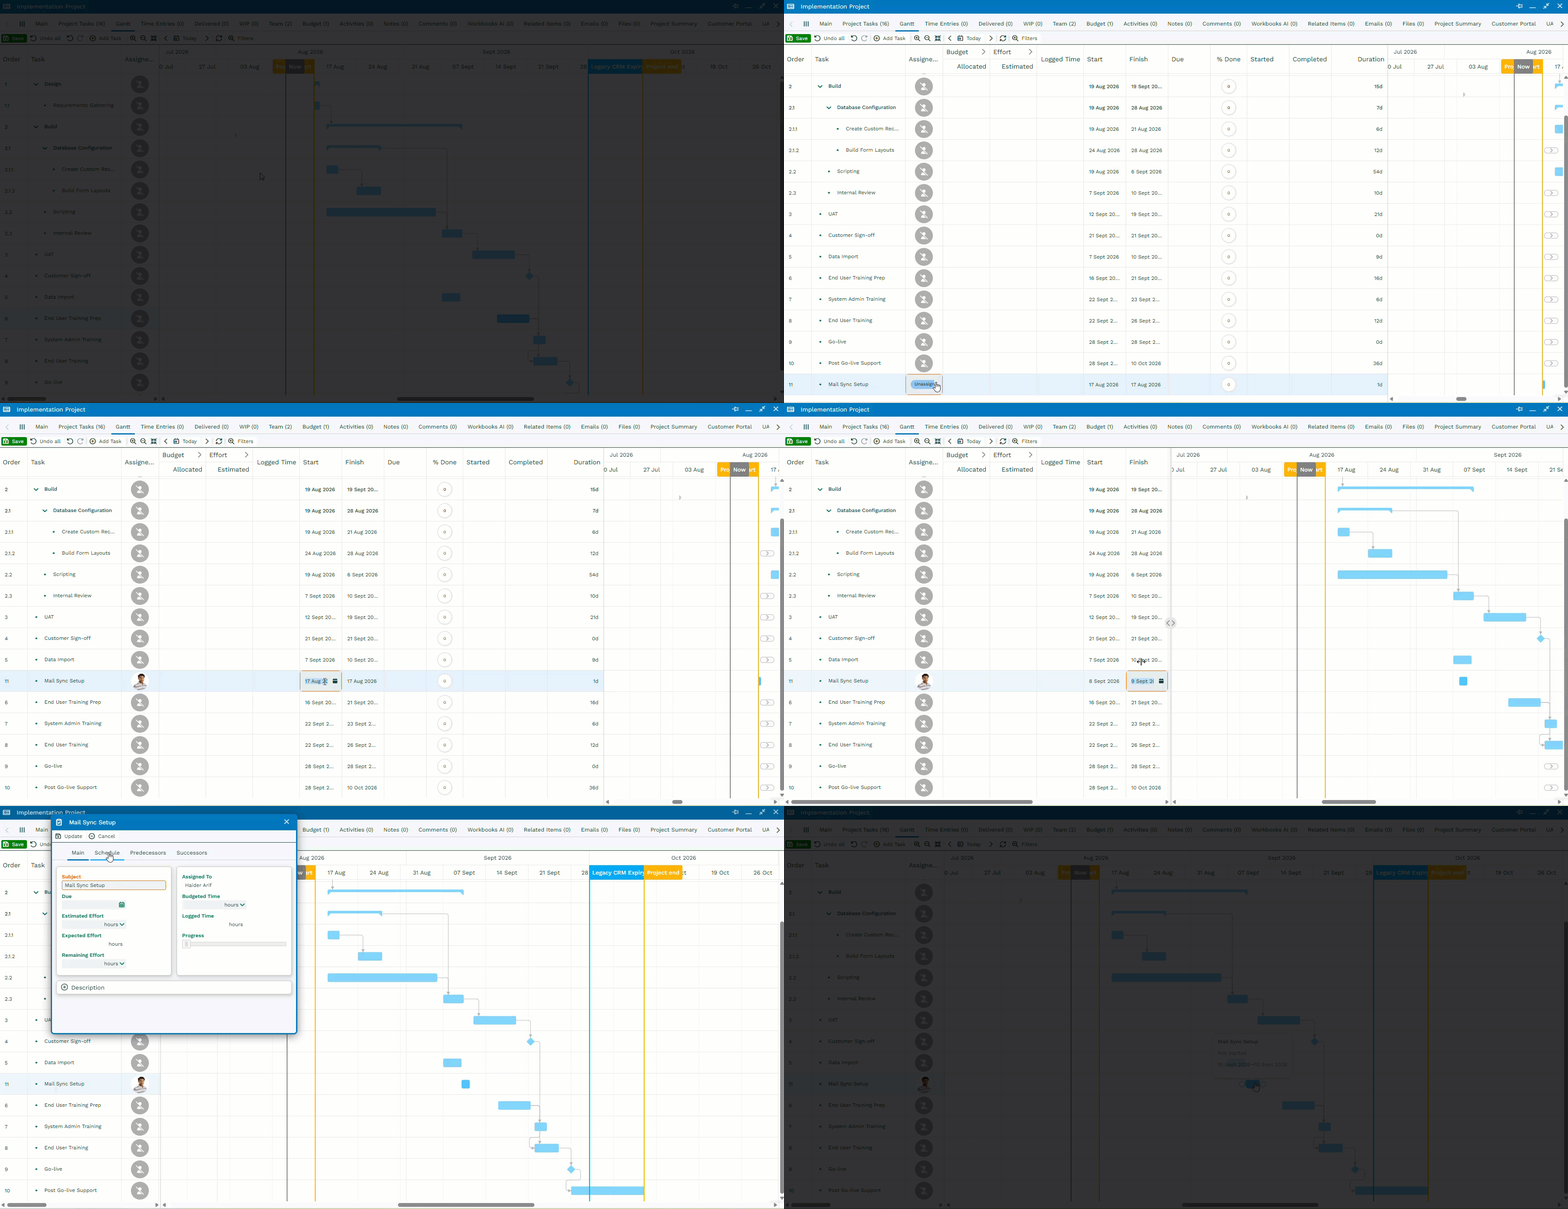
You can make changes directly in the grid hidden behind the calendar, or drag and drop tasks within the task list or calendar. This makes it easy to adjust your project plan and keep timelines up to date.
Creating and managing Dependencies
Dependencies define the relationship between tasks in a project. They help you build a realistic schedule by showing how one task affects another.
For example, some tasks can’t start until a previous task has been completed. By linking tasks together, your project timeline can automatically adjust when dates change.
Dependencies help you:
- Link related tasks together
- Control when tasks can start
- Understand the impact of delays
- Build a realistic project timeline
- Spot potential bottlenecks early
When linked tasks change, dependent tasks may update automatically, helping keep your project plan accurate.
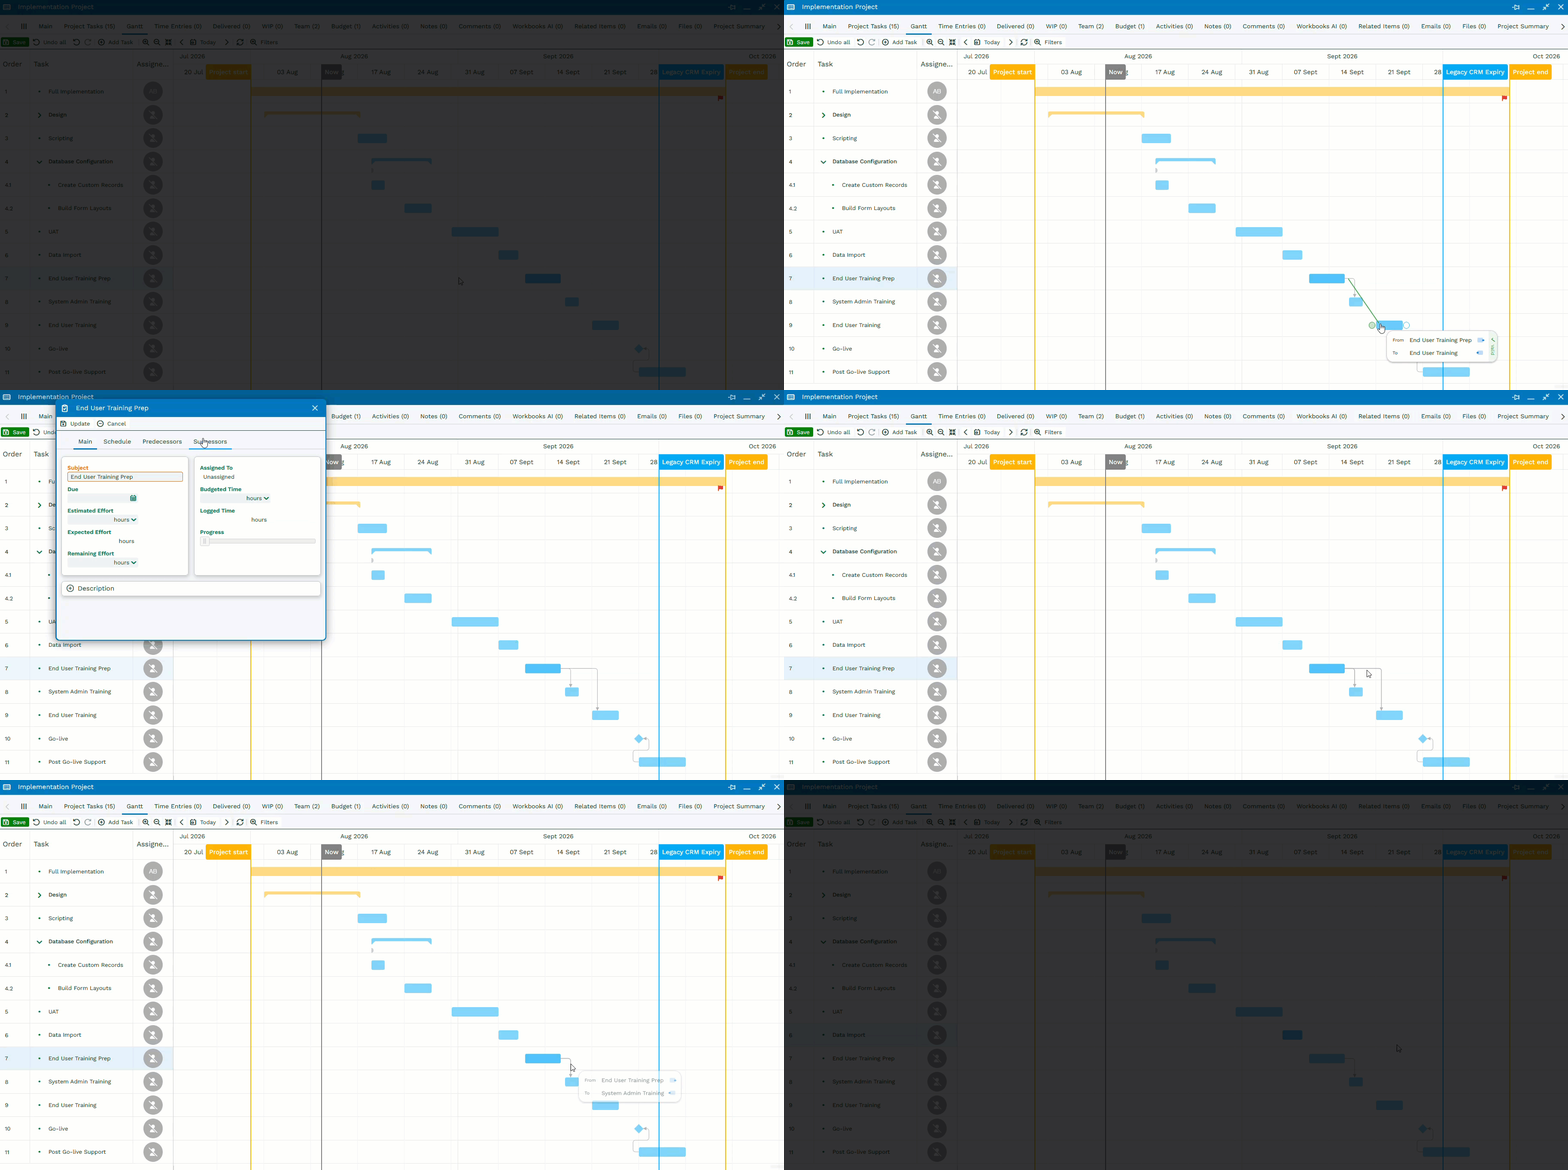
You can create dependencies in the Gantt view by dragging a link from one task to another or right-clicking on a Task > Add… > Predecessor or Successor. You can also edit dependencies by opening a Task and selecting either Predecessors or Successors. From here, you can change or remove linked tasks, choose the dependency type e.g Start to Finish and also set any Lag time between tasks.
To remove a dependency, either double-click the dependency line in the Gantt view or delete the relevant predecessor or successor from the task.
Milestones and Deadlines
Milestones and deadlines help you track important events and target dates throughout your project. While they serve different purposes, both make it easier to monitor progress, communicate expectations, and keep Projects on track.
Milestones represent a significant event or achievement within a project. Unlike a task, a milestone doesn’t usually involve work being completed. Instead, it marks an important point in the project timeline. For example:
- Project kickoff
- Testing completion
- Customer sign-off
- Go-live
Using milestones helps you:
- Track progress against key goals
- Highlight important project achievements
- Create clear review and approval points
- Improve visibility for stakeholders
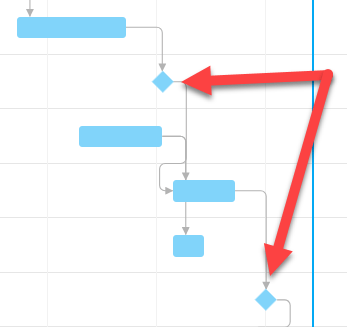
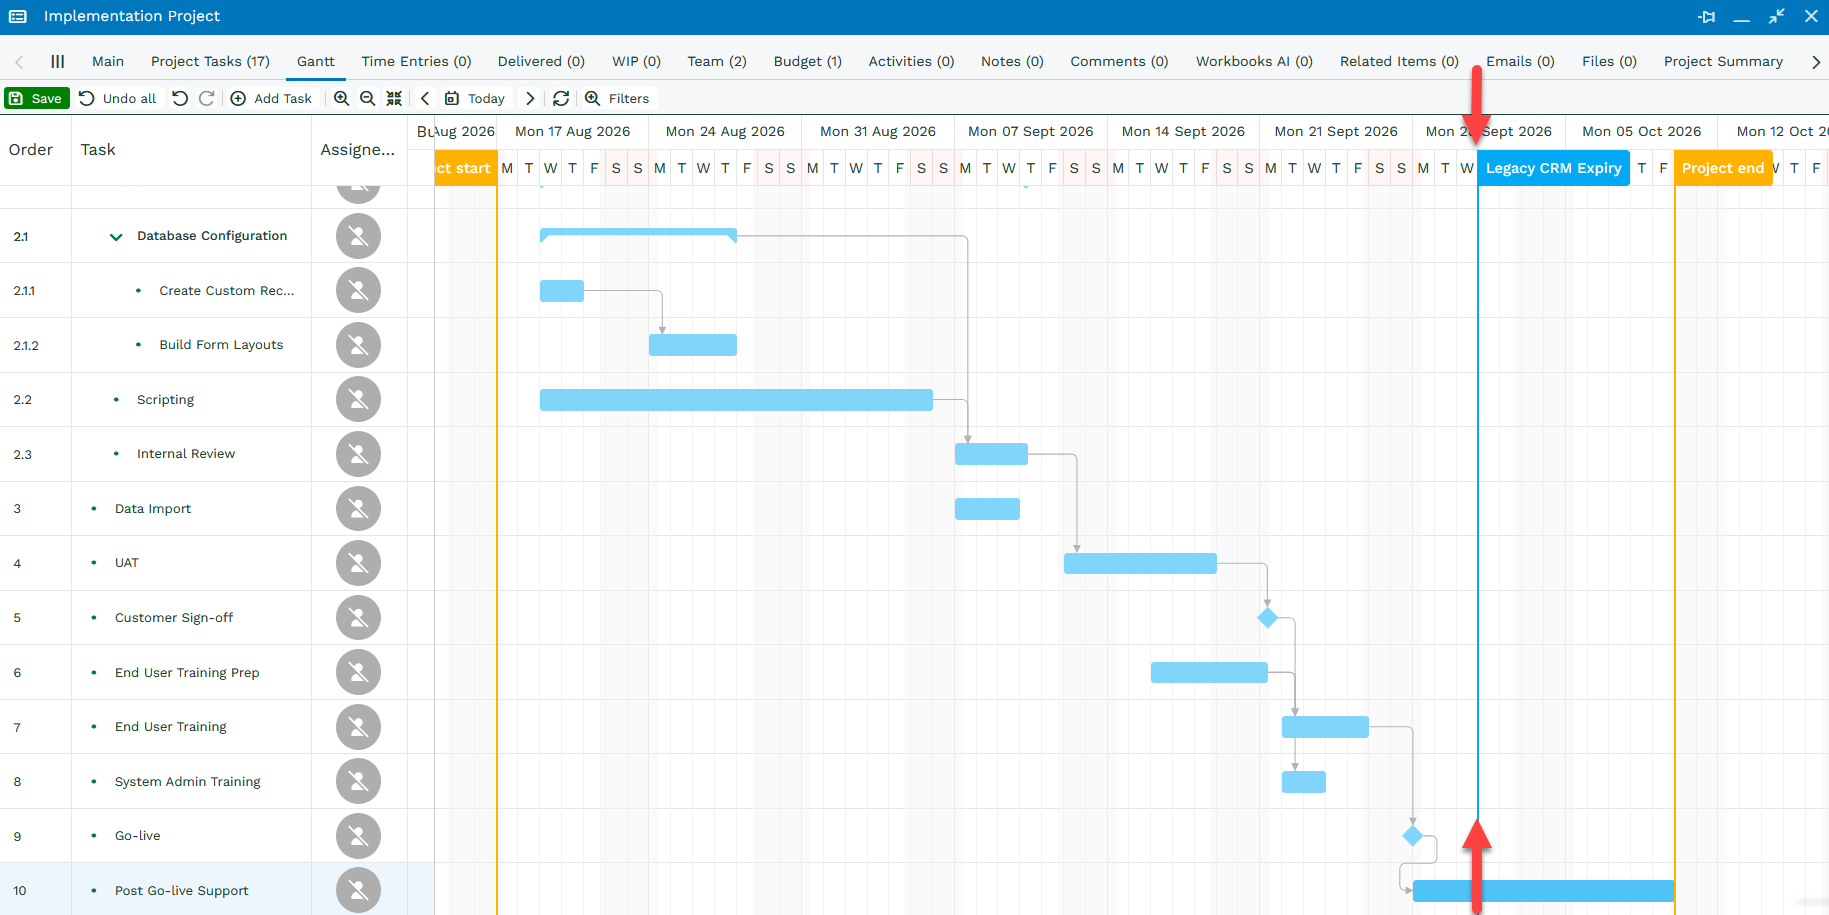
Milestones are displayed Tasks in the shape of a diamond on the Gantt chart:
Whereas, Deadlines are usually a target date that work should be completed by. Unlike Milestones, Deadlines act as reference points on the project timeline and can be used to track important commitments or delivery dates. For example:
- Planned release dates
- Contractual delivery dates
- Customer review dates
- Regulatory submission deadlines
Using Deadlines helps you:
- Keep teams focused on important dates
- Spot schedule risks early
- Track progress against commitments
- Improve project planning and forecasting
Deadlines appear as vertical markers in bright blue on the Gantt chart, making key dates visible across the project timeline. The screenshot below shows a Deadline for the customers ‘Legacy CRM Expiry’. This acts as a reminder that the ‘Go-live’ must be before this to avoid any disruptions to the customers business.
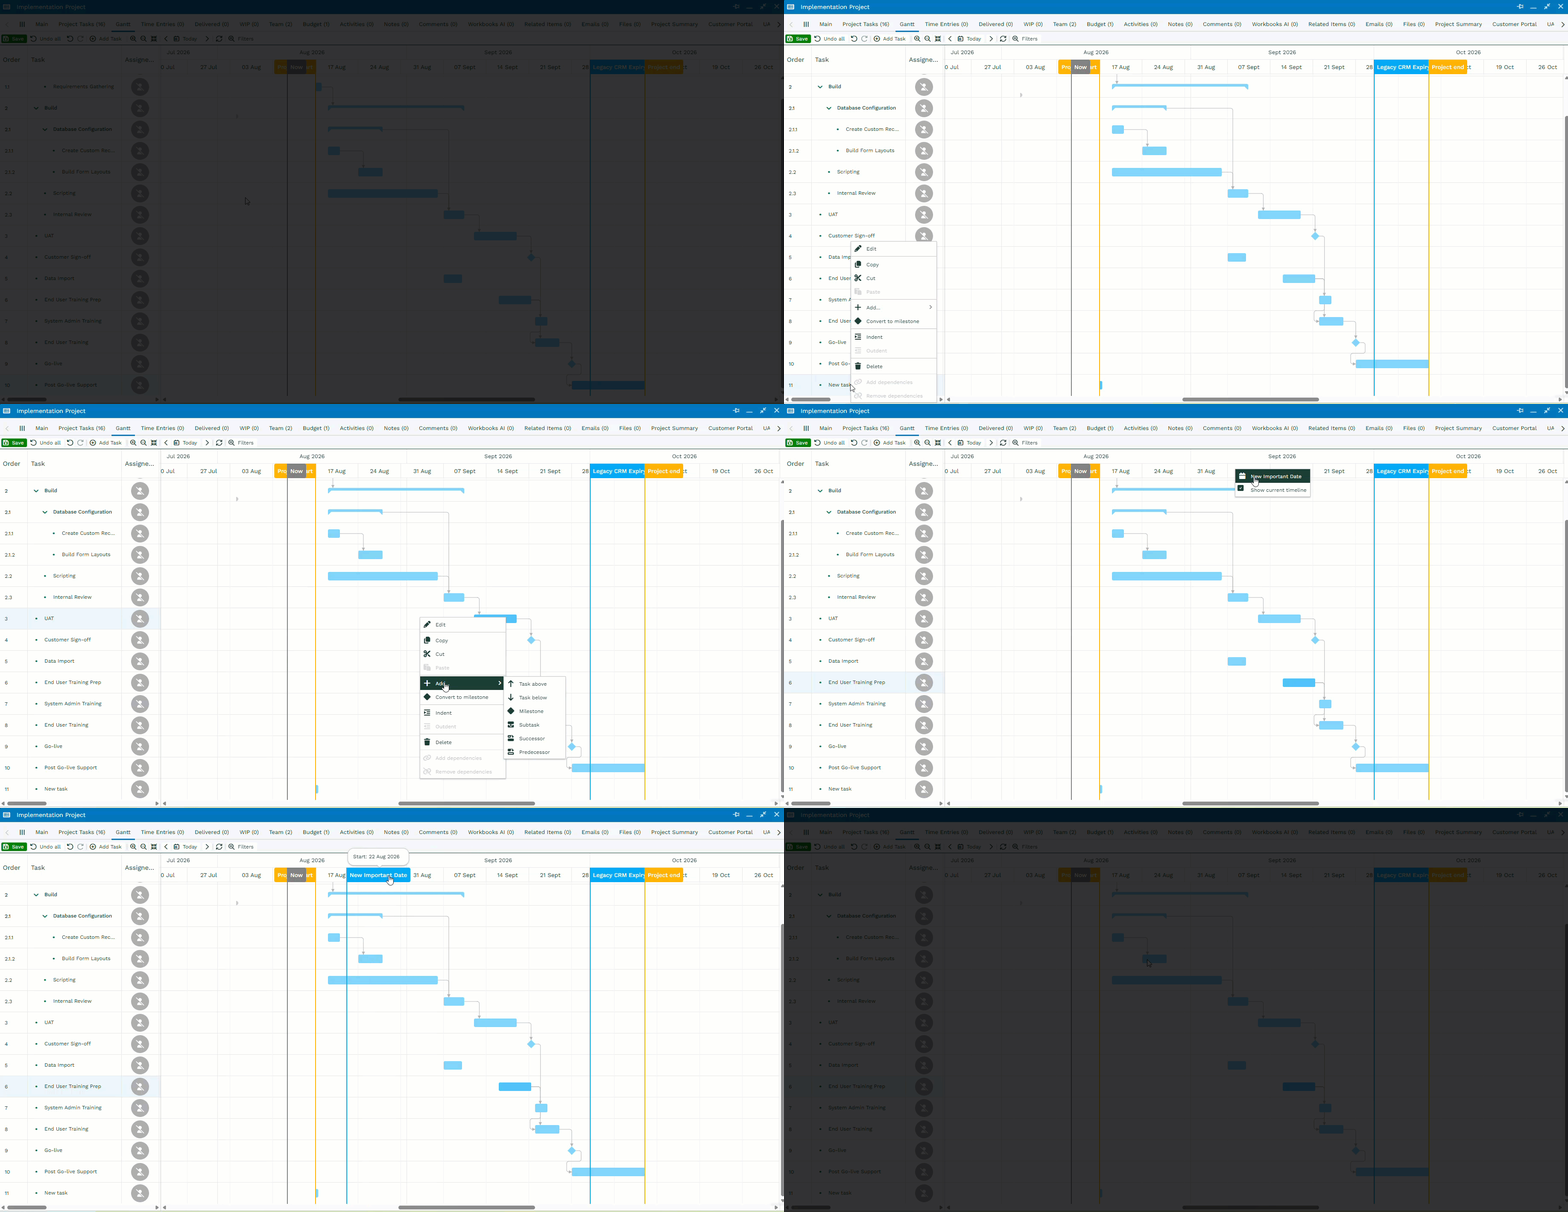
You can add a milestone in either of these ways:
- Add a task to the Project > right-click it and select ‘Convert to Milestone’
- Right-click in the calendar and select Add > Milestone
To add a Deadline, right-click a date in the timeline and select New Important Date. Enter a name for the date in the pop-up window and save it.
If you need to change the date later, simply drag the deadline to the correct position on the timeline or alternatively to delete it, right click on the Deadline title and select ‘Delete’.
Tracking Progress
The Gantt view gives you a quick visual overview of how your project is progressing.
% Done
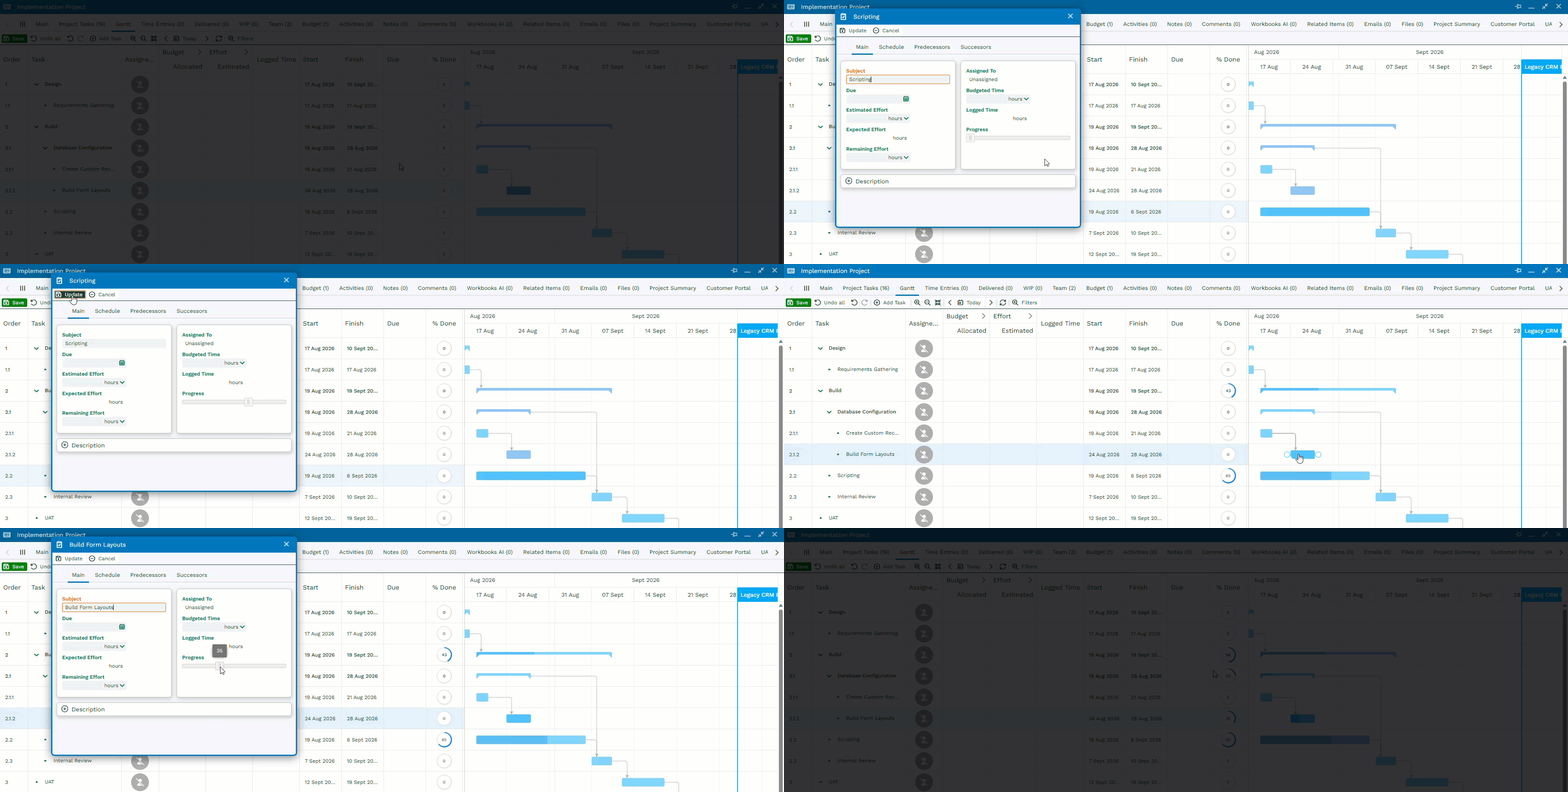
The ‘% Done’ value is calculated from the progress of Tasks. It helps you quickly see how much of the planned work has been completed.
For tasks with child tasks, progress is calculated from the child tasks rather than the parent task itself. This means the parent task’s% Done value will only update when progress is logged against one or more child tasks.
In the example below, updating the progress of the ‘Scripting’ Task also updates the progress of its parent Task, ‘Build’. If progress is added to ‘Build Form Layouts’, the progress is reflected in both ‘Database Configuration’ and ‘Build’, as the task sits within a two-level Task hierarchy.
This makes it easy to track progress across the entire project without manually updating parent tasks.
Task status indicators
Task bars use color-coding to highlight the current status of work:
- Blue: Task not started yet
- Yellow: Tasks that should have started but haven’t yet
- Red: Overdue Tasks
- Green: Completed Tasks
Tasks that have passed their due date are also marked with a red flag, making them easy to identify.
Managing Budgets
Project budgets can be managed at different levels within your task hierarchy, giving you flexibility in how you track time and monitor progress.
A task can have its own budget, inherit a shared budget from a parent task, or have no budget assigned. How you structure budgets is up to you, but it’s best to decide this before work begins. For more information, see Managing Project Budgets.
You can add Budget to a Task within the Gantt Chart, by the editable grid or double clicking on the Task in the timeline: