









Create a Report Cell Custom Field to show the Adobe Sign Agreement Status for a single Agreement (optional)
NOTE: Make sure you’ve installed the Adobe Sign plugin and completed the steps in our Adobe Sign installation guide and Create a DLI Custom Field to open Adobe Sign Tasks easily from your records, before following the instructions on this page.
If you’d like to see the status of an Adobe Sign document without opening the related Activity, you can create a Report Cell custom field. This lets you display the Adobe Sign status directly on the record and, if you’d like, apply color-coding to make statuses easier to spot.
You can create the report from the Template – Adobe Sign Document Status – Record Type template, where Record Type is the record type you selected during plugin installation. If you use the template, you can skip straight to create a new custom field on Customer Orders
If you’d prefer to build the report yourself, follow the steps below.
Create the report
Start with the record type you’re sending documents from. For example, if you’re sending Customer Orders for signature, create the report from Orders.
Add the required columns
Add the following columns to the report:
- Object Reference for the record type
- IDs of related Activities
You can also add these optional columns if you’d find them useful:
- Activity Reference
- Activity Status
- Activity Type
These extra columns can help when reviewing or troubleshooting Adobe Sign activities.
Create a calculated status column
Instead of using the standard Activity Status field, we recommend creating a calculated column.
This gives you more control over how statuses are displayed and makes them easier to understand at a glance. It also allows you to apply custom styling, such as color-coding different statuses.
Another benefit is that you can display a meaningful value for records that don’t yet have an Adobe Sign Activity. For example, you could show New Order until the Adobe Sign process has been started.
This approach makes it easier to track document progress directly from the record, without needing to open the related Activity.
The formula should be similar to below, amending the statements after each ‘THEN’ as necessary:
IF( activities.activity_type = ‘Adobe Sign’,
(CASE activities.activity_status
WHEN ‘New’ THEN ‘Generated/Not Sent to Adobe Sign’
WHEN ‘Sent to Adobe Sign’ THEN ‘Generated/Sent to Adobe Sign’
WHEN ‘Created in Adobe Sign’ THEN ‘Generated/Ready for Sending in Adobe Sign’
WHEN ‘Sender Cancelled’ THEN ‘Document Cancelled by Sender’
WHEN ‘Recipient Cancelled’ THEN ‘Customer Rejected Document’
WHEN ‘Document Expired’ THEN ‘Document Exceeded Signature Time Limit’
WHEN ‘Document Viewed’ THEN ‘Customer Viewed Document’
WHEN ‘Awaiting Signature’ THEN ‘Document Sent/Awaiting Signature’
WHEN ‘Complete’ THEN ‘Document Signed’
ELSE ‘New Order’
END), ‘New Order’)
Add styling to your status field
You can then add some CSS styling to your column so that the report cell displays colours. You would first need to create another calculated column, using a formula like below, amending the colours as necessary:
IF( activities.activity_type = ‘Adobe Sign’,
(CASE activities.activity_status
WHEN ‘New’ THEN ‘text-align: center;background-color:DarkOrange;color: white’
WHEN ‘Sent to Adobe Sign’ THEN ‘text-align: center;background-color:DarkOrange;color: white’
WHEN ‘Created in Adobe Sign’ THEN ‘text-align: center;background-color:DarkOrange;color: white’
WHEN ‘Sender Cancelled’ THEN ‘text-align: center;background-color:Red;color: white’
WHEN ‘Recipient Cancelled’ THEN ‘text-align: center;background-color:Red;color: white’
WHEN ‘Document Expired’ THEN ‘text-align: center;background-color:Red;color: white’
WHEN ‘Document Viewed’ THEN ‘text-align: center;background-color:DarkOrange;color: white’
WHEN ‘Recipient Email Bounced’ THEN ‘text-align: center;background-color:Red;color: white’
WHEN ‘Awaiting Signature’ THEN ‘text-align: center;background-color:DarkOrange;color: white’
WHEN ‘Complete’ THEN ‘text-align: center;background-color:Green;color: white’
ELSE ‘text-align: center;background-color:white;color: black’
END), ‘text-align: center;background-color:white;color: black’)
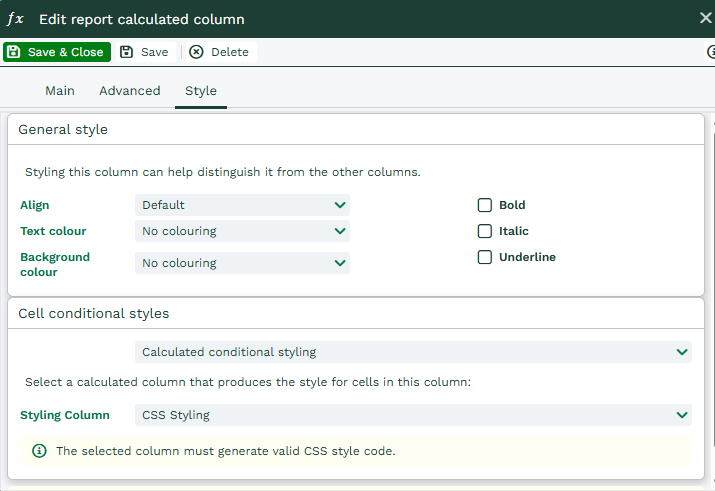
You’ll then need to amend the Status calculated column to have ‘Calculated conditional styling’ using the calculated column you just created.
Create the Report Cell field
Once you’ve finished building the report, create a new custom field on your chosen record type. In this example, that’s Customer Orders.
Create the field as a Report Cell and configure it as follows:
- Report: Select the report you created in the previous steps
- Display Column: Select your styled calculated Status column
The Report Cell will then display the current Adobe Sign status directly on the record, including any color-coding you’ve applied. This makes it easy to see the status of a document at a glance without opening the related Adobe Sign Activity.
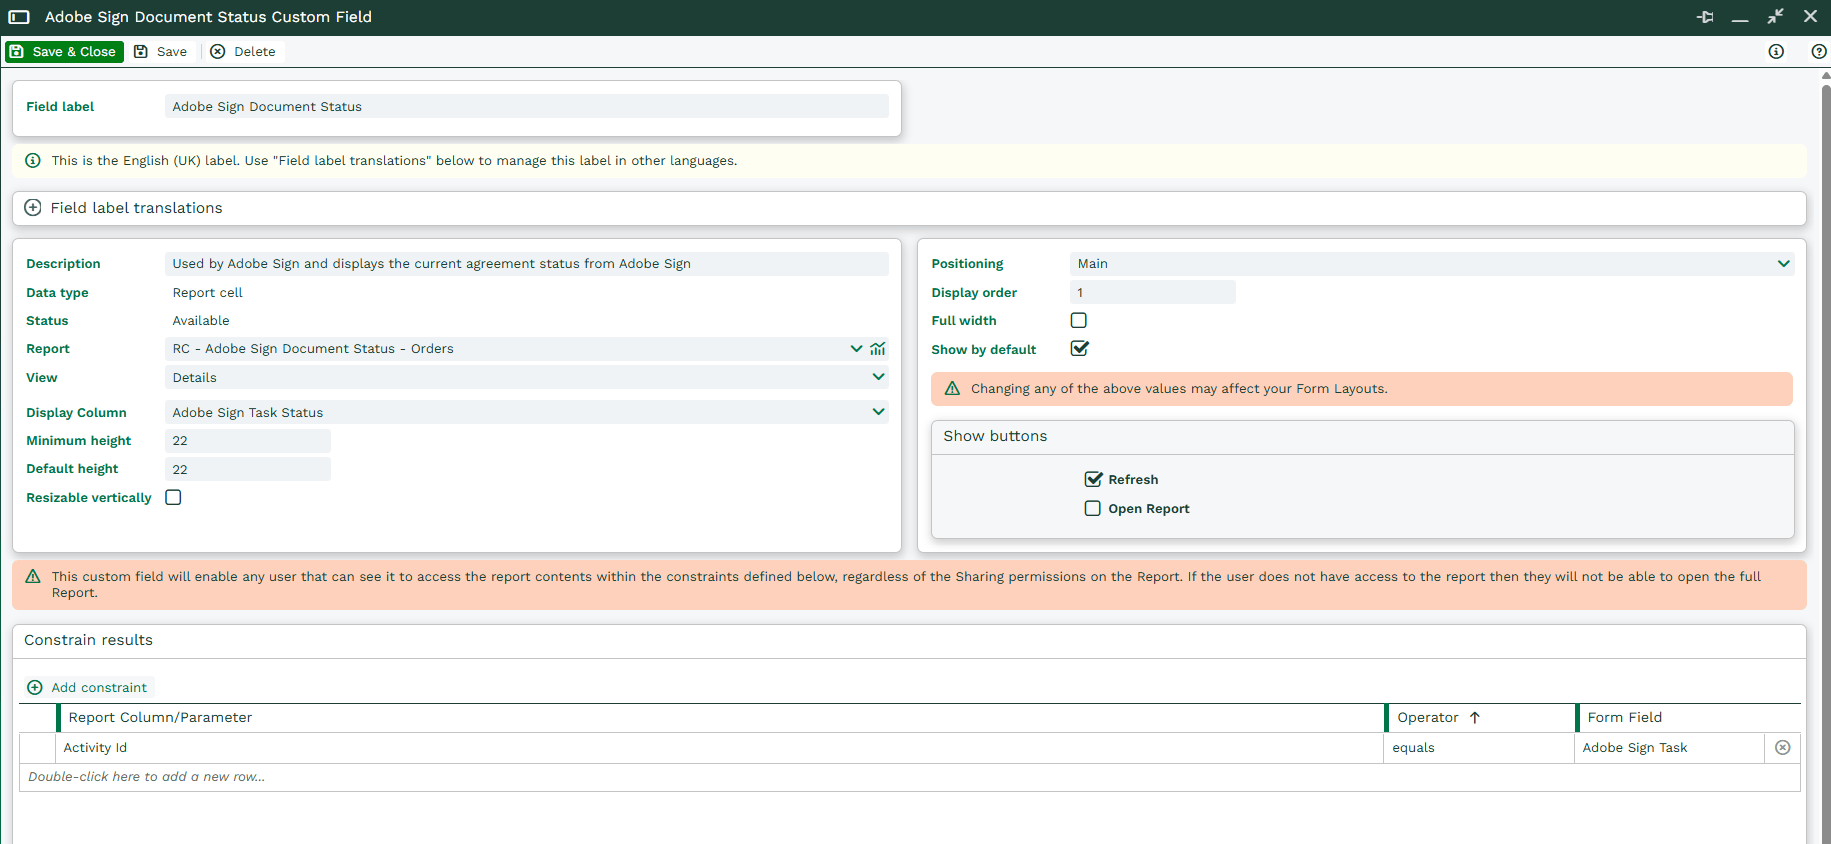
You should then constrain the Report Cell by the ‘Adobe Sign Task’ field, matching it to the Activity Id column from the report.
You can then amend your Form Layout to show your new Report Cell in the relevant place.