
Workbooks
  • Knowledge Base
  • Customer Forum
  • Training
  • Support Portal
  • Support Processes
Login
  1. Home
  2. Support
  3. Knowledge Base
  4. Knowledge base
  5. Integrations
  6. Email Integrations
  7. Workbooks Exchange Server Sync
  8. What gets synchronised?
  9. Synchronising with the WESS Add-in
Support

Knowledge Base

Browse our knowledge base articles to quickly solve your issue.

  1. Home
  2. Support
  3. Knowledge Base
  4. Knowledge base
  5. Integrations
  6. Email Integrations
  7. Workbooks Exchange Server Sync
  8. What gets synchronised?
  9. Synchronising with the WESS Add-in
  • Welcome to the Knowledge Base
  • Introduction
    • Using the Knowledge Base
    • Editions & Licensing
      • Renewing Licences
    • Workflow
      • Queues
    • Logging In
      • Configuring Security Policies
      • Google Authentication
      • Login Protection
      • Microsoft Azure Active Directory
        • Link Workbooks to Microsoft Azure
        • Setting up User Templates
        • Locking down your Workbooks
    • Support Processes
  • Training
    • Training Videos
    • Training Courses
  • Getting Started
    • Supported browsers
    • Introduction
    • Desktop
      • Tips & Tricks on the Desktop
      • Welcome Messages & Bulletins
    • Records
      • External Links to Workbooks records
      • Tabs
        • Default Tab Views
        • Summary Timeline View
        • Overview Tab
      • Watching Records
      • Notes
    • Landing Pages
      • Bulk Actions
        • Scheduled Bulk Actions
      • Customising Views
        • Customising Columns
        • Filtering
          • Custom Filters
        • Calendar Views
        • Card View
          • Report Card View
          • Worked Examples of Card Views
      • Deleted Items
      • Edit Grids
      • Exporting Data
      • Exporting to MS Excel
    • Workbooks on Mobiles and Tablets
  • Preferences
    • Introduction to Preferences
    • Setting your Preferences
      • Email Accounts
      • Notifications & Reminders
  • Activities
    • Introduction to Activities
    • Using Activities
      • Meetings
        • Integrating Workbooks and Google Calendar
          • Installing and Managing Workbooks and Google Calendar Integration
          • Synchronising your Google Calendar with Workbooks
      • Follow-on Activities
  • Cases
    • Introduction to Cases
    • Displaying & Adding Cases
    • Managing Cases
    • Case Portal
      • Installation
        • Custom Fields
        • Case Portal Configuration
          • Company Details
          • General
            • Case Portal Reports
          • New Case
          • Help Text
          • Emails
          • Advanced Features
          • Field Mappings
          • Help Dialog
          • Product Area Questions
        • Case Portal Additional Features
          • Setting up Public/Private Activity creation
          • Setup Registration Emails from a Person
          • Automatic Emails on Case Status Change
      • Using the Case Portal
        • Case Updates - Public & Private Activities
        • Inviting a Person to the Case Portal
  • Email
    • Introduction to Email
    • Working With Emails
    • Email Signatures
    • Sending Bulk Email
    • Common Email Errors
    • Email Integrations
    • Mailing Lists
  • Forecasts & Quotas
    • Introduction to Forecasts & Quotas
    • Sales Forecasts
      • Adjusting Forecasts
      • Included Forecasts
    • Sales Quotas
  • Importing Data
    • Introduction to Importing
    • Preparing your Import Data
      • Import Templates
      • Compulsory fields for Import
    • Workbooks Import Wizard
      • Uploading your data
      • Defining Field Mappings
      • Extending your Import to other Record types
      • Checking for Duplicates
      • Running and Reviewing your Import
    • Managing your Imports
      • Undoing an Import
  • Leads
    • Introduction to Leads
    • Displaying & Adding Leads
    • Converting Leads
  • Marketing
    • Introduction to Marketing
    • Marketing Campaigns
      • Displaying & Adding Campaigns
      • Campaign Management
      • Campaign Membership
      • Tracking URLs on Campaigns
      • Integrating DotDigital and Workbooks
        • Configuring Workbooks and Dotmailer
      • Integrating MailChimp and Workbooks
        • Configuring Workbooks and MailChimp
    • Mailing Lists
      • Creating Mailing Lists
    • Products
      • Pricing Schemes
      • Supply Scheme
      • Product Bundles
    • Mailshots
      • Creating a Mailshot
    • Upload Library
      • Using the Upload Library
    • Templates
      • Creating Templates
      • Creating a Template to show multiple lines
      • Extra Template Placeholders
    • Using HubSpot with Workbooks
    • Event Management
      • Introduction to Event Management
      • Enabling the Event Management Module
      • Using Event Records
        • Event Records
        • Event Sessions
        • Event Speakers
        • Event Sponsors
        • Event Products
        • Event Tickets
        • Event Attendees
      • The Event Management Portal
        • Introduction to the Event Management Portal
        • Prerequisites for installation
        • Accessing the Plugin
        • Installing the Event Management Portal
        • Amending Event Portal Parameters
        • Adding Custom CSS to the Event Portal
      • On The Day Registration App
      • Setup On the Day Registration App
    • Compliance Records
      • Introduction to Compliance Records
      • Enabling Compliance Records
      • Creating Compliance Records
      • Using Compliance Records
    • Spotler Integration
      • What is Spotler?
      • Navigating your Spotler homepage
      • GatorMail
        • Introduction to GatorMail
        • Managing your GatorMail Account
          • Domain Setup
        • GatorMail Configuration
          • GatorMail Field Mappings
            • GatorMail Hard Bounces
          • Preference Centres & Landing Pages
            • Preference Centre Setup
        • Creating Emails in GatorMail
          • Imbedding Images and Videos
        • Sending Emails in GatorMail
          • Sending GatorMail Campaigns
            • Campaign Action Types
            • Ramp-up
            • Testing Campaigns and Emails
          • Using SendForensics
          • Understanding your Campaign results
        • Advanced Features
          • Gator Smart Forms
          • GatorMail - Dynamic Content
      • GatorLeads / Web Insights
        • Tracking Code
          • Restricting Page Tracking
        • Setting up the Plugin
        • Viewing Web Insights Data on your Form Layouts
        • Domain Names and Online Activities
        • Reporting incorrect Leads created through Web Insights
        • Reporting on Web Insights data
        • Using UTM Values
        • Why aren’t Online Activities being created in the database?
        • Why is GatorLeads recording online activities in a foreign language?
      • GatorSurvey
      • GatorWorkflow
        • Spotler Data Sync
        • Triggered Mailshots
      • GatorPopup
  • Opportunities
    • Introduction to Opportunities
    • Displaying & Adding Opportunities
    • Opportunity Line Items
    • Opportunity Relationships
  • Integrations
    • Mapping
      • Introduction to the Mapping Module
      • Using the Mapping Module
      • Using Mapping in Reports
        • Changing the size/colour of Map Pins
    • Electronic Signing Tools
      • Docusign Integration
        • DocuSign Functionality
          • Copy Document on Signature
          • Update Related Records
          • Sending Multiple Documents
          • People, Organisations & Cases with DocuSign
          • Invoice Payments with DocuSign
          • Managing DocuSign Documents
        • Setting up the DocuSign Integration
          • Authentication with DocuSign
          • Production vs Sandbox
          • Creating a Document with a DocuSign Template
          • Creating a Document with a Workbooks PDF
          • DocuSign Fields
          • DocuSign Settings
          • Form Layout Configuration
        • DocuSign - Worked Examples
          • Taking Payments
          • Updating Related Records
          • Multiple Document Sends
          • Creating a Template for Cases
          • Creating a Template for Organisations
          • Creating a Template for People
          • Unified PDF for Transaction Documents
        • DocuSign - Reporting
          • Multiple Send Report Grid
          • Document Review Report
          • Monitoring Integration Errors
      • Adobe Sign Integration
        • Introduction to Adobe Sign
        • Authentication with Adobe Sign
        • Installing the Integration
        • Integration Monitoring & Error Handling
        • Setup of Adobe Sign
        • Adobe Sign Fields & Form Layout Configuration
        • Optional Custom Fields for Adobe Sign
        • Adobe Sign Button Process
        • Using the Adobe Sign Integration
    • Creditsafe Integration
      • Installing the Creditsafe Plugin
      • Configuring Organisations to use the Creditsafe Integration
      • An example of how to use the Creditsafe Integration
    • Zapier
      • Introduction to Zapier
      • Available Triggers and Actions
      • Linking your Workbooks Account to Zapier
      • Setting up Zaps
        • Posted Invoices to Xero Invoices
        • Xero payments to Workbooks Tasks
        • New Case to Google Drive folder
        • New Case to Basecamp Project
        • New Workbooks Case to JIRA Ticket
        • Jira Issue to new Case
        • 123FormBuilder Form Entry to Case
        • Eventbrite Attendee to Sales Lead and Task
        • Facebook Ad Leads to Sales Leads
        • Wufoo Form Entry to Sales Lead
        • Posted Credit Note to Task
        • QuickBooks Online
          • Initial Setup
            • Authentication with QuickBooks Online
          • People & Organisations to QuickBooks Customers
          • POSTED Workbooks Invoice to QuickBooks Online
          • QuickBooks Online Payment to Workbooks Invoice & Task
          • QuickBooks Sales Tax Code Lookup
        • Survey Monkey responses to Tasks
      • Multistep Zaps
    • Email Integrations
      • Email Dropbox
        • Setting up your Dropbox
        • Using your Dropbox
      • Workbooks Exchange Server Sync
        • Supported email clients
        • Set Up
          • Setting up the WESS
          • Setting up the Outlook Add-In
          • Customising the WESS Add-In
          • How to change Authentication setup for WESS
            • O365 Exchange authentication Troubleshooting
        • What gets synchronised?
          • Synchronising with the WESS
          • Synchronising with the WESS Add-in
          • How to force a sync
          • Best practice
        • WESS Troubleshooting
      • Workbooks Outlook Connector
        • Introduction to the Outlook Connector
        • Before downloading the Outlook Connector
          • System Requirements
          • Enabling the Outlook Connector
        • Download/update the Outlook Connector
        • Installing the Outlook Connector
          • Uninstalling the Outlook Connector
        • Using the Outlook Connector
          • Configuring the Outlook Connector's Settings
          • Identifying Records in Workbooks created in Outlook
        • Outlook Connector Troubleshooting
    • Event & Webinar Integration Tools
      • GoToWebinar
        • Installation
          • GoToWebinar Fields & Processes
          • Setting up Process Buttons for GoToWebinar
        • Authentication
          • Multiple GoToWebinar Accounts
          • Removing GoToWebinar Accounts
        • Create/Update & Cancel Webinars from Events
        • Event Attendees as Webinar Registrants
        • Event Speakers as Webinar Panelists
        • Retrieve Webinar Data
      • ON24
        • Installation
          • ON24 Fields & Processes
          • Setting Up Process Buttons for ON24
        • Authentication with ON24
          • Removing ON24 Accounts
        • Create Webcasts from Events
        • Event Attendees as Webcast Registrants
        • Retrieve Webcast Data
          • Reporting: Survey Responses
          • Reporting: Poll Responses
        • Retrieve Survey Data
        • Engagement Hub Interactions
    • Microsoft Office
      • Azure Active Directory
      • Excel
      • Outlook
      • Power BI
      • SharePoint
        • Authentication
        • Installation
          • Custom Fields & Processes
          • SharePoint Integration Settings
        • Using the SharePoint Integration
      • Word
        • Introduction to the Word Add-in
        • Deploying the Word Add-in
        • Creating Word Add-in Templates
          • Example Word Add-in Templates
        • Using Word Add-in Templates
        • Word Add-in Tips and Tricks
    • Outreach
      • Installation
        • Outreach Fields & Processes
        • Create Outreach Custom Field Mappings
          • Configure Outreach Field Dynamic Picklist
        • Sync Outreach Mappings
      • Outreach Authentication
        • Remove Outreach Account
      • Sync People to Outreach Prospects
        • People Field Mappings
      • Sync Organisations to Outreach Accounts
        • Organisation Field Mappings
      • Sync Workbooks Opportunities to Outreach
        • Opportunity Field Mappings
      • Sync Tasks/Activities from Workbooks to Outreach
        • Follow-Up Activities created via Scheduled Process
      • Sync Outreach Sequences to Workbooks
      • Sync Outreach Sequence States to Workbooks
      • Sync Outreach Sequence Step Numbers to Workbooks
      • Sync Prospects/Accounts/Opportunities from Outreach to Workbooks
      • Sync Outreach Tasks/Calls/Meetings to Workbooks
    • Scribe/Workbooks Connector
      • Connection Setup
        • Microsoft SQL Server Connection Requirements
      • Connector Control Blocks
      • Worked Example - Create, Read, Update & Delete
    • RingCentral
      • Installation
        • RingCentral Integration Fields and Processes
      • RingCentral Authentication
        • Remove RingCentral Account
      • Creating Phone Call Activities
      • Click to Dial
  • People & Organisations
    • Introduction to People & Organisations
    • Organisations
      • Displaying & Adding Organisations
      • Customers & Suppliers
    • People
      • Displaying & Adding People
      • Adding People to Outlook
    • Relationships
      • Change Employer Wizard
      • Direct Relationships
      • Third Party Relationships
    • De-duplication and Merge
      • Workbooks Merging
      • Workbooks DQ
      • Data Quality
    • Using Postcode Lookup
    • Data Enrichment
      • Introduction to Data Enrichment
      • Setting up Data Enrichment
  • Snippets
  • Reporting
    • Introduction to Reporting
      • Creating Reports
        • Standard Workbooks Reports
        • Creating a Pre-populated Report
        • Creating a Report from a Template
          • Report Templates
        • Creating a Blank Report
        • Auto-refreshing Report Views
      • Sharing Reports
    • Using Reports
      • Reporting Explained
        • Adding Targets, Conditional Formatting and CSS Styling
          • Calculated Targets
          • Target Sets
            • Creating a Target set for Closed Cases per Customer Support Agent
            • Creating a Target set for Closed Sales amount per Sales Person by quarter
        • Reporting with multiple currencies
        • Drilling into Summary Views
        • Improving Report Performance & Run Time
      • Displaying reports within Record Views
      • Displaying Reports
        • Reporting Views (Reports on Landing Pages)
      • Adding a Report view to a Dashboard
    • Charts
      • Creating & Using Charts
        • Bar Charts
          • Targets on Bar Charts
        • Line Charts
        • Pie Charts
        • Dial Charts
    • Exporting Reports
      • Emailing Scheduled Reports
    • Advanced Reporting
      • Types of Split Columns
      • Using Calculated Columns
        • Introduction to the IF Statement
        • Introduction to the CASE Statement
        • Applying Search filters in Calculated Columns
        • Comments in Calculated Columns
        • Financial Year Reporting
        • Introduction to Date Functions in Reports
        • Using Calculated Criteria
        • Reporting on empty fields
      • Audit Reporting
  • Dashboards
    • Adding Elements to Dashboards
      • Configuring Dashboard Elements
    • Dashboard Views
    • Dashboard Fields
    • Creating a Sales Dashboard
    • Springboard
    • Adding a Dashboard as a Record Tab
  • Okta Authentication
  • Transaction Documents
    • Introduction to Transaction Documents
      • Displaying & Adding Transaction Documents
      • Copying Transaction Documents
      • Transaction Documents Fields Help
      • Transaction Documents Line Items Help
      • Printing & Sending Transaction Documents
      • Managing Transaction Document Currencies
      • Managing Transaction Document Statuses
      • Setting a Blank Default Currency on Transaction Documents
    • Credit Notes
    • Customer Orders
    • Invoices
    • Quotations
    • Supplier Orders
    • Contract Management
      • Displaying & Adding Contracts
      • Using Contracts with Cases
    • Sagelink
  • Auditing
    • Auditing
  • Configuration
    • Introduction to System Administration
      • Quick Start Wizard
    • Users & Security
      • Users
        • Setting up your Users
        • Disabling Users
        • Profile Pictures
      • User Groups
        • Capabilities
        • Creating & Modifying User Groups
      • Permissions
        • Sharing Policies & Mandatory Permissions
          • Configuring the Advanced Security Module
            • Configuring the Advanced Security Module: Segmenting Users by function
            • Configuring the Advanced Security Module: Segmenting Users by location
      • Account Settings
      • Licences & Modules
        • Multi Language
    • Database
      • Databases
      • Storage Usage
      • Prefixes & Numbering
        • Modifying Object References
      • Export Database
      • Database Settings
    • Accounting
      • Accounting Periods
      • Exchange Rates
        • Setting Exchange Rates
      • Tax Regimes
        • Setting Tax Rates
        • Sales Tax Rulesets
          • Using Sales Tax Rulesets
      • Own Organisations
        • Setting up your Own Organisation
    • Email & Integration
      • Email Settings
        • Setting up your Email Server
        • Using Workbooks Server to send Emails
      • API Keys
      • Web to Case and Web to Lead
        • Setting up a Web2Case Form
        • Setting up a Web2Lead Form
        • Using Web Forms in Workbooks
        • Editing a Web Key Form
      • Preference Centre
      • MailChimp & dotMailer
      • Loqate
      • Bank Account Validation
    • Customisation
      • Creating & Modifying Picklists
      • Desktop Preferences
      • Theme
      • Record Types
        • Creating Custom Fields
          • Dynamic Linked Items & Picklists
          • Constrained Dynamic Linked Items (DLI) & Picklists
          • Creating relationships with Dynamic Linked Items (DLIs)
          • Linking Custom Field Values
          • Showing Linked Records in Tabs
        • Report-based Custom Fields
          • Improving the Performance of Report Cells/Grids
        • Linked Fields & Reference Fields
        • Record Templates
        • Form Layouts
          • Customising an Organisation form
          • Displaying a Tab as a Side Panel
          • Card View
          • Read-only Assigned to Fields
        • Customising relationships between parties
          • Configuring Custom Party Relationships
        • Opportunity Stages
      • Custom Records
        • Enabling Custom Records
        • Creating Custom Record Types
          • Editing Custom Record Types
        • Using Custom Records
    • Automation
      • Plugins
        • Field Updater Plugin
        • File Storage Plugin
          • Using File Storage
          • Using SharePoint File Storage
        • Cognism Enrich Plugin
          • Using Cognism Enrich
        • Email to Case Plugin and Process
      • Processes
        • Process Logging
      • Workbooks Scripts
        • Script Library
        • How Workbooks Runs Scripts
        • Workbooks Script External Access
      • API Data
      • Triggers and Webhooks
        • Configuring Triggers and Webhooks
    • PDF Configuration
      • Modifying Document Templates
        • Adding Terms & Conditions to your Documents
        • Multi-line Value Tags
      • Modifying Default Colours & Images
      • Creating Custom Document Templates
  • Contact Support
    • Contacting Workbooks Support
    • Workbooks CRM Advisory Packs
    • Introduction to the Administrator Service
  • Releases & Roadmap
    • Roadmap
    • September 2022 Release
    • June 2022 Release
    • March 2022 Release
    • October 2021 Release
    • June 2021 Release
    • March 2021 Release
    • 2020 Releases
      • December 2020 Release
      • September 2020 Release
      • April 2020 Release
      • January 2020 Release
    • 2019 Releases
      • September 2019 Release
      • February 2019 - Event Management Release
      • January 2019 Release
    • 2018 Releases
      • October 2018 Release
      • May 2018 Release
      • February 2018 Release
      • January 2018 Release
    • 2017 Releases
      • November 2017 Release
      • September 2017 Release
      • June 2017 Release
      • March 2017 Release
    • 2016 Releases
      • December 2016 Release
      • August 2016 Release
      • January 2016 Release
  • Workbooks Glossary

Synchronising with the WESS Add-in

  • Introduction
  • Emails
    • Relating emails to specific records
  • Contacts
    • Managing contacts
    • Creating contacts
    • Updating contacts
  • Creating new records

Introduction

The WESS Add-in allows you to have greater control over the synchronisation of records between Workbooks and Outlook. The Add-in runs in parallel with the WESS to provide a complete solution for managing the synchronisation of records.

In addition to having all of the synchronisation abilities that come with the WESS, those using the Outlook Add-in will benefit from being able to make a direct connection to Workbooks. This will allow you to create and update records in Outlook itself, these will then be immediately available within Workbooks and accessible for all other Users.

It's worth noting that emails from people with the same domain as you (e.g. your work email) will not appear in the Outlook Add-in, even if they already exist in Workbooks.

Emails

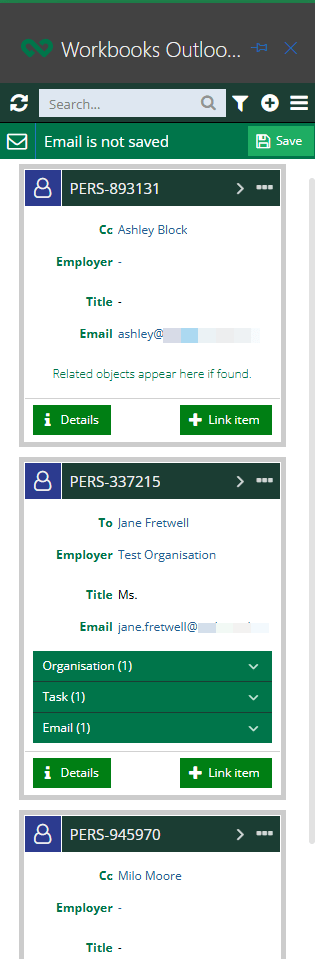
When viewing an email within your Outlook client, the WESS Add-in will automatically look up all of the contacts from the To and CC fields. It then uses the email address to retrieve any Person or Sales Lead Record within Workbooks that share that email address as well as all of the additional information stored on that record. If a Lead or Person Record is not found using the email address you will be able to create a new record in Workbooks directly within the Add-in.

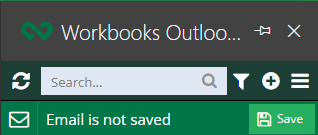
If this is a new email and has not already been synced to Workbooks you will see that the banner across the top of the Add-in will say that the “Email is not saved”. 

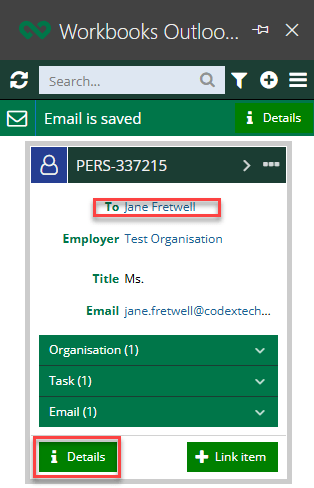
Using the Save button will change the banner’s wording to “Email is saved” and the Save icon is replaced with a Details button. Saving the email will also mean that it appears immediately within Workbooks and it will be attached to all of the recipients’ records.

Back to top.

Relating emails to specific records with the WESS Add-In

If an email is related to a specific Record such as an Opportunity or Case it is possible to create a link between the email and the record within the WESS Add-in. Once a Record has been related to an email it will then appear in the sidebar where it can be easily opened and reviewed within Workbooks. This allows users to quickly and effectively manage emails within Outlook without the need to look for data in two systems, this then ensures that data is easy to find across multiple users' mailboxes.

To link an Email to a Record you will first need to find it, this can be done by using the WESS Add-in's Search Bar.

NOTE: You may want to consider using the filter (funnel icon) to search within a specific record type to return more accurate search results at a greater rate.

Any results returned will then appear in the sidebar and a summary of the records found will appear at the bottom of the screen, the Email can then be linked to the Record by using the Link Item button that appears on the record's card within the WESS Add-in.

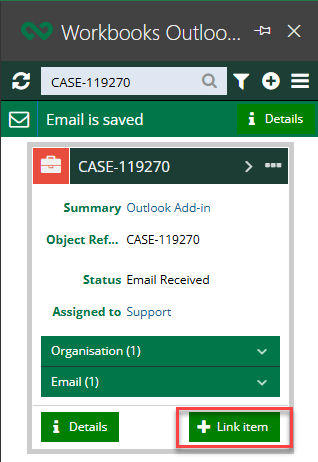
Once the Email has been linked to the Record the link Item will change to Unlink Item allowing you to remove the link between the Email and the Record as required. 

You will then be able to find the email attached to the Record within Workbooks for easy review.

Contacts

Managing contacts with the WESS Add-In

One of the key benefits of using the WESS Add-in is the ability to use Outlook data to create contacts that will be immediately available within Workbooks. 

The WESS Add-in will look up all People & Sales Leads and show any with a matching email address. This also means If you have multiple Records with the same email address a Contact Card will appear for each Workbooks Record.

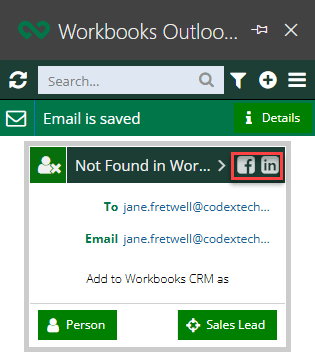
When viewing a Contact Card you will see that you have the option to search Facebook or LinkedIn using the button at the top of the Contact Card. Using either button will perform a search for accounts on the site using the name that has been saved against the Contact Card. You can then choose whether to connect with that person via Facebook or LinkedIn.

Creating Contacts in Workbooks with the WESS Add-in

When sending or receiving any email within Outlook you will see all of the contact information stored on Contact Cards within the WESS Add-in for every recipient. From here you can see an immediate snapshot of the details held within Workbooks.

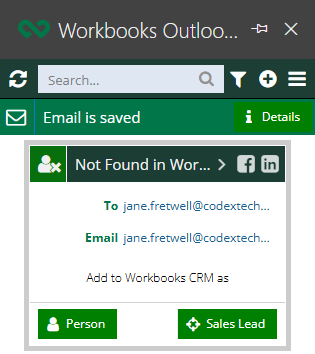
If the Add-in is unable to find a Person or Sales Lead using the Email address you will see an empty Contact Card, with the title “Not found in Workbooks”.

Any user with the WESS Add-in will then be able to create this as a Person or Sales Lead Record within Workbooks by using the respective buttons at the bottom of the Contact Card.

Selecting either button will open a new form within the Add-in where you can start entering the details of the contact. 

NOTE: Any Field with a lightbulb above it will be automatically populated with values from the Email for you.

Once you have filled in all of the details on the Contact Card select the Create button, this will save all of the details and immediately create a new Person within Workbooks. The WESS Add-in will automatically refresh and show the newly created Person’s Contact Card with all of the details populated.

Back to top.

Updating Contacts from Outlook

The WESS Add-in provides users with a two-way synchronisation of contact information, meaning that data can be updated in either your Outlook client or Workbooks and will be updated in the other system immediately.

When viewing a Contact Card within the Outlook Add-in you are able to amend the details within the Contact any changes will feedback to Workbooks and update the Person or Lead Record immediately. 

To edit the details on a Contact Card you can select either the contact's name or the Details button.

This will open the Contact Card showing you all of the details stored in the fields used by the Add-in. To change the information held in a Field simply select the pencil icon at the end of the field. 

Selecting the pencil icon will open a new dialogue box where you can update what is held in the field already. Once you have made your changes use the Done button to save them to the Contact Card.

Edited Fields will appear in bold orange text allowing you to easily review all of the changes that have been made to a contact before updating the Person Record in Workbooks.

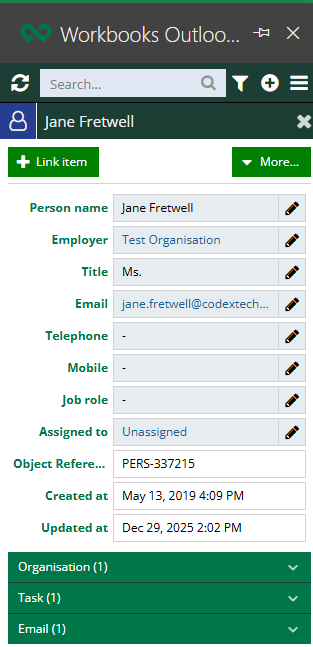
Once saved, the text will return back to its standard font size and colour.

These changes will update Records immediately within Workbooks and can be easily reviewed as necessary.

Back to top.

Creating new records with the Add-in

New Records can be created through the WESS Add-in, and it can also be used to pull information directly from the email body to help populate details and save time during creation.

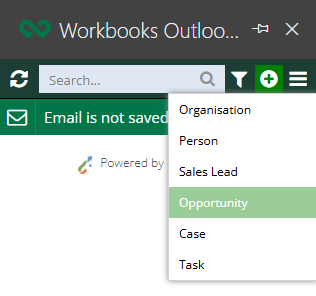
To create a new Record use the plus icon at the top of the Add-in, this will open a new picklist that will give you the selection of record types available.

Selecting a Record Type will open a blank Record within the Add-in where you can enter the details as required, some fields such as the Assigned to will automatically be populated by your username as will any other field that is marked with a light bulb icon.

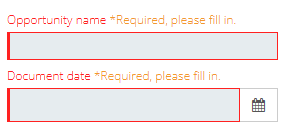
As with Workbooks, different Record types will have different required fields that need to be populated, these will appear with a red outline and a note saying that the fields are required for easy reference.

Once all of the required Fields have been populated the Create button at the bottom of the card will become available and will create the record immediately within Workbooks.

Back to top.

  • Synchronising with the WESS
  • How to force a sync

© 2023 Workbooks.com - privacy & terms
  • Linkedin
  • Twitter
  • Youtube
  • Facebook