
Workbooks
  • Knowledge Base
  • Customer Forum
  • Training
  • Support Portal
  • Support Processes
Login
  1. Home
  2. Support
  3. Knowledge Base
  4. Knowledge base
  5. Integrations
  6. Scribe/Workbooks Connector
  7. Worked Example - Create, Read, Update & Delete
Support

Knowledge Base

Browse our knowledge base articles to quickly solve your issue.

  1. Home
  2. Support
  3. Knowledge Base
  4. Knowledge base
  5. Integrations
  6. Scribe/Workbooks Connector
  7. Worked Example - Create, Read, Update & Delete
  • Welcome to the Knowledge Base
  • Introduction
    • Using the Knowledge Base
    • Editions & Licensing
      • Renewing Licences
    • Workflow
      • Queues
    • Logging In
      • Configuring Security Policies
      • Google Authentication
      • Login Protection
      • Microsoft Azure Active Directory
        • Link Workbooks to Microsoft Azure
        • Setting up User Templates
        • Locking down your Workbooks
    • Support Processes
  • Training
    • Training Videos
    • Training Courses
  • Getting Started
    • Supported browsers
    • Introduction
    • Desktop
      • Tips & Tricks on the Desktop
      • Welcome Messages & Bulletins
    • Records
      • External Links to Workbooks records
      • Tabs
        • Default Tab Views
        • Summary Timeline View
        • Overview Tab
      • Watching Records
      • Notes
    • Landing Pages
      • Bulk Actions
        • Scheduled Bulk Actions
      • Customising Views
        • Customising Columns
        • Filtering
          • Custom Filters
        • Calendar Views
        • Card View
          • Report Card View
          • Worked Examples of Card Views
      • Deleted Items
      • Edit Grids
      • Exporting Data
      • Exporting to MS Excel
    • Workbooks on Mobiles and Tablets
  • Preferences
    • Introduction to Preferences
    • Setting your Preferences
      • Email Accounts
      • Notifications & Reminders
  • Activities
    • Introduction to Activities
    • Using Activities
      • Meetings
        • Integrating Workbooks and Google Calendar
          • Installing and Managing Workbooks and Google Calendar Integration
          • Synchronising your Google Calendar with Workbooks
      • Follow-on Activities
  • Cases
    • Introduction to Cases
    • Displaying & Adding Cases
    • Managing Cases
    • Case Portal
      • Installation
        • Custom Fields
        • Case Portal Configuration
          • Company Details
          • General
            • Case Portal Reports
          • New Case
          • Help Text
          • Emails
          • Advanced Features
          • Field Mappings
          • Help Dialog
          • Product Area Questions
        • Case Portal Additional Features
          • Setting up Public/Private Activity creation
          • Setup Registration Emails from a Person
          • Automatic Emails on Case Status Change
      • Using the Case Portal
        • Case Updates - Public & Private Activities
        • Inviting a Person to the Case Portal
  • Email
    • Introduction to Email
    • Working With Emails
    • Email Signatures
    • Sending Bulk Email
    • Common Email Errors
    • Email Integrations
    • Mailing Lists
  • Forecasts & Quotas
    • Introduction to Forecasts & Quotas
    • Sales Forecasts
      • Adjusting Forecasts
      • Included Forecasts
    • Sales Quotas
  • Importing Data
    • Introduction to Importing
    • Preparing your Import Data
      • Import Templates
      • Compulsory fields for Import
    • Workbooks Import Wizard
      • Uploading your data
      • Defining Field Mappings
      • Extending your Import to other Record types
      • Checking for Duplicates
      • Running and Reviewing your Import
    • Managing your Imports
      • Undoing an Import
  • Leads
    • Introduction to Leads
    • Displaying & Adding Leads
    • Converting Leads
  • Marketing
    • Introduction to Marketing
    • Marketing Campaigns
      • Displaying & Adding Campaigns
      • Campaign Management
      • Campaign Membership
      • Tracking URLs on Campaigns
      • Integrating DotDigital and Workbooks
        • Configuring Workbooks and Dotmailer
      • Integrating MailChimp and Workbooks
        • Configuring Workbooks and MailChimp
    • Mailing Lists
      • Creating Mailing Lists
    • Products
      • Pricing Schemes
      • Supply Scheme
      • Product Bundles
    • Mailshots
      • Creating a Mailshot
    • Upload Library
      • Using the Upload Library
    • Templates
      • Creating Templates
      • Creating a Template to show multiple lines
      • Extra Template Placeholders
    • Using HubSpot with Workbooks
    • Event Management
      • Introduction to Event Management
      • Enabling the Event Management Module
      • Using Event Records
        • Event Records
        • Event Sessions
        • Event Speakers
        • Event Sponsors
        • Event Products
        • Event Tickets
        • Event Attendees
      • The Event Management Portal
        • Introduction to the Event Management Portal
        • Prerequisites for installation
        • Accessing the Plugin
        • Installing the Event Management Portal
        • Amending Event Portal Parameters
        • Adding Custom CSS to the Event Portal
      • On The Day Registration App
      • Setup On the Day Registration App
    • Compliance Records
      • Introduction to Compliance Records
      • Enabling Compliance Records
      • Creating Compliance Records
      • Using Compliance Records
    • Spotler Integration
      • What is Spotler?
      • Navigating your Spotler homepage
      • GatorMail
        • Introduction to GatorMail
        • Managing your GatorMail Account
          • Domain Setup
        • GatorMail Configuration
          • GatorMail Field Mappings
            • GatorMail Hard Bounces
          • Preference Centres & Landing Pages
            • Preference Centre Setup
        • Creating Emails in GatorMail
          • Imbedding Images and Videos
        • Sending Emails in GatorMail
          • Sending GatorMail Campaigns
            • Campaign Action Types
            • Ramp-up
            • Testing Campaigns and Emails
          • Using SendForensics
          • Understanding your Campaign results
        • Advanced Features
          • Gator Smart Forms
          • GatorMail - Dynamic Content
      • GatorLeads / Web Insights
        • Tracking Code
          • Restricting Page Tracking
        • Setting up the Plugin
        • Viewing Web Insights Data on your Form Layouts
        • Domain Names and Online Activities
        • Reporting incorrect Leads created through Web Insights
        • Reporting on Web Insights data
        • Using UTM Values
        • Why aren’t Online Activities being created in the database?
        • Why is GatorLeads recording online activities in a foreign language?
      • GatorSurvey
      • GatorWorkflow
        • Spotler Data Sync
        • Triggered Mailshots
      • GatorPopup
  • Opportunities
    • Introduction to Opportunities
    • Displaying & Adding Opportunities
    • Opportunity Line Items
    • Opportunity Relationships
  • Integrations
    • Mapping
      • Introduction to the Mapping Module
      • Using the Mapping Module
      • Using Mapping in Reports
        • Changing the size/colour of Map Pins
    • Electronic Signing Tools
      • Docusign Integration
        • DocuSign Functionality
          • Copy Document on Signature
          • Update Related Records
          • Sending Multiple Documents
          • People, Organisations & Cases with DocuSign
          • Invoice Payments with DocuSign
          • Managing DocuSign Documents
        • Setting up the DocuSign Integration
          • Authentication with DocuSign
          • Production vs Sandbox
          • Creating a Document with a DocuSign Template
          • Creating a Document with a Workbooks PDF
          • DocuSign Fields
          • DocuSign Settings
          • Form Layout Configuration
        • DocuSign - Worked Examples
          • Taking Payments
          • Updating Related Records
          • Multiple Document Sends
          • Creating a Template for Cases
          • Creating a Template for Organisations
          • Creating a Template for People
          • Unified PDF for Transaction Documents
        • DocuSign - Reporting
          • Multiple Send Report Grid
          • Document Review Report
          • Monitoring Integration Errors
      • Adobe Sign Integration
        • Introduction to Adobe Sign
        • Authentication with Adobe Sign
        • Installing the Integration
        • Integration Monitoring & Error Handling
        • Setup of Adobe Sign
        • Adobe Sign Fields & Form Layout Configuration
        • Optional Custom Fields for Adobe Sign
        • Adobe Sign Button Process
        • Using the Adobe Sign Integration
    • Creditsafe Integration
      • Installing the Creditsafe Plugin
      • Configuring Organisations to use the Creditsafe Integration
      • An example of how to use the Creditsafe Integration
    • Zapier
      • Introduction to Zapier
      • Available Triggers and Actions
      • Linking your Workbooks Account to Zapier
      • Setting up Zaps
        • Posted Invoices to Xero Invoices
        • Xero payments to Workbooks Tasks
        • New Case to Google Drive folder
        • New Case to Basecamp Project
        • New Workbooks Case to JIRA Ticket
        • Jira Issue to new Case
        • 123FormBuilder Form Entry to Case
        • Eventbrite Attendee to Sales Lead and Task
        • Facebook Ad Leads to Sales Leads
        • Wufoo Form Entry to Sales Lead
        • Posted Credit Note to Task
        • QuickBooks Online
          • Initial Setup
            • Authentication with QuickBooks Online
          • People & Organisations to QuickBooks Customers
          • POSTED Workbooks Invoice to QuickBooks Online
          • QuickBooks Online Payment to Workbooks Invoice & Task
          • QuickBooks Sales Tax Code Lookup
        • Survey Monkey responses to Tasks
      • Multistep Zaps
    • Email Integrations
      • Email Dropbox
        • Setting up your Dropbox
        • Using your Dropbox
      • Workbooks Exchange Server Sync
        • Supported email clients
        • Set Up
          • Setting up the WESS
          • Setting up the Outlook Add-In
          • Customising the WESS Add-In
          • How to change Authentication setup for WESS
            • O365 Exchange authentication Troubleshooting
        • What gets synchronised?
          • Synchronising with the WESS
          • Synchronising with the WESS Add-in
          • How to force a sync
          • Best practice
        • WESS Troubleshooting
      • Workbooks Outlook Connector
        • Introduction to the Outlook Connector
        • Before downloading the Outlook Connector
          • System Requirements
          • Enabling the Outlook Connector
        • Download/update the Outlook Connector
        • Installing the Outlook Connector
          • Uninstalling the Outlook Connector
        • Using the Outlook Connector
          • Configuring the Outlook Connector's Settings
          • Identifying Records in Workbooks created in Outlook
        • Outlook Connector Troubleshooting
    • Event & Webinar Integration Tools
      • GoToWebinar
        • Installation
          • GoToWebinar Fields & Processes
          • Setting up Process Buttons for GoToWebinar
        • Authentication
          • Multiple GoToWebinar Accounts
          • Removing GoToWebinar Accounts
        • Create/Update & Cancel Webinars from Events
        • Event Attendees as Webinar Registrants
        • Event Speakers as Webinar Panelists
        • Retrieve Webinar Data
      • ON24
        • Installation
          • ON24 Fields & Processes
          • Setting Up Process Buttons for ON24
        • Authentication with ON24
          • Removing ON24 Accounts
        • Create Webcasts from Events
        • Event Attendees as Webcast Registrants
        • Retrieve Webcast Data
          • Reporting: Survey Responses
          • Reporting: Poll Responses
        • Retrieve Survey Data
        • Engagement Hub Interactions
    • Microsoft Office
      • Azure Active Directory
      • Excel
      • Outlook
      • Power BI
      • SharePoint
        • Authentication
        • Installation
          • Custom Fields & Processes
          • SharePoint Integration Settings
        • Using the SharePoint Integration
      • Word
        • Introduction to the Word Add-in
        • Deploying the Word Add-in
        • Creating Word Add-in Templates
          • Example Word Add-in Templates
        • Using Word Add-in Templates
        • Word Add-in Tips and Tricks
    • Outreach
      • Installation
        • Outreach Fields & Processes
        • Create Outreach Custom Field Mappings
          • Configure Outreach Field Dynamic Picklist
        • Sync Outreach Mappings
      • Outreach Authentication
        • Remove Outreach Account
      • Sync People to Outreach Prospects
        • People Field Mappings
      • Sync Organisations to Outreach Accounts
        • Organisation Field Mappings
      • Sync Workbooks Opportunities to Outreach
        • Opportunity Field Mappings
      • Sync Tasks/Activities from Workbooks to Outreach
        • Follow-Up Activities created via Scheduled Process
      • Sync Outreach Sequences to Workbooks
      • Sync Outreach Sequence States to Workbooks
      • Sync Outreach Sequence Step Numbers to Workbooks
      • Sync Prospects/Accounts/Opportunities from Outreach to Workbooks
      • Sync Outreach Tasks/Calls/Meetings to Workbooks
    • Scribe/Workbooks Connector
      • Connection Setup
        • Microsoft SQL Server Connection Requirements
      • Connector Control Blocks
      • Worked Example - Create, Read, Update & Delete
    • RingCentral
      • Installation
        • RingCentral Integration Fields and Processes
      • RingCentral Authentication
        • Remove RingCentral Account
      • Creating Phone Call Activities
      • Click to Dial
  • People & Organisations
    • Introduction to People & Organisations
    • Organisations
      • Displaying & Adding Organisations
      • Customers & Suppliers
    • People
      • Displaying & Adding People
      • Adding People to Outlook
    • Relationships
      • Change Employer Wizard
      • Direct Relationships
      • Third Party Relationships
    • De-duplication and Merge
      • Workbooks Merging
      • Workbooks DQ
      • Data Quality
    • Using Postcode Lookup
    • Data Enrichment
      • Introduction to Data Enrichment
      • Setting up Data Enrichment
  • Snippets
  • Reporting
    • Introduction to Reporting
      • Creating Reports
        • Standard Workbooks Reports
        • Creating a Pre-populated Report
        • Creating a Report from a Template
          • Report Templates
        • Creating a Blank Report
        • Auto-refreshing Report Views
      • Sharing Reports
    • Using Reports
      • Reporting Explained
        • Adding Targets, Conditional Formatting and CSS Styling
          • Calculated Targets
          • Target Sets
            • Creating a Target set for Closed Cases per Customer Support Agent
            • Creating a Target set for Closed Sales amount per Sales Person by quarter
        • Reporting with multiple currencies
        • Drilling into Summary Views
        • Improving Report Performance & Run Time
      • Displaying reports within Record Views
      • Displaying Reports
        • Reporting Views (Reports on Landing Pages)
      • Adding a Report view to a Dashboard
    • Charts
      • Creating & Using Charts
        • Bar Charts
          • Targets on Bar Charts
        • Line Charts
        • Pie Charts
        • Dial Charts
    • Exporting Reports
      • Emailing Scheduled Reports
    • Advanced Reporting
      • Types of Split Columns
      • Using Calculated Columns
        • Introduction to the IF Statement
        • Introduction to the CASE Statement
        • Applying Search filters in Calculated Columns
        • Comments in Calculated Columns
        • Financial Year Reporting
        • Introduction to Date Functions in Reports
        • Using Calculated Criteria
        • Reporting on empty fields
      • Audit Reporting
  • Dashboards
    • Adding Elements to Dashboards
      • Configuring Dashboard Elements
    • Dashboard Views
    • Dashboard Fields
    • Creating a Sales Dashboard
    • Springboard
    • Adding a Dashboard as a Record Tab
  • Okta Authentication
  • Transaction Documents
    • Introduction to Transaction Documents
      • Displaying & Adding Transaction Documents
      • Copying Transaction Documents
      • Transaction Documents Fields Help
      • Transaction Documents Line Items Help
      • Printing & Sending Transaction Documents
      • Managing Transaction Document Currencies
      • Managing Transaction Document Statuses
      • Setting a Blank Default Currency on Transaction Documents
    • Credit Notes
    • Customer Orders
    • Invoices
    • Quotations
    • Supplier Orders
    • Contract Management
      • Displaying & Adding Contracts
      • Using Contracts with Cases
    • Sagelink
  • Auditing
    • Auditing
  • Configuration
    • Introduction to System Administration
      • Quick Start Wizard
    • Users & Security
      • Users
        • Setting up your Users
        • Disabling Users
        • Profile Pictures
      • User Groups
        • Capabilities
        • Creating & Modifying User Groups
      • Permissions
        • Sharing Policies & Mandatory Permissions
          • Configuring the Advanced Security Module
            • Configuring the Advanced Security Module: Segmenting Users by function
            • Configuring the Advanced Security Module: Segmenting Users by location
      • Account Settings
      • Licences & Modules
        • Multi Language
    • Database
      • Databases
      • Storage Usage
      • Prefixes & Numbering
        • Modifying Object References
      • Export Database
      • Database Settings
    • Accounting
      • Accounting Periods
      • Exchange Rates
        • Setting Exchange Rates
      • Tax Regimes
        • Setting Tax Rates
        • Sales Tax Rulesets
          • Using Sales Tax Rulesets
      • Own Organisations
        • Setting up your Own Organisation
    • Email & Integration
      • Email Settings
        • Setting up your Email Server
        • Using Workbooks Server to send Emails
      • API Keys
      • Web to Case and Web to Lead
        • Setting up a Web2Case Form
        • Setting up a Web2Lead Form
        • Using Web Forms in Workbooks
        • Editing a Web Key Form
      • Preference Centre
      • MailChimp & dotMailer
      • Loqate
      • Bank Account Validation
    • Customisation
      • Creating & Modifying Picklists
      • Desktop Preferences
      • Theme
      • Record Types
        • Creating Custom Fields
          • Dynamic Linked Items & Picklists
          • Constrained Dynamic Linked Items (DLI) & Picklists
          • Creating relationships with Dynamic Linked Items (DLIs)
          • Linking Custom Field Values
          • Showing Linked Records in Tabs
        • Report-based Custom Fields
          • Improving the Performance of Report Cells/Grids
        • Linked Fields & Reference Fields
        • Record Templates
        • Form Layouts
          • Customising an Organisation form
          • Displaying a Tab as a Side Panel
          • Card View
          • Read-only Assigned to Fields
        • Customising relationships between parties
          • Configuring Custom Party Relationships
        • Opportunity Stages
      • Custom Records
        • Enabling Custom Records
        • Creating Custom Record Types
          • Editing Custom Record Types
        • Using Custom Records
    • Automation
      • Plugins
        • Field Updater Plugin
        • File Storage Plugin
          • Using File Storage
          • Using SharePoint File Storage
        • Cognism Enrich Plugin
          • Using Cognism Enrich
        • Email to Case Plugin and Process
      • Processes
        • Process Logging
      • Workbooks Scripts
        • Script Library
        • How Workbooks Runs Scripts
        • Workbooks Script External Access
      • API Data
      • Triggers and Webhooks
        • Configuring Triggers and Webhooks
    • PDF Configuration
      • Modifying Document Templates
        • Adding Terms & Conditions to your Documents
        • Multi-line Value Tags
      • Modifying Default Colours & Images
      • Creating Custom Document Templates
  • Contact Support
    • Contacting Workbooks Support
    • Workbooks CRM Advisory Packs
    • Introduction to the Administrator Service
  • Releases & Roadmap
    • Roadmap
    • September 2022 Release
    • June 2022 Release
    • March 2022 Release
    • October 2021 Release
    • June 2021 Release
    • March 2021 Release
    • 2020 Releases
      • December 2020 Release
      • September 2020 Release
      • April 2020 Release
      • January 2020 Release
    • 2019 Releases
      • September 2019 Release
      • February 2019 - Event Management Release
      • January 2019 Release
    • 2018 Releases
      • October 2018 Release
      • May 2018 Release
      • February 2018 Release
      • January 2018 Release
    • 2017 Releases
      • November 2017 Release
      • September 2017 Release
      • June 2017 Release
      • March 2017 Release
    • 2016 Releases
      • December 2016 Release
      • August 2016 Release
      • January 2016 Release
  • Workbooks Glossary

Worked Example - Create, Read, Update & Delete

The Workbooks Connector for Scribe can be used for migration and integrations to/from Workbooks CRM. As described here, the connector has full support for Create, Read, Update and Delete actions and uses the Workbooks API under the covers to offer a user-friendly experience when creating maps in Scribe.

The following worked example, explains how to build a map to take a CSV of People from an SFTP Server (see here for instructions how to set up a source connection to an SFTP Server before trying to build out this example):

  • Look for an existing Person in Workbooks using the "Id" column as the query on the Workbooks External Reference field to find a match
  • If found, the record is updated. Otherwise, a new record is created. In both examples, only the basic fields such as Name, Email Address and Assigned To Fields are populated
  • The map will then delete the record it finds as a final step to show a full example
  • The example also provides an Update/Insert alternative approach instead of using separate Create & Update blocks

The first step to building a good map is to understand the data that you have in the source system and what transformations are required to copy the data from the source (in this case, a CSV file on an SFTP server) to a target system i.e. Workbooks. Carrying out this analysis first will also help you to understand the logic that is required to build a map that is robust, and one that deals with duplicate records as much as possible.

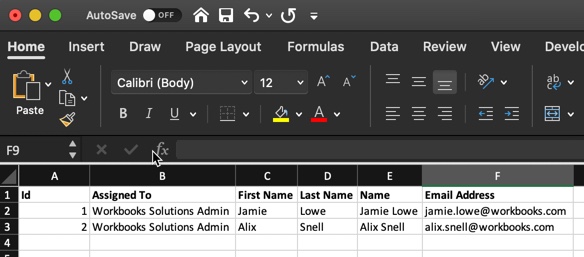
In this example, we simply need to copy data from a CSV of contacts to Workbooks People. The map needs to ensure that it doesn't create duplicate People records, and therefore we need to create a map that searches in Workbooks for an existing record, and then either creates a new record if not found or updates an existing record. Looking at the example CSV below, either the Id or Email Address should be unique to the row in the CSV so these can be used in the Query/Lookup block to Workbooks. For this example, we will map the Id to the External Reference column, as the Email can change and therefore may create a duplicate record if the Email Address is ever updated.

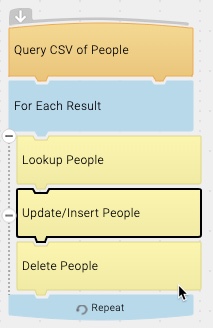
Start building your map, by dragging on the necessary blocks to the Scribe canvas in the following order:

The map requires these steps in order of appearance:

  • Add a Query block. This should be added from connection to the CSV file which is hosted on an SFTP Server - see here for how to configure an SFTP connection in Scribe.
  • Next, lookup People. Add this from the Workbooks connection setting the Entity to People
  • Add a Scribe If/Else Control
  • Within the "IF", add a Update Block from the Workbooks connection setting the Entity to People
  • Within the "ELSE", add an Create Block from the Workbooks connection setting the Entity to People
  • Outside of the IF/Else Control block, add a Delete from the Workbooks connection, also setting the Entity to People

The next few steps will revisit each block and configure the settings accordingly.

The Lookup People block added in Step 1 allows us to query a Workbooks database to return any matching records. The Lookup should only return one Person record by matching on a unique field. If a record is found then the map will go on to update the existing Person record, otherwise it will ceate a new Person.

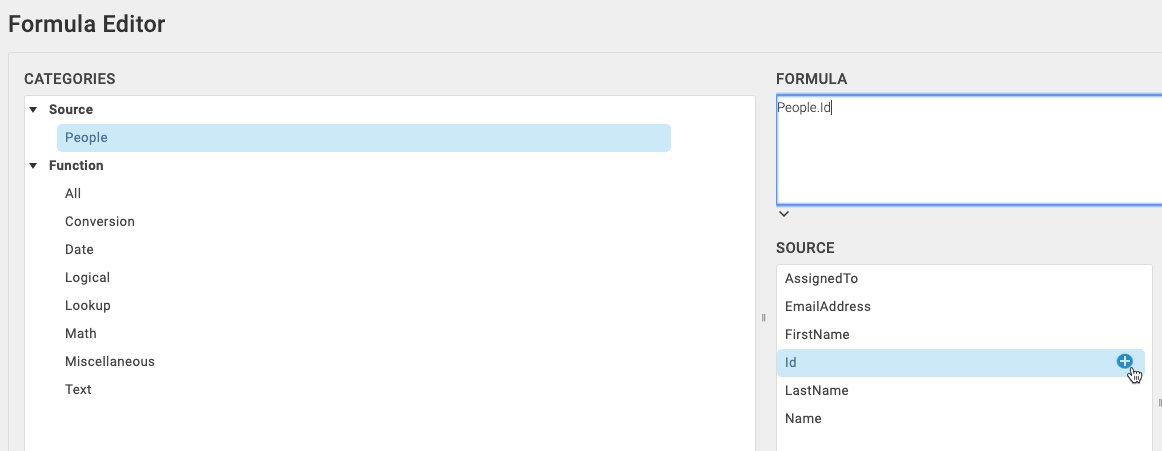
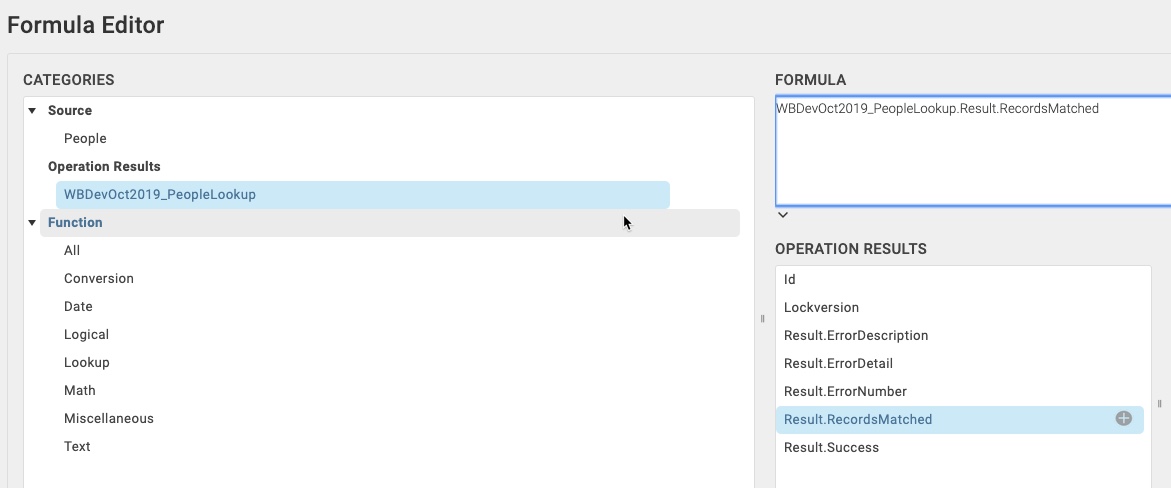
Double click on the Lookup Block, and go to the Lookup Critieria tab. Click the "+" on the right hand side, then select External Reference in the Field column.

In the Value column, configure this to use the "Id" from our Query block by clicking the "fX" button to open the Formula Editor screen:

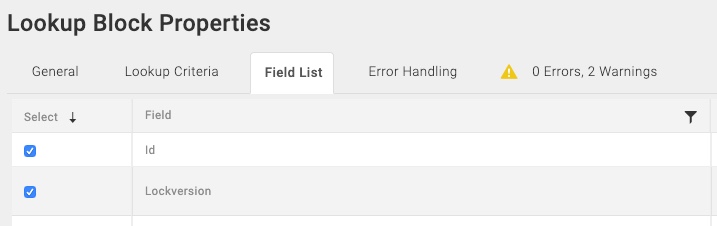
Next, on the Field List tab, select the Id & Lock Version columns. These fields are needed later if we find a match, to update the record.

In the case of more than one record being found, the map will fail as it does not know which record to update from the multiple records found, similar to the Workbooks Import tool.

Scribe offers some out of the box Control Blocks which can be used to control the behaviour of a map such as the If/Else statement. An If/Else block is used in this example to control whether a new record is created, or an existing record is updated based on the result of the Lookup to Workbooks. If a record is found, then we use an Update block to update that record, otherwise in the "else" condition, we setup a Create block.
 
Drag an If/Else block underneath the Lookup block, then double click the If to configure the condition that will be tested by clicking the Condition tab:
 
 
On the Condition tab, hover over the left-hand side then click the "fX" button that appears. From the Operation Results menu, select the Lookup block result, then choose "Result.RecordsMatched" as the formula, then click OK. 


Back on the Condition tab, set the Value on the right-hand side 1.
 
This logic tells Scribe that if there is one record matched, then update it. Otherwise, create a new record.
 
Next, configure the Update block. For an update to Workbooks via the connector, you need to know the Id & Lock Version of the record that you wish to update. In the previous block, we used a Lookup block in an attempt to find an existing record, therefore the map can reference the Id & Lock Version field from this block.
 
Double click the Update block, then select the Matching Criteria tab. From this tab, add a new mapping for Id by clicking the "+" button on the right-hand side. Select Id as the Field, equals as the Operator, and finally click the "fX" button to open the formula window.


From the Operation Results menu, select the Lookup block result, then choose "Id" as the formula, then click OK. 


Click the "+" again, then repeat the above to add another mapping for Lock Version, so that the Matching Criteria tab looks like below:
 

From the Fields tab, you will see the Source Connection (the CSV file) and the Target Connection (Workbooks). Add in mappings from the CSV file, to the Workbooks fields by dragging and dropping the fields from the left to right-hand side of the screen matching up field names. Map the Assigned To, Name, First Name, Last Name & Email Address to the equivalent fields on the Workbooks side.
 
For External Reference, set this to the Id column of our CSV. This is what will be used to find the record again if we re-run the map multiple times otherwise you will end up will duplicate records. To achieve this, either drag and drop as before or select the "fX" logo to add the field mapping via the Formula Editor screen.


For now, we don't need to worry about transforming the data as we have a simple data set, but for more complex scenarios this would be achieved from the same screen if required.
 
 
In this example, for our Create we want to use the same field mappings as defined above. Simply replicate the same steps carried out on the Fields tab, as outlined in Step 4. You do not need to set Matching Criteria for a Create block, thus the tab is not available.
 
Alternatively, you can copy the Update block and change the block type to Create if you know that all mappings will be the same regardless of a Create or Update action. To do this:
  • Hover over the Update block added, then click the gear icon to reveal a context menu
  • From here, click "Copy".

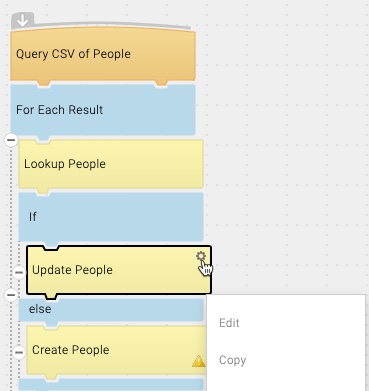
  • Single click anywhere on the Scribe canvas, to reveal the context menu again. Click "Paste"
  • From the copied block, hover to reveal the menu again but this time click "Change Block Type"
  • In the dialogue box, change the block type to "Create"

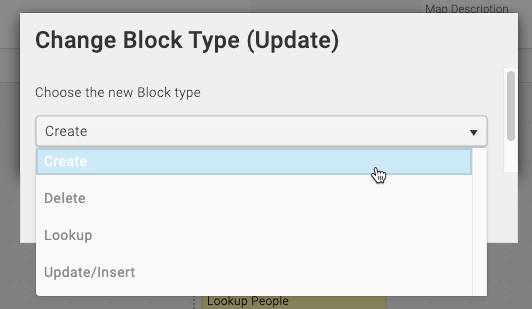
Lastly, remove the existing Create block from the map and replace with the new one


Using a Scribe Map, records can be deleted using the Delete block type. Like an Update, Workbooks requires the Id and Lock Version to remove a record from the system.
NOTE: Whilst included in this example to explain how to achieve a delete via the Connector, you should take this out if using this example in a production environment.
In the Delete block, add in mappings for Id & Lock Version from the Lookup block as per Step 4 under the Matching Criteria tab:


An alternative to using IF/ELSE logic with separate Create and Update blocks in your map is to use the Update/Insert block type. This block type allows you to merge the Create and Update blocks and remove the IF/Else logic, as the Workbooks API will then carry out the correct action, based on the field mappings that are configured.
NOTE: Whilst the map appears much more concise using this approach, it is not possible to use any form of Batch Processing which is possible with the separate Create/Update Blocks. You should consider volumes of records that will be processed via this map before adopting this approach.
Taking the example put together in Steps 1 - 5, remove the If/Else block by dragging it to the side of the map (this should also remove the existing Create & Update blocks at the same time). Next, add in the Update/Insert Block, below the Lookup Block:
 

Double click the new block, and under the Matching Criteria tab add the Id & Lock Version mappings from the Lookup block as per Step 3 (Update) or Step 5 (Delete):


Lastly, add any other mappings under the field tab as before. When this Map is executed, the updated map will have the same behaviour as before but with a more concise design which is easier to follow.
 
 
  • Connector Control Blocks
  • RingCentral

© 2023 Workbooks.com - privacy & terms
  • Linkedin
  • Twitter
  • Youtube
  • Facebook