


Opportunity Stages
How to use Opportunity Stages to reflect the stages in your sales cycle and why you should assign probability percentages to them.
Opportunity Stages are used to reflect the stages in your sales cycle.
Implementing Workbooks often provides an ideal opportunity to review your sales cycle and introduce some best practice within your business.
Opportunity Stages are also used to determine which Opportunities are forecast in any given month. If you haven’t yet formalised the steps in your sales process, you can use the pre-defined list supplied with Workbooks.
Alternatively, if you want to amend these, you can specify as many Opportunity Stages as you like but must map each stage to a Forecast status. This status, combined with the Close Date of an Opportunity, determines whether or not an Opportunity appears in a Forecast. Only those stages that map to either Best Case or Commit will appear in a Forecast.
In addition, Opportunity Stages can be assigned percentage probabilities, (ie, the percentage likelihood that the deal will close). These probabilities then appear on an Opportunity record and can be used in reporting to calculate a weighted sales forecast.
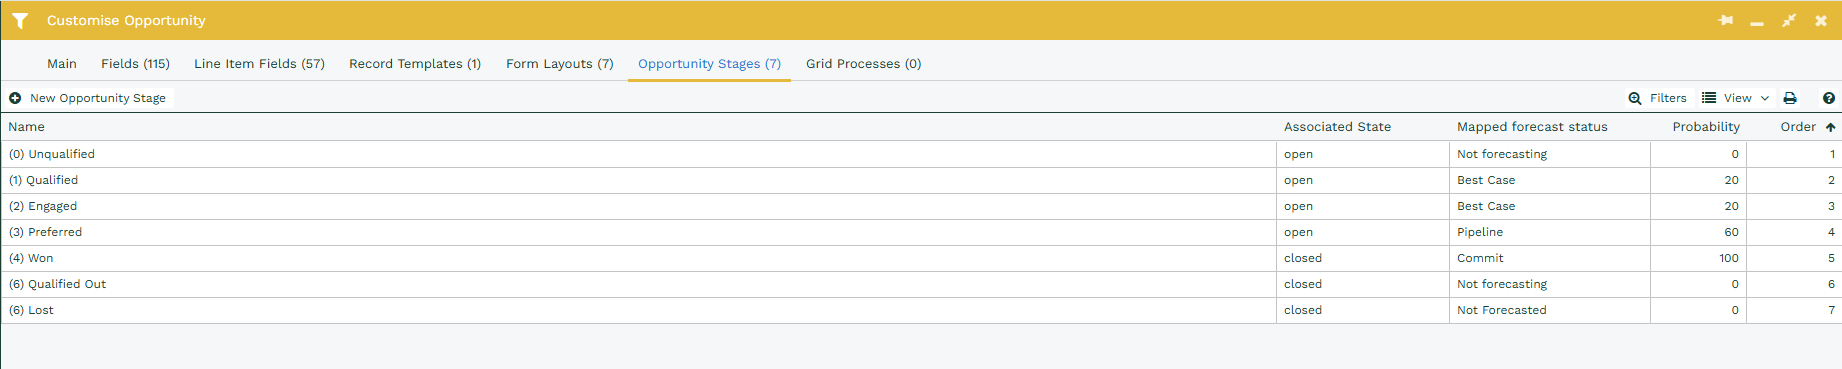
To amend Opportunity Stages (which you can only do if you have System Administrator Capabilities), click Start > Configuration> Customisation > Record Types. From the list on the right choose Opportunities. The screen that appears includes a tab called Opportunity Stages.
You can amend an existing Stage by clicking on it and changing the values in the fields. Alternatively, you can click New Opportunity Stage to create a brand new one.
You can remove an existing Stage by clicking on it and clicking on Delete. When you do this it will ask you what Stage you want any existing Opportunities, that have the Stage you are deleting, to be changed to. We advise this is done out of hours as all Opportunities should be closed down before this is done.
The fields for each Opportunity Stage include:
Opportunity Stage Name – this is what will appear in the dropdown picklist within the Opportunity Stage field on an Opportunity;
Stage maps to probability – this allows you to enter a percentage probability of the deal being won, that is automatically associated with the Opportunity Stage;
Mapped Forecast Status – you can use the dropdown picklist to choose which Forecast Status to apply. As outlined above, only Opportunities with a Stage that maps to either Best Case or Commit will appear in a Sales Forecast;
Order – this controls the order in which the stages appear in the dropdown picklist on an Opportunity;
Associated Record State – you can choose ‘open’ or ‘closed’, which makes it easier to report on all Opportunities that are considered either open or closed, rather than having to select specific Opportunity Stages.
NOTE: If you want to delete a Stage, click on the grid to open the relevant Stage and click Delete. This will open a dialogue box where you must specify an Opportunity Stage to replace the one you’re deleting. If there are any Opportunities in your database at the Stage you are deleting, they will automatically be changed to the Stage that you specify as replacing the deleted entry.
Generally, an Opportunity moves forward from one stage to the next (possibly ‘skipping’ stages) until it is either Won or Lost. Sometimes however, you might need to downgrade an Opportunity to a previous stage.
To do this a user must have the ‘Downgrade Opportunity to Previous Stage’ capability. (By default this capability is automatically given to users in the following groups: System Administration, Sales Administration, Sales Managers and Sales People but can be removed by users in the System Administrator group, if required.)