









Creating Cases from Line items
Case records are available in Workbooks, and can be configured to support a versatile array of business processes. Internally within the Workbooks office, we use these to track:
- Support Cases
- Service Incidents
- Customers at Risk
- …and so on
This record type can be used to provide different teams within a business a way of tracking fulfilment of a product or service after they’re sold.
An example we commonly encounter is Media & Publishing businesses often need to track the delivery of articles, publications, or similar work.
In Workbooks, we recommend using an Order with Line Items to record what’s been purchased. You can then create a Case for each Line Item to track fulfillment. Linking the Case back to the Line Item makes it easy to report on purchase and delivery together.
This can be done manually, but it can take time if there are multiple Line Items. To speed things up, the Workbooks Process Engine includes a script in our Script Library. It takes a Report of Order Line Items, creates a Case for each one, and automatically updates the Line Item with the Case reference. This guide explains how to set up and use that process in your database.
Step 1: Create Custom Fields
Firstly, create a few Custom Fields to support the process:
| # | Field Name | Data Type | Record Type | Additional Information |
| 1 | Process Failure | Checkbox | Order | |
| 2 | Process Failure Message | Multi-line Text | Order | Using a Multi-line text box ensures that you can store all errors that might be generated as this type of field can store around 65,000 characters including new lines. Do not use a standard text field, as this can only store 255 characters and doesn’t allow for new lines |
| 3 | Case Reference | Dynamic Linked Item (DLI) | Order Line Item | Build a simple report on “Cases” that has columns for:
Setup this field to use the Case Object Reference as the display value |
As an additional step, you can also update your form layouts to show these fields, or create reports to surface the data. See step 2 for more detail on the reports needed to support this process.
Step 2: Create Workbooks Reports
Create two separate Workbooks reports to drive the process.
We’ve provided template reports with the required fields already included. We recommend using these as a starting point, then add any extra columns you need for Order to Case field mappings (see step 3 for more details).
To create the reports, go to Start > New > Report > Create report from a template report, then select the report you want from the list below:
- Report 1: Order Line Items that need Cases – this is the main report that the Scheduled Process will use to identify Orders that need processing. You’ll need to make a few changes to this report to customize it for your database:
- Add a Report Criteria as follows:
- Process Failure = FALSE (this ensures that any Orders that failed to process are removed from this report so that the process can continue to operate even if there was an issue. NOTE: Failures are dealt with in Report 2 below).
- Line Items > Case Reference IS BLANK (this ensures that any Order Line Items that were successfully processed are removed from the Report)
- Add any custom columns to the Report. These can then be mapped to the Case records that are created when this process runs and is configured in Step 4 below.
- This post assumes you have a DLI to People records to track the Contact for an Order, you can of course use a different field if you wish but the Report Columns must have the data specified below, otherwise the script will fail to create a Case or not populate fields as you may expect. If you do not currently have a Person DLI in place on your Order records, see here for an example. Add 3 x new columns as follows:
- Add a Report Criteria as follows:
| # | Report Column Location | Report Column Name |
| 1 | Contact > Id (the Person’s Id) | Contact Id |
| 2 | Contact > Email (the Person’s Email Address) | Contact Email |
| 3 | Contact > Telephone (the Person’s Telephone Number) | Contact Telephone |
- Report 2: Orders with Processing Errors – this report can be used as an exception report to identify Orders that have failed to process. If this happens you will need to review the failed Orders and either fix them, or raise the issue with Workbooks Support. Once the issue has been resolved, set the Process Failure checkbox to FALSE to re-process the Order. To create this report, take a copy of the 1st Report above and change the Report Criteria to the following:
- Process Failure = TRUE (the process automatically sets this field to TRUE if there was a failure either creating a Case, or updating the Order Line Item).
- Case Reference (remove this criteria)
Step 3: Create Email Template
If the process fails, your admin users need to be notified so the Order can still be processed. If you’re using Scheduled Process mode (see step 4), an email will be sent with the error details to a chosen address.
We’ve provided a basic template to support this. To add it to your database, go to Start > Marketing > Templates > New Template, select A specific record type, then choose Orders.
Select the template called ‘Cases from order line items – error handling’. You can then update it to suit your needs, including:
- Email Template Name: Either leave this as the default, or rename to something more appropriate
- From: Choose the email account the message should be sent from.
You’ll need to set up an email account in Workbooks before you can select it here. See here for more details. - To: Enter in the email addresses of any recipients that should be notified of a process failure.
- Subject: You can leave this as the default or rename it to something more relevant. The @object_ref@ placeholder will automatically be replaced with the Order reference (for example, ORD-123) when the email is sent.
- Body: We’ve included some default text, but you can update this if needed.
At a minimum, replace “REPLACE_WITH_PROCESS_NAME” with the name of the process you’ll set up in step 4.
Note
NOTE: Don't change the placeholder for @script_error@, the automation replaces this text automatically with the problem detected. If this is removed, you will not see what went wrong with your process upon receiving this email.
Check the sharing permissions for this template so it’s available to the user the scheduled process will run as. We usually recommend running automated processes as the “Automation” user.
To do this, open the email template, select the sharing padlock, and add a new row to share the template as follows:
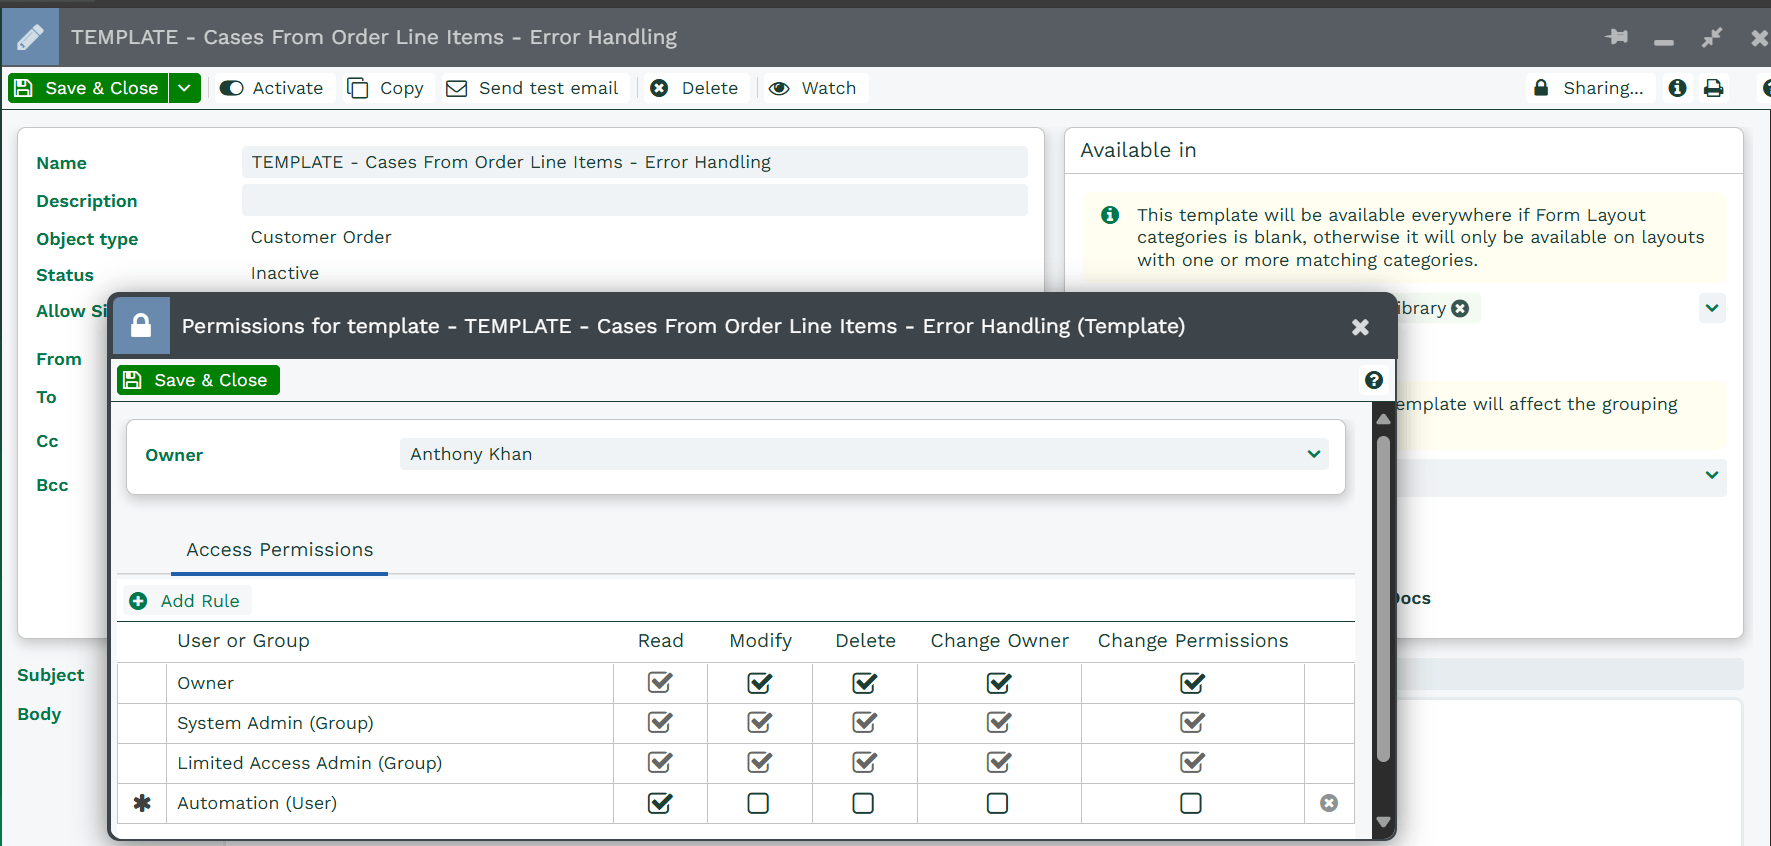
Take note of the name that you saved the Email Template with, you will need this for Step 4 below, whilst configuring the Scheduled Process Parameters.
Step 4: Create a Scheduled Process
Go to Start > Configuration > Automation > Scheduled Processes, and create a new scheduled process called ‘Create cases from orders’. Set the following options on the process:
- Name: Create Cases from Orders
- Script: Script Library > Create Cases from Order Line Items
- Run As: Automation
- Enabled: TRUE
- Log Level: Set to “Debug” and set the date to be 1 week from now. This will allow any initial setup issues to be investigated and resolved easily
Make sure to update the default scheduled process frequency to suit your business needs and expected Order and Case volumes. Once everything is set up, click Save. This will reveal a Parameters tab, where you’ll need to configure the following:
| # | Parameter Name | Parameter Description | Parameter Value |
| 1 | case_field_mappings | Columns added to the report called “Create Cases from Order” can be used in this parameter to map columns from the Report to a Case when it is created | See below. |
| 2 | data_view_name | The name of the report view that this script will monitor when it runs | Set this to the name of the 1st Report created in Step 2 above, concatenated with the Report View Name. In this example, the value should be set to “Order Line Items that need Cases:Scheduled Process” where “Scheduled Process” is the name of the Report View within the Report called “Order Line Items that need Cases” |
| 3 | failure_email_template_name | The name of an Email Template that will be sent out to a specified recipient if this script encounters an error | Set this to the email template configured in Step 3 above |
| 4 | order_id_column | The report column that holds the ID of a Order record | Leave blank (this is only needed for a Button Process as per an optional Step 5, below) |
| 5 | processing_batch_size | The number of records that will be processed in one run of this script | Set to a suitable number based on your volumes, if this parameter is not set, the script defaults to 5 Line Items at a time. We’d recommend no more than 100 in one run for optimal performance |
Note
NOTE: There are 3 Parameters where the name starts with "dev_only" available on this Scheduled Process which should be left intentionally blank. Do not set these, as the script is written to trigger an error for debugging purposes if these parameters are set.
Step 4a: Setup Case Field Mappings:
You can map fields from an Order to a Case to suit your business needs using the case_field_mappings parameter. Before updating the parameter, add the relevant columns to the first report created in step 2.
Use the following format for each mapping:
REPORT_COLUMN_NAME:CASE_FIELD_NAME
For example, to map a column called ‘Company Brand’ from an Order to a Case:
- Add a Company Brand column to the first report
- Set the parameter value to:
- company_brand:cf_case_brand
Note
NOTE: All mappings must be in lower case. For Report Columns, also replace spaces with underscores from the column name, otherwise the mapping will not work.
Note
NOTE: cf_case_brand can be obtained by looking at the API Reference for Case records available under Start > Configuration > Automation > API Reference, then selecting Cases. From here, use CTRL/CMD + F to look for the FIELD LABEL, then copy and paste the FIELD NAME column to your parameter.
Each mapping should be separated by a new line (i.e. pressing return/enter on your keyboard).
Note
NOTE: The script does not automatically create a Related Item between the Case and the Order record. This can be achieved by creating a DLI Custom Field on Cases, which is driven by a Report of all Orders. You must ensure that the "Create Relationship" checkbox is ticked on the new Custom Field. When configuring the other Field Mappings above, also create a column in your Report for the Order ID, and map this to the new DLI Custom Field as part of the setup.
Step 5: Create Button Processes (optional)
Go to Start > Configuration > Customization > Orders, then open Form layouts and select the appropriate layout. On the Automation tab, select New process button and configure the options as follows:
- Button Text: Create Production Cases(change as appropriate)
- Script Location: Script Library
- Script: Create Cases from Order Line Items
- Enable: True
- Run As: Automation
- Position: First (ensures this is a Button Process, not an On Save Process)
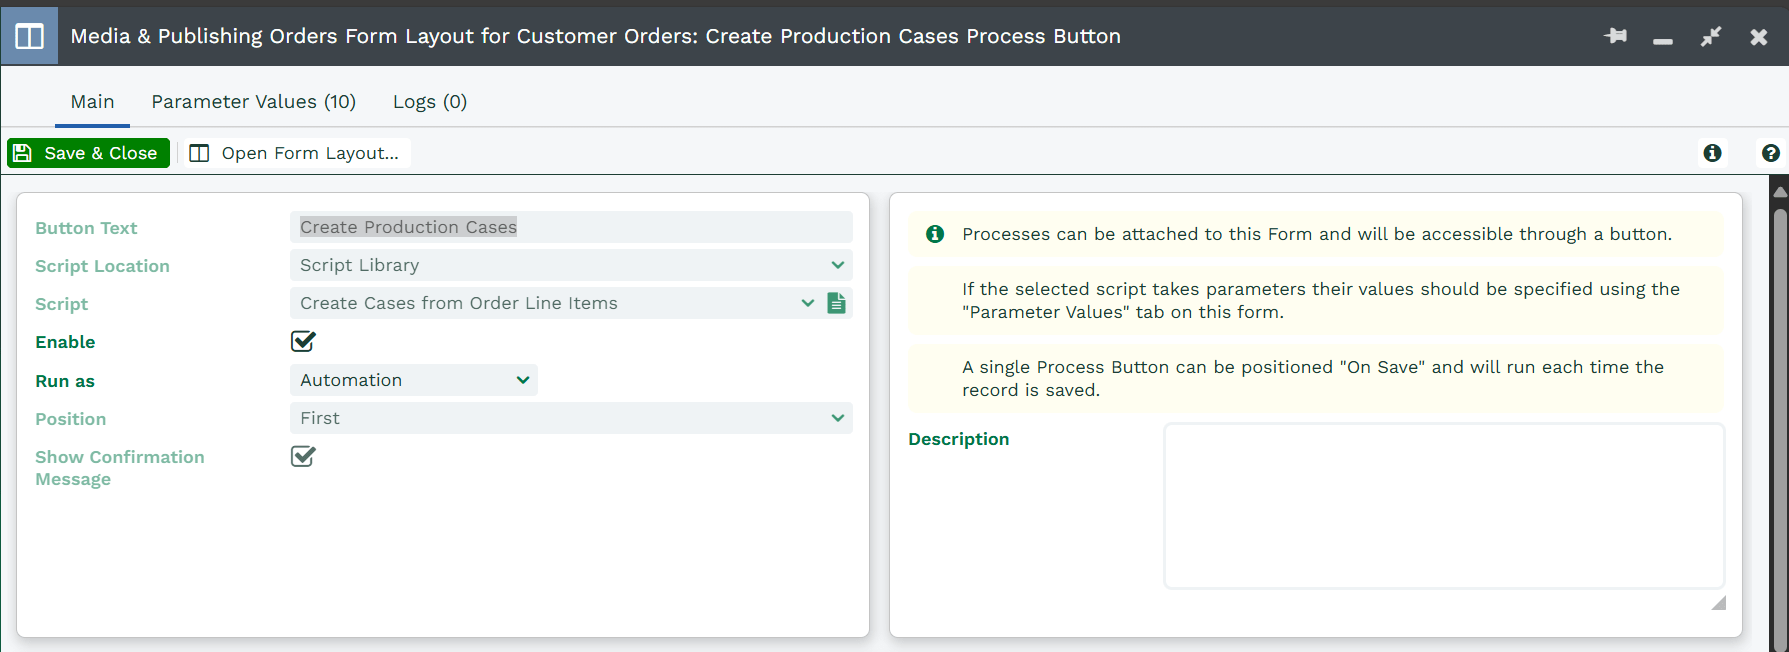
Once you have saved the Process, a new tab called “Parameter Values” appears. Configure the Parameters here in a similar way to the Scheduled Process but with the following values:
| # | Parameter Name | Parameter Description | Parameter Value |
| 1 | case_field_mappings | Columns added to the report called “Create Cases from Order” can be used in this parameter to map columns from the Report to a Case when it is created | See above (Step 4a). If you have already configured the Scheduled Process, it’s likely these mappings will be the same and can be copied from the same parameter on the Scheduled Process to this process. |
| 2 | data_view_name | The name of the report view that this script will monitor when it runs | Set this to the name of the 1st Report created in Step 2 above, concatenated with the Report View Name. In this example, the value should be set to “Order Line Items that need Cases:Button Process” where “Scheduled Process” is the name of the Report View within the Report called “Order Line Items that need Cases” |
| 3 | failure_email_template_name | The name of an Email Template that will be sent out to a specified recipient if this script encounters an error | Leave this blank. When running the Button Process, errors are output as an on screen message and no email is sent. |
| 4 | order_id_column | The report column that holds the ID of a Order record | Within the 1st Report created above, click the “Automation” tab within the “Button Process” View. The API Reference will open in you browser. Use CTRL/CMD + F to find a Column called “Order Id”. Copy & Paste the value from the Field Name column to this Parameter – it will look something like this “ord_id_60759”. |
| 5 | processing_batch_size | The number of records that will be processed in one run of this script | Set to a suitable number based on your volumes, if this parameter is not set, the script defaults to 5 Line Items at a time. For a Button Process, the lower the number the better as this type of process can only run for 60 seconds. Therefore, 5 should be suitable, however it may mean you need to click the Process Button more than once to create all Cases for an Order. |
You may have more than one Form Layout in your database. Therefore, if you want the button to show on different Form Layouts you will need to repeat Step 5.