It is possible to amend a Template to show multiple lines that correspond to the Line Items of a Transaction Document, or perhaps a line for each of the Activities related to a Person

![]()
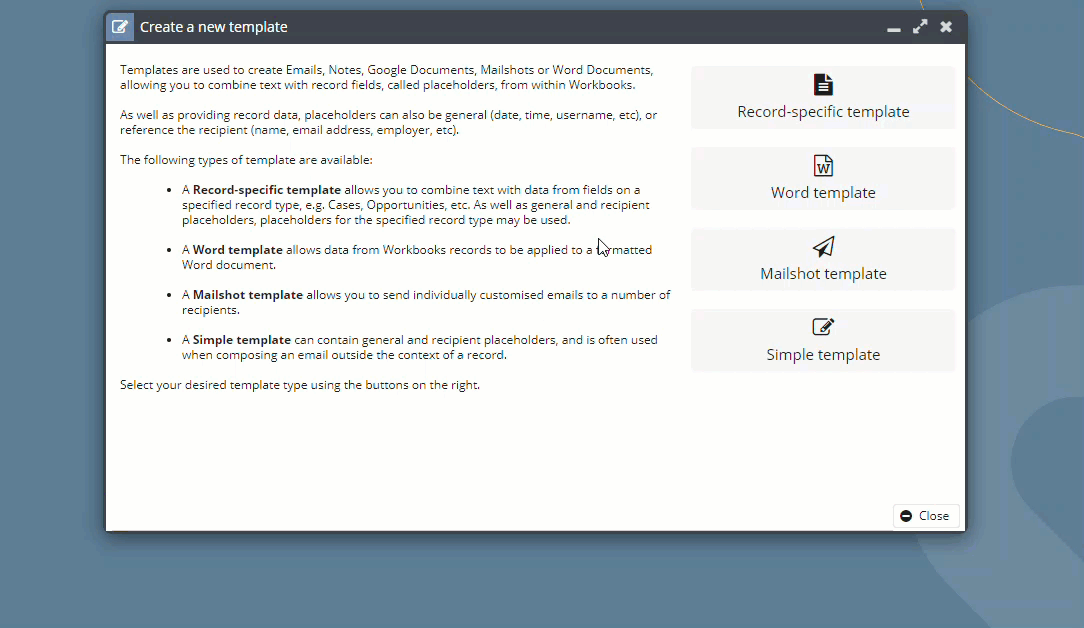
To create a new Template click Start > Marketing > Templates > New Template, or Start > Emails > Email Templates. (System Administrators can also access templates via Start > Configuration > Templates.)
No matter which of the following template types you choose, you can include placeholders that will display information about the current date, current user and so on. The full list and details of the syntax that should be used can be found here.
By default, Templates are private to the user who created them. To share them with other users, click on the Sharing Permissions padlock icon in the top right-hand corner.
When sharing the template with other Workbooks users, ensure that they have configured their email account so that they can send emails using this template.
Choose the object type (record type) for which you want to create a new Template by clicking on its name. If any pre-defined templates exist for the object type you've chosen, you will see them listed here. You can open an existing template by clicking on it, and can then use it just as it is or modify it to suit your needs.
If you're creating a template from scratch, click 'New Blank Template'.
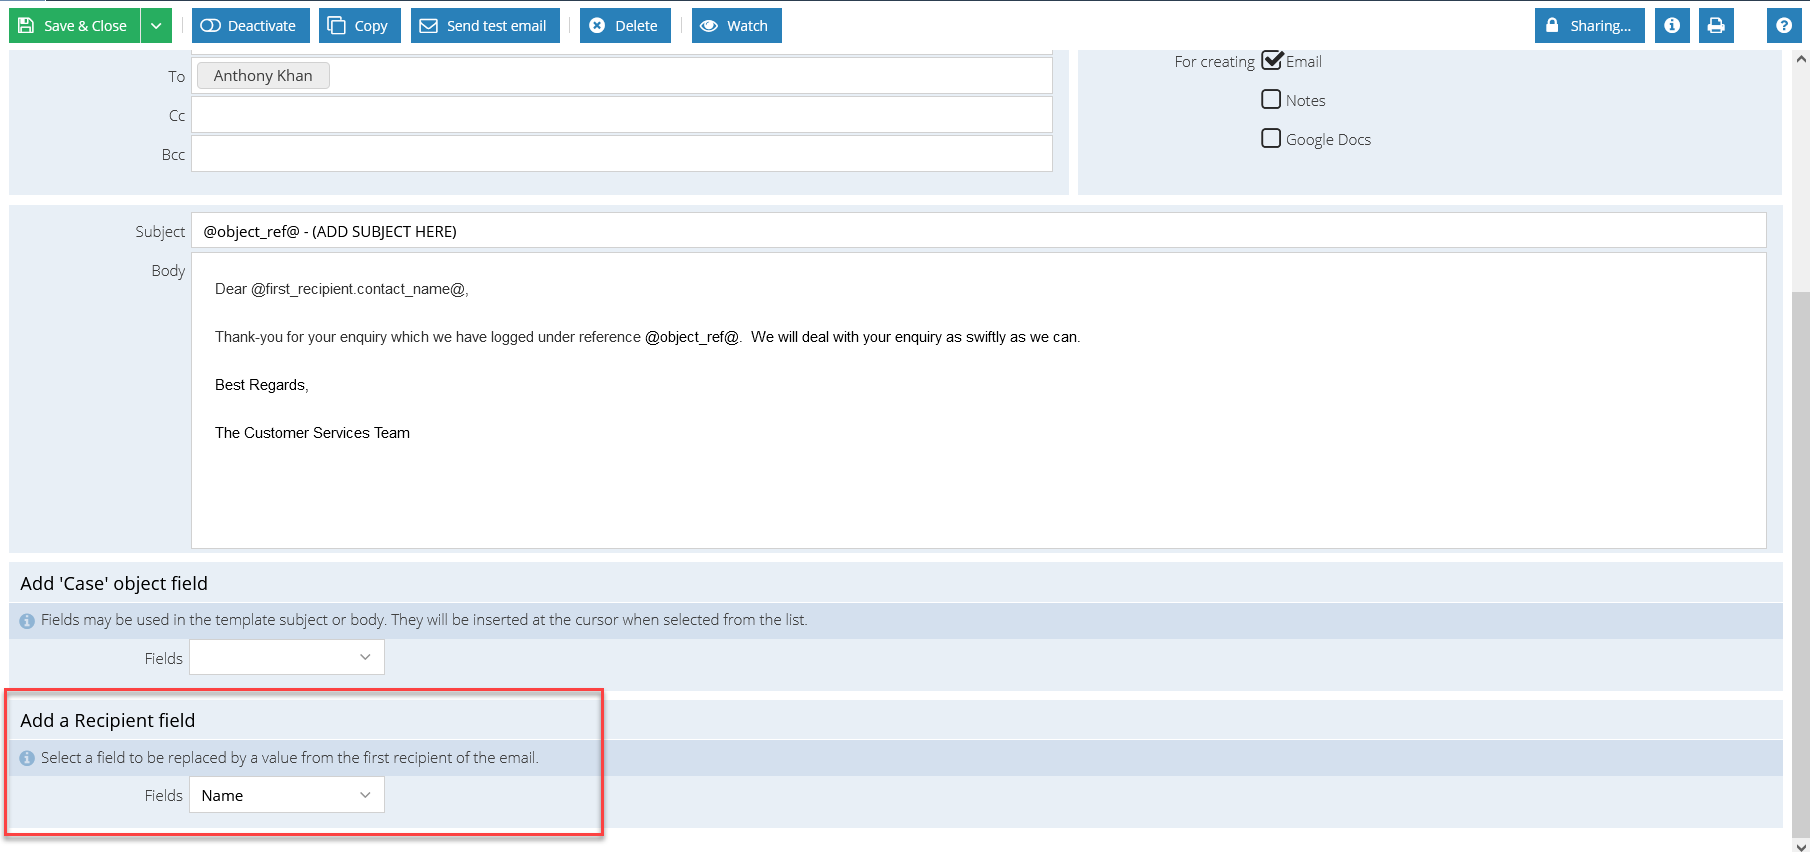
Use the checkboxes on the right to control whether the Template is available for use with Emails, Notes or Google Docs (or any combination of the three). If you choose to create a template for use with Emails and want the template to include a user's default Email Signature, tick the box next to 'Allow Signature'.
The To, Cc and Bcc fields can be populated as you would a standard email, you can add entire mailing lists in these fields or individual recipients.
NOTE: In order for the categorisation of the template to appear on relevant records, you must also assign a category to the record itself that the template applies to. To see how to do this, please click here.
Now complete the Subject field and populate the Body. Leave the Subject field blank if you want to retain the subject that has been applied to the target record. For example, if you want the subject of an Activity to remain after a template has been applied, leave the Subject field in the template blank.
To pull through data specific to the object type for which you're creating the template with the body text, use the dropdown picklist next to 'Fields' and add whichever fields you require. This can be done within the Template Body and/or to the Subject. Within the drop-down, you will see a list of all the fields from the record type for which you are creating the Template. For example, if you're creating a Template for Cases, you'll see options such as Contact email, Description, Object Reference, Status and so on. In addition, you can use the drill through arrow to pull data from other record types. This widens the range of 'merge fields' you can apply to your template.
If you want to include the logo that has been set up within the Upload Library for use on templates, you can enter the text @logo@ to your template.
You may want to create a template that includes a placeholder for multiple lines. For example, you might want to see all the Activities linked to an Opportunity, or all the Campaigns of which a Person is a member. To do this, you need to alter the HTML within the template. Click here for more information.
NOTE: Templates must be activated before being available for use, so click on 'Activate' to save and close the template.
You can add details about the first recipient in email templates by adding it using the “Add Object Field” option at the bottom of the template.
The template types that have this option are: Specific Record Type and Simple Template. You will be able to use this to easily pull information about the first recipient into the email.
When using email templates, there is a validation process that checks if there are any remaining placeholders in the email's subject or body and warns users when trying to send it. However, this should be passable.
Users will receive a warning prompt detailing any remaining unresolved placeholders in their email before sending it. However, you will be able to ignore this and send the email anyway (if you choose). Also, there will be a prompt if the first recipient has changed since applying a template with recipient placeholders , as this will mean that the resolved placeholders are now invalid.
To insert data specific to the mailshot recipient (whose details can be held in either a Person or a Sales Lead record) use the dropdown picklist next to Fields, and add whichever fields you require.
To merge data specific to the object type for which you're creating the template, with the body text, use the dropdown picklist next to 'Fields' and add whichever fields you require. Merge field data can be added to the Template Body and/or to the Subject.
NOTE: Within the drop-down there are custom fields which are only present on one type of record, ie just on a Sales Lead or just on a Person, and so contain the label (Sales Lead only) or (Person only), respectively. If you use one of these fields and your mailshot is sent to both types of recipient this will result in the field being blank on some emails.
The mailshot Template includes the following text: "You have received this email because email address'@main_email@' is subscribed to '@subscription_name@'. If you do not wish to receive these emails you may change your email subscriptions".
When the email arrives with the recipient, @main_email@ will be replaced by the recipient's main email address and @subscription_name@ will be replaced by the name of the Campaign that the mailshot relates to. The recipient can click on 'change your email subscriptions', and opt out of mail for just this campaign or for other/all campaigns. Do not try to delete this text as you will not be able to activate or save the template without it.
NOTE:
To create general Email Templates, ie those that don't relate to specific object (record) types:
NOTE: Templates must be activated before being available for use - click on 'Activate' to save and close the template.
Click here for more information on applying a template when sending an email.